1. Introducció
This manual provides essential information for the safe and effective operation, maintenance, and troubleshooting of your Snap-on Orbital Dual Action Polisher ETJ2200. Please read this manual thoroughly before using the product and retain it for future reference.
2. Instruccions de seguretat
Seguiu sempre les precaucions bàsiques de seguretat per reduir el risc d'incendi, descàrrega elèctrica i lesions personals.
- Utilitzeu l'equip de protecció individual (EPI) adequat, incloent-hi ulleres de seguretat i protecció auditiva.
- Assegureu-vos que l'àrea de treball estigui ben il·luminada i lliure d'obstacles.
- Keep children and bystanders away while operating the polisher.
- No feu servir l'eina en damp o condicions humides.
- Unplug the tool from the power source before making any adjustments, changing accessories, or storing it.
- Use only accessories specifically designed for this polisher.
- Inspeccioneu el cable d'alimentació per si hi ha danys abans de cada ús.
3. Producte acabatview i Components
The Snap-on Orbital Dual Action Polisher ETJ2200 is designed for efficient polishing and buffing tasks. Familiarize yourself with its main components.
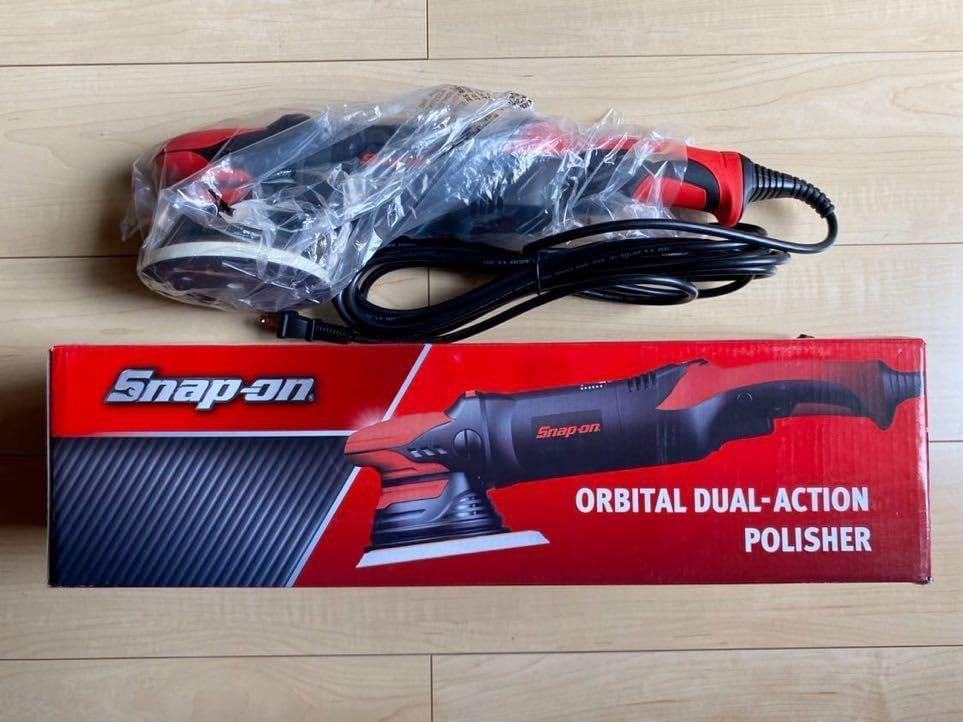
Figura 3.1: The Snap-on Orbital Dual Action Polisher ETJ2200, still in its protective plastic packaging, alongside its red and black retail box. The box clearly displays the "Snap-on" logo and "ORBITAL DUAL-ACTION POLISHER" text.

Figura 3.2: Un detallat view of the polisher's backing pad, which features multiple ventilation holes, and the standard two-prong power plug. The tool is still partially encased in its clear plastic bag.

Figura 3.3: The included instruction manual for the Snap-on Orbital Dual Action Polisher ETJ2200, shown next to a clear plastic bag containing an Allen wrench and a small metal component, likely for pad attachment or adjustment.

Figura 3.4: Un primer pla view of the product packaging, highlighting the model number "ETJ2200" printed on a black label against the red box, confirming the specific model of the polisher.
Components clau:
- Carcassa del motor: Contains the motor and internal mechanisms.
- Mànec: Disseny ergonòmic per a una subjecció i un control còmodes.
- Cable d'alimentació: Connects the polisher to an electrical outlet.
- Coixinet de suport: The circular pad where polishing pads are attached.
- Marcador de control de velocitat: Adjusts the orbital speed for different applications.
- Interruptor d'encesa/apagada: Activa i desactiva l'eina.
4. Configuració
4.1 Desembalatge
- Traieu amb cura la polidora i tots els accessoris de l'embalatge.
- Check the contents against the packing list to ensure all parts are present and undamaged.
- Conserveu l'embalatge per a futurs emmagatzematges o transports.
4.2 Attaching the Polishing Pad
- Ensure the polisher is unplugged from the power source.
- Align the desired polishing pad (sold separately) with the hook-and-loop surface of the backing pad.
- Press firmly to secure the polishing pad in place. Ensure it is centered to prevent imbalance during operation.
4.3 Connexió d'alimentació
- Connect the polisher's power cord to a suitable electrical outlet. Ensure the voltage coincideix amb els requisits de l'eina.
- Do not use extension cords unless absolutely necessary. If an extension cord is required, ensure it is rated for the tool's power consumption and is in good condition.
5. Instruccions de funcionament
5.1 Abans de l'operació
- Clean the surface to be polished thoroughly to remove dirt and debris.
- Apply a small amount of polishing compound directly to the polishing pad or the work surface.
- Set the speed control dial to a low setting for initial application.
5.2 Starting the Polisher
- Place the polishing pad flat against the work surface before turning the tool on.
- Press the On/Off switch to start the polisher.
- Gradually increase the speed using the speed control dial as needed for the task.
5.3 Polishing Technique
- Move the polisher in a slow, overlapping pattern across the surface.
- Apply light, even pressure. Avoid pressing down too hard, as this can reduce the orbital action and cause swirl marks.
- Work in small sections to ensure thorough coverage and optimal results.
- Monitor the surface for desired finish and adjust speed or compound as necessary.
5.4 Stopping the Polisher
- Reduce the speed to the lowest setting.
- Lift the polisher from the work surface.
- Press the On/Off switch to turn off the tool.
- Unplug the polisher from the power source after use.
6. Manteniment
6.1 Neteja
- After each use, wipe down the exterior of the polisher with a clean, damp tela.
- Remove any polishing compound residue from the backing pad and polishing pads.
- Clean or replace polishing pads regularly to maintain effectiveness.
6.2 Emmagatzematge
- Store the polisher in a clean, dry place, away from direct sunlight and extreme temperatures.
- Mantenir fora de l'abast dels nens.
- Enrotlleu el cable d'alimentació amb cura per evitar danys.
6.3 Carbon Brush Replacement (if applicable)
Refer to the original instruction manual (Figure 3.3) for specific details on carbon brush inspection and replacement, if your model requires user maintenance of these components. Typically, this involves removing access caps on the motor housing.
7. Solució De Problemes
| Problema | Causa possible | Solució |
|---|---|---|
| Polisher does not start. | No power supply; Damaged power cord; Faulty switch. | Check power outlet and connections; Inspect power cord for damage; Contact qualified service personnel. |
| Vibracions o sorolls excessius. | Unbalanced polishing pad; Damaged backing pad; Internal component issue. | Ensure pad is centered and securely attached; Replace damaged pads; Seek professional repair. |
| Poor polishing results (swirls, uneven finish). | Incorrect speed setting; Insufficient or excessive compound; Worn or dirty polishing pad; Incorrect technique. | Adjust speed; Apply appropriate amount of compound; Clean or replace pad; Review instruccions d'ús per a la tècnica adequada. |
| L'eina s'escalfa massa. | Ús intensiu prolongat; Ranures de ventilació bloquejades. | Allow tool to cool down; Ensure ventilation slots are clear; Avoid continuous heavy pressure. |
8. Especificacions
| Característica | Detall |
|---|---|
| Número de model | ETJ2200 |
| Tipus | Orbital Dual Action Polisher |
| Marca | Snap-on |
| Font d'alimentació | Elèctric (CA) |
| Aplicació | Polishing, Buffing |
| ASIN | B0DLV4NX3M |
Nota: Classificacions elèctriques específiques (voltage, vatage, OPM/RPM range) are typically found on the product label or in the original manufacturer's manual. Please refer to those sources for precise technical specifications.
9. Garantia i Suport
9.1 Informació de la garantia
Specific warranty terms and conditions for the Snap-on Orbital Dual Action Polisher ETJ2200 are provided by the manufacturer or seller at the time of purchase. Please refer to any warranty cards or documentation included with your product. Keep your proof of purchase for warranty claims.
9.2 Atenció al client
For technical assistance, parts, or service inquiries, please contact the retailer or the official Snap-on customer support channels. Contact information can typically be found on the product packaging, the original instruction manual, or the official Snap-on weblloc.
When contacting support, please have your product model number (ETJ2200) and purchase details readily available.


