Introducció
This manual provides comprehensive instructions for the installation, operation, and maintenance of your MSI PRO H510M-B II Micro-ATX Motherboard. Designed for Intel Core 10th Generation Processors with an LGA 1200 socket, this motherboard offers essential features for building a reliable personal computer system. Please read this manual thoroughly before proceeding with installation.

Figure 1: MSI PRO H510M-B II Motherboard and Retail Box.
This image displays the MSI PRO H510M-B II motherboard alongside its retail packaging, providing a visual overview of the product as it appears out of the box.
1. Configuració i instal·lació
Segueix aquests passos amb atenció per instal·lar la placa base i els seus components.
1.1. Preparació del xassís
Ensure your computer chassis is prepared for motherboard installation. Install standoffs in the chassis that align with the screw holes on the motherboard. Refer to your chassis manual for specific instructions.
1.2. Instal·lació de la CPU
- Localitza el sòcol de la CPU LGA 1200 a la placa base.
- Obriu la palanca del sòcol de la CPU i aixequeu la placa de càrrega.
- Carefully align the notches on your Intel 10th Gen Core processor with the socket. Do not force the CPU into place.
- Baixeu la placa de càrrega i fixeu-la amb la palanca.
- Instal·leu el refrigerador de CPU segons les instruccions del fabricant.
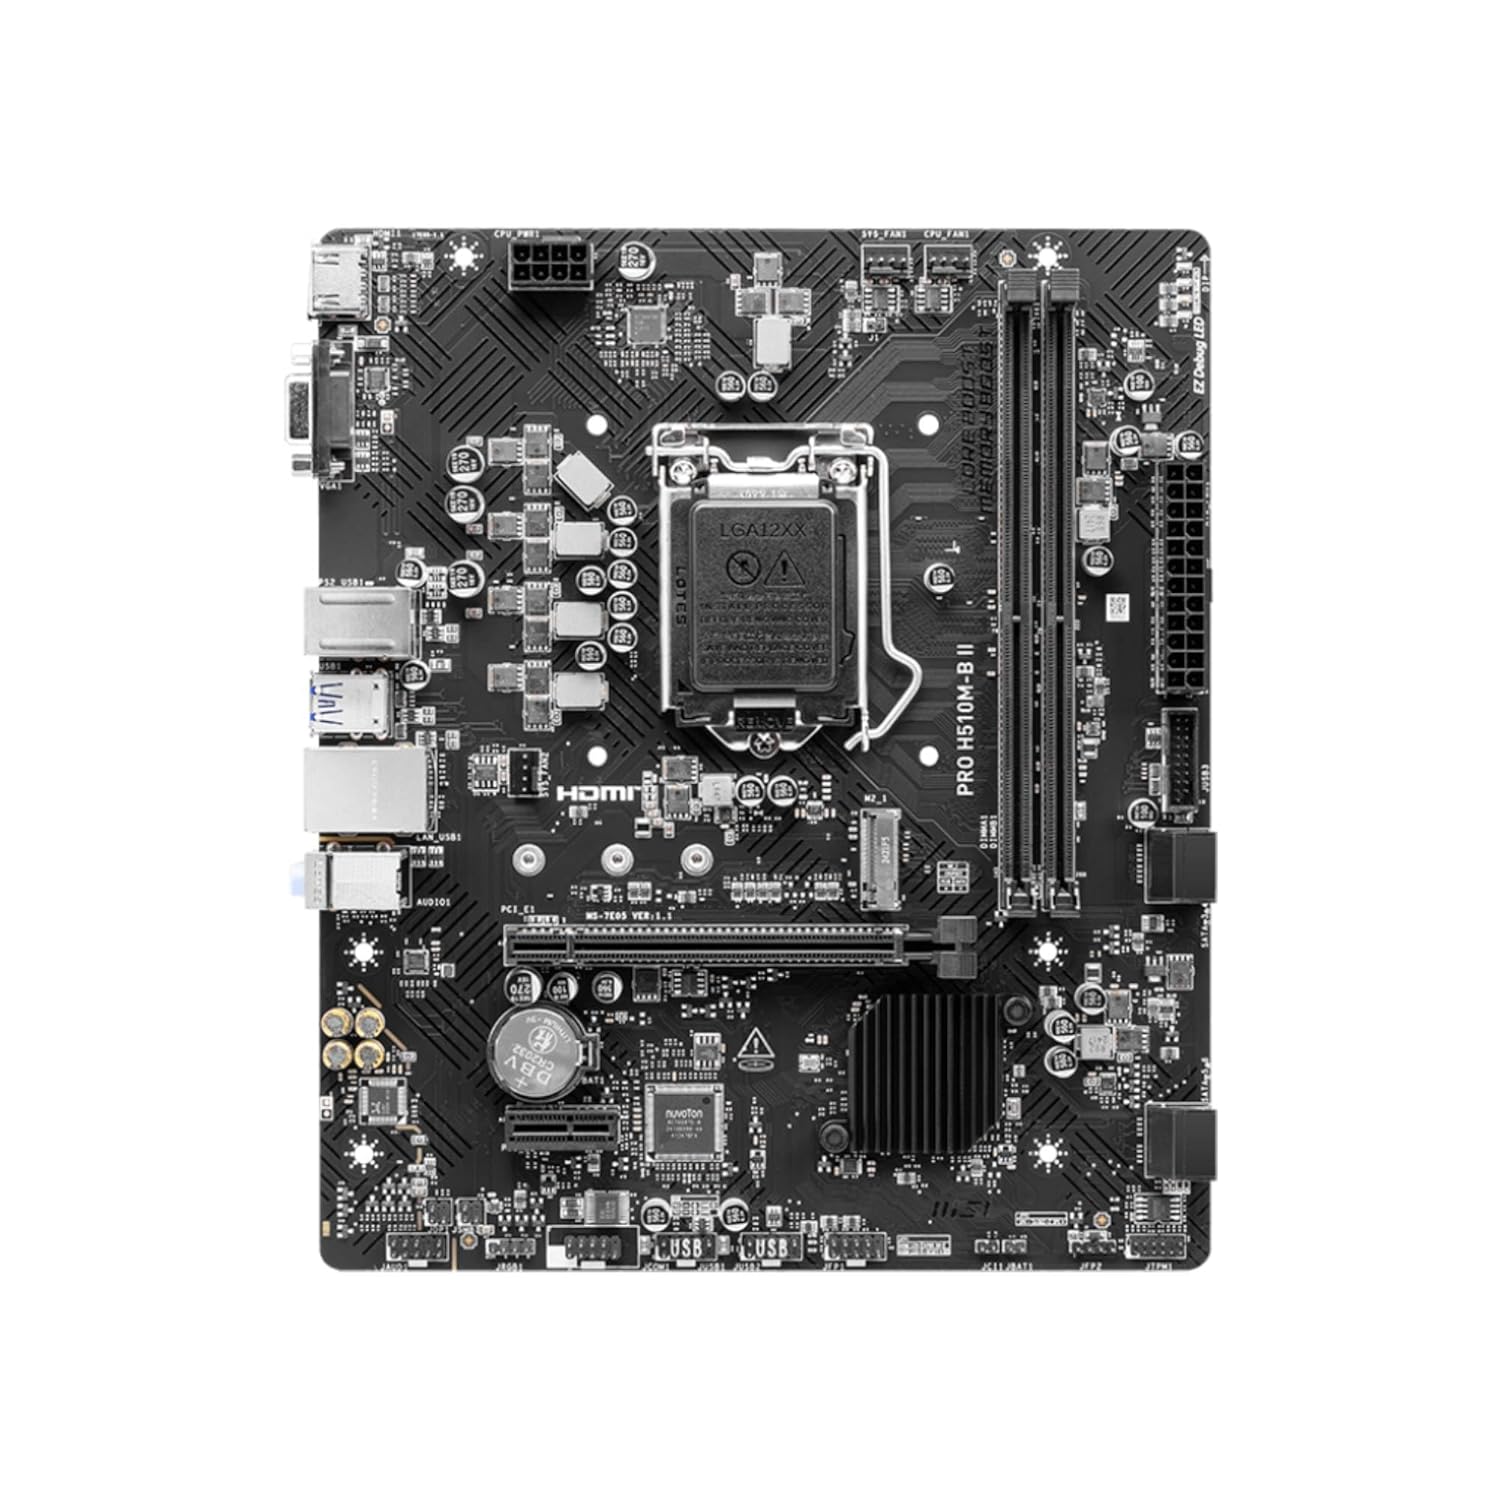
Figura 2: De dalt a baix view de la placa base, destacant el sòcol de la CPU LGA 1200.
This image provides an overhead perspective of the MSI PRO H510M-B II motherboard, clearly showing the central LGA 1200 CPU socket and surrounding components.
1.3. Instal·lació de memòria (RAM)
The motherboard supports DDR4 memory modules. It features two DIMM slots.
- Obriu els clips dels dos extrems de la ranura DIMM.
- Alineeu l'osca del mòdul de memòria DDR4 amb l'osca de la ranura DIMM.
- Insert the module firmly until the clips snap into place.
1.4. Instal·lació de la targeta gràfica
The motherboard includes one PCIe 3.0 x16 slot for a graphics card.
- Localitzeu la ranura PCIe 3.0 x16.
- Remove the corresponding expansion slot cover from your chassis.
- Align your graphics card with the slot and press down firmly until it is seated.
- Secure the graphics card to the chassis with a screw.
1.5. Instal·lació d'un SSD M.2
The motherboard has one M.2 Gen3 x4 32Gb/s slot for NVMe SSDs.
- Locate the M.2 slot.
- Inseriu l'SSD M.2 a la ranura amb un angle de 30 graus.
- Gently push the SSD down and secure it with the provided screw.
1.6. Connexions d'alimentació
Connect the 24-pin ATX main power connector and the 8-pin CPU power connector from your power supply unit (PSU) to the motherboard.
1.7. Connectors del panell frontal
Connect the chassis front panel cables (power button, reset button, HDD LED, power LED, USB ports, audio jacks) to their respective headers on the motherboard. Refer to the motherboard layout diagram in the full manual for exact locations.

Figura 3: Angle view of the motherboard, illustrating various headers and slots.
This image presents an angled perspective of the MSI PRO H510M-B II motherboard, detailing the placement of expansion slots, memory DIMMs, and various internal connectors.
2. Instruccions de funcionament
Un cop instal·lats i connectats tots els components, podeu engegar el sistema.
2.1. Arrencada inicial
Press the power button on your chassis. The system should power on, and you should see a display on your monitor. If not, refer to the Troubleshooting section.
2.2. Accés a la BIOS/UEFI
Per accedir a la utilitat de configuració de la BIOS/UEFI, premeu la tecla DEL repetidament durant la seqüència d'arrencada inicial. La BIOS permet configurar els paràmetres del sistema, l'ordre d'arrencada i supervisar l'estat del maquinari.
2.3. Instal·lació del controlador
After installing your operating system, install the necessary drivers for the motherboard components (chipset, LAN, audio, etc.). These drivers are typically provided on a support DVD or can be downloaded from the official MSI weblloc.
2.4. Sistema de refrigeració
The motherboard features a chipset heatsink for passive cooling. Additionally, MSI's Smart Fan Control automatically adjusts system fan settings based on CPU and GPU temperatures to maintain optimal thermal performance and acoustics.
2.5. Connectivitat
El panell d'E/S posterior ofereix diverses opcions de connectivitat:
- Ports USB: Multiple USB 3.2 Gen 1 Type-A (5Gbps) and USB 2.0 ports.
- Sortida de vídeo: HDMI 1.4 for display connectivity.
- Xarxa: 1Gbps LAN controller for wired internet access.
- Àudio: 7.1 HD Audio with Audio Boost for high-quality sound.
- Ports heretats: PS/2 port for older keyboards/mice, VGA port.

Figure 4: Rear I/O panel connectors.
Aquesta imatge ofereix un primer pla view of the rear input/output panel of the MSI PRO H510M-B II motherboard, detailing all available ports for external device connections.
3. Manteniment
Un manteniment adequat garanteix la longevitat i el funcionament estable de la placa base.
- Neteja: Netegeu regularment la pols de la placa base i els components amb aire comprimit. Assegureu-vos que el sistema estigui apagat i desendollat abans de netejar-lo.
- Actualitzacions de la BIOS: Periodically check the MSI website for BIOS/UEFI updates. Updates can improve compatibility, stability, and performance. Follow MSI's instructions carefully when updating the BIOS.
- Actualitzacions de controladors: Keep your chipset, LAN, audio, and other drivers updated to ensure optimal performance and compatibility with new software and hardware.
4. Solució De Problemes
Si teniu problemes, consulteu els passos habituals següents per a la resolució de problemes:
- Sense energia:
- Comproveu totes les connexions d'alimentació (ATX de 24 pins, CPU de 8 pins, GPU).
- Assegureu-vos que la font d'alimentació estigui engegada.
- Verifiqueu la connexió del botó d'engegada del panell frontal.
- Sense pantalla:
- Ensure the monitor is connected to the graphics card (or motherboard if using integrated graphics) and powered on.
- Torneu a col·locar els mòduls de la targeta gràfica i de la RAM.
- Prova amb un altre monitor o cable si és possible.
- Inestabilitat/Avaries del sistema:
- Comproveu les temperatures de la CPU i la GPU.
- Verifiqueu que els mòduls de RAM estiguin correctament col·locats.
- Executeu eines de diagnòstic de memòria.
- Assegureu-vos que tots els controladors estiguin actualitzats.
- Component no detectat:
- Reseat the component (e.g., M.2 SSD, SATA drive).
- Check power and data cables.
- Verify BIOS settings for component detection.
- Fan Error:
- Ensure all fans (CPU, chassis) are properly connected to the motherboard headers.
- Check fan rotation and clear any obstructions.
- Adjust fan speed settings in BIOS if necessary.
For further assistance, consult the full MSI user manual or contact MSI technical support.
5. Especificacions
Key technical specifications for the MSI PRO H510M-B II Motherboard:
| Característica | Especificació |
|---|---|
| Marca | MSI |
| Model | PRO H510M-B II |
| Factor de forma | Micro-ATX |
| Socket de CPU | LGA 1200 |
| Processadors compatibles | Intel Core 10th Gen Processors |
| Chipset | Intel H510 |
| Tipus de memòria | DDR4 |
| Ranures de memòria | 2 x DIMM |
| Capacitat màxima de memòria | 64 GB |
| Velocitat de rellotge de memòria | Fins a 2933 MHz |
| Ranura PCIe x16 | 1 x PCIe 3.0 x16 (with Steel Slot) |
| Ranura M.2 | 1 x M.2 Gen3 x4 32Gb/s |
| LAN | 1Gbps LAN Controller |
| Sortida de vídeo | HDMI 1.4, VGA |
| Ports USB (posteriors) | USB 3.2 Gen 1 Type-A (5Gbps), USB 2.0 |
| Àudio | 7.1 HD Audio with Audio Boost |
| Dimensions (LxWxH) | 23.6 x 20.2 x 5 cm |
| Pes de l'article | 660 g |
6. Garantia i Suport
For detailed warranty information, please refer to the warranty card included with your product or visit the official MSI weblloc. Els termes i condicions de la garantia poden variar segons la regió.
For technical support, driver downloads, BIOS updates, and additional resources, please visit the official MSI support page:
When contacting support, please have your motherboard model (PRO H510M-B II) and serial number ready.


