Introducció
This manual provides comprehensive instructions for the safe and efficient operation, installation, and maintenance of your Acekool 5000 BTU Window Air Conditioner. Designed for compact rooms up to 150 square feet, this unit offers quick and efficient cooling with user-friendly mechanical controls and a reusable filter. Please read this manual thoroughly before use and retain it for future reference.

Figure 1: Acekool 5000 BTU Window Air Conditioner Unit
Què hi ha a la caixa
En desembalar, assegureu-vos que tots els elements que s'enumeren a continuació hi siguin presents i no estiguin danyats:
- 1 x Window Air Conditioner Unit
- 1 x Window Bracket
- 1 x Installation Kits (includes Filler Panels, Lock Frame & Sash Lock, Window Sash Seal, Insulation Strips, Screws, Top Mounting Rail)
- 2 x manuals d'usuari

Figure 2: Included Installation Kit Components
Configuració i instal·lació
The Acekool 5000 BTU Window Air Conditioner is designed for easy installation in standard windows. Follow these steps for proper setup:
- Prepara la finestra: Ensure your window is clean and free of obstructions. The unit requires a vertical clearance of at least 14.5 inches and a width between 23-34 inches.
- Attach Top Mounting Rail: Secure the top mounting rail to the top of the air conditioner unit using the provided screws. Ensure the screw hole on the rail faces outwards, as this will be used to secure the window.
- Install Accordion Panels: Attach the expandable accordion panels to both sides of the air conditioner unit. These panels are labeled "Left" and "Right" and slide into the designated guides on the unit. Stretch them out to their full length.
- Posicioneu la unitat: Carefully lift the air conditioner and place it into the window opening. Ensure the bottom lip of the unit rests securely on the window sill and the top mounting rail is positioned against the upper window frame.
- Secure the Window: Lower the window sash firmly against the top mounting rail of the air conditioner.
- Extend and Secure Side Panels: Pull out the accordion side panels to fill the remaining gap in the window opening. Secure these panels to the window frame using the provided screws.
- Apply Insulation Strips: Use the provided insulation strips to seal any remaining gaps around the unit and panels to prevent air leakage and improve efficiency.
- Install Lock Frame & Sash Lock: For added security, install the lock frame and sash lock as per the instructions in the installation kit to prevent the window from being opened from the outside.
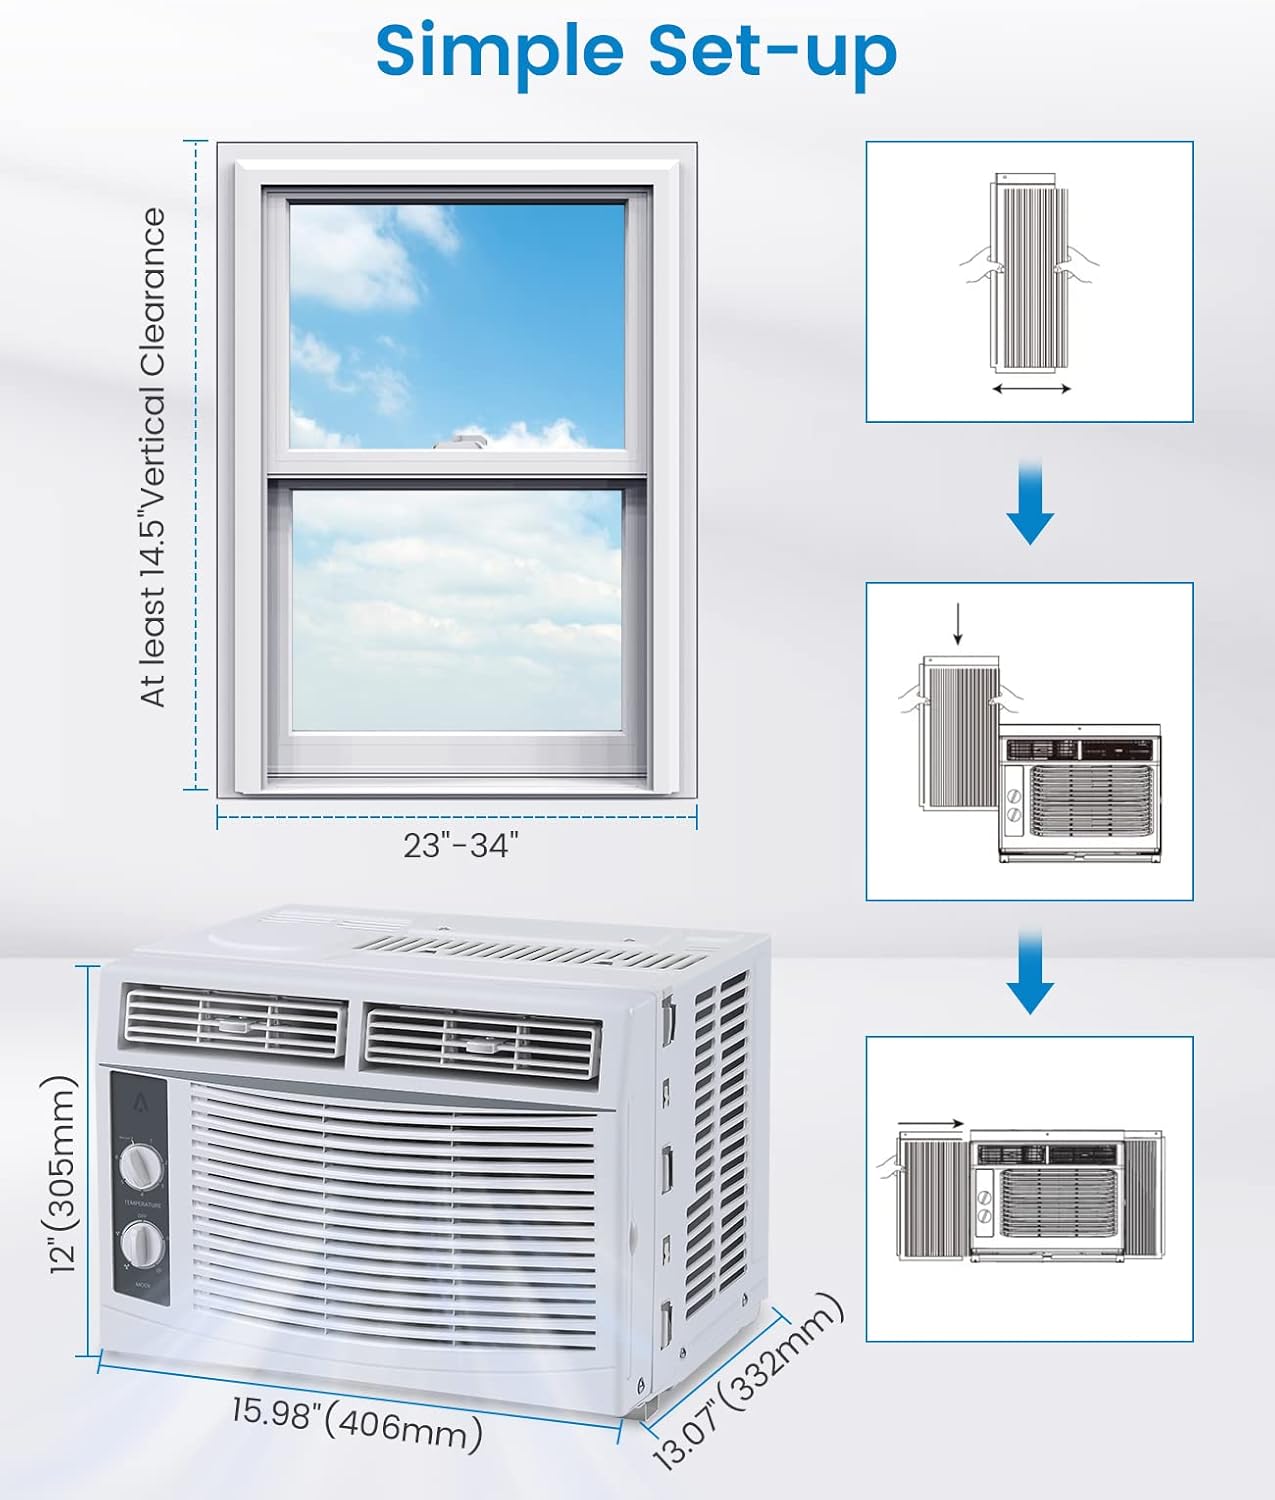
Figure 3: Visual Guide for Simple Setup
Instruccions de funcionament
Your Acekool air conditioner features easy-to-use mechanical controls for optimal comfort.

Figure 4: Temperature and Mode Control Knobs

Figure 5: Adjustable Air Direction Vents
Dial de control de temperatura:
- The top dial controls the temperature setting from 1 (warmest) to 7 (coldest).
- Turn the dial towards 7 for maximum cooling.
Mode Control Dial:
- DESACTIVAT: Apaga la unitat.
- FAN ONLY (Low/High): Operates the fan without cooling. Use for air circulation.
- COOL (Low/High): Activates the cooling function.
- Low Cool: Provides gentle cooling with lower fan speed.
- High Cool: Provides powerful cooling with higher fan speed.
Direcció de l'aire:
- Adjust the horizontal and vertical louvers on the front of the unit to direct the airflow as desired.
Manteniment
Un manteniment regular garanteix un rendiment òptim i una llarga vida útil del vostre aire condicionat.
Neteja del filtre d'aire:
The reusable air filter should be cleaned regularly (every two weeks or more often depending on usage and air quality) to maintain cooling efficiency.
- Locate the filter on the right side of the unit.
- Gently pull the filter out from its slot.
- Rinse the filter under running water to remove dust and debris. For heavy dirt, use a mild detergent.
- Deixeu que el filtre s'assequi completament a l'aire abans de tornar-lo a inserir a la unitat.

Figure 6: Removing the Reusable Air Filter for Cleaning
Neteja general:
- Netegeu l'exterior de la unitat amb un damp tela. No utilitzeu productes químics aggressivs ni netejadors abrasius.
- Ensure the unit is unplugged before any cleaning or maintenance.
Especificacions
| Característica | Detall |
|---|---|
| Nom de marca | Acekool |
| Informació del model | 5000 BTU |
| Pes de l'article | 36.4 lliures |
| Dimensions del producte | 13.07 x 15.98 x 12 polzades |
| País d'origen | Xina |
| Capacitat | 30 pintes |
| Consum anual d'energia | 1 quilowatts hora per any |
| Nivell de soroll | 50 dB |
| Tipus d'instal·lació | Finestra |
| Característiques especials | 4 Way Swing, Fast Cooling |
| Color | Blanc |
| Voltage | 115.0 V |
| Potència de refrigeració | 5000 unitats tèrmiques britàniques |
Resolució de problemes
If you encounter issues with your Acekool air conditioner, please refer to the following common troubleshooting steps:
- La unitat no s'encén:
- Assegureu-vos que el cable d'alimentació estigui ben connectat a una presa de corrent amb connexió a terra.
- Revisa l'interruptor de casa teva.
- Verify the mode dial is not set to "OFF".
- Refrigeració insuficient:
- Check if the air filter is dirty and needs cleaning.
- Ensure windows and doors in the room are closed to prevent warm air from entering.
- Verify the temperature setting is set to a colder level (e.g., 7).
- Ensure the unit is appropriately sized for the room (up to 150 sq.ft for 5000 BTU).
- Soroll inusual:
- Un lleuger brunzit del compressor és normal.
- Check for any loose parts or obstructions around the fan.
- Ensure the unit is installed level to prevent rattling.
- Fuga d'aigua:
- Ensure the unit is slightly tilted outwards to allow condensate to drain properly.
- Check for any blockages in the drainage area.
Si els problemes persisteixen després d'intentar aquests passos, poseu-vos en contacte amb l'atenció al client.
Garantia i suport
Acekool is committed to providing excellent customer service and product quality. Your product comes with:
- Email Support within 12 hours
- 30 days Unreasonable Return policy
- 12 Months Free Maintenance and Technology Supports
For further assistance, please refer to the contact information provided with your purchase or visit the official Acekool weblloc.

Figure 7: Acekool Customer Support Details


