1. Introducció i informació de seguretat
This manual provides essential information for the safe installation, operation, and maintenance of your VEVOR RV Tankless Water Heater. Please read it thoroughly before use and retain it for future reference.
Advertències importants de seguretat:
- Do not use this product in an enclosed space or tent. Ensure adequate ventilation.
- Do not use or store flammable or explosive materials near this product.
- Do not spray aerosols near the device while it is in operation.
- Installation and all components must comply with national standards and local regulations.
- Always ensure proper gas and water connections to prevent leaks.
- The exhaust port can reach high temperatures during operation. Avoid contact.
2. Producte acabatview
The VEVOR RV Tankless Water Heater provides on-demand hot water for your recreational vehicle. It features a compact design and intelligent controls for user convenience.
Característiques principals:
- Rapid Instant Heating: Delivers 42,000 BTU for quick hot water supply.
- Ús per a totes les estacions: Segmented combustion technology adjusts water temperature for optimal performance in varying climates.
- Control convenient: Equipped with an LED smart display and touch controls for easy temperature and power management.
- Outdoor Water Outlet: Includes a front outlet for external use, such as washing pets or vehicles.
- RV Compatibility: Designed with a 15x15 inch door size, 12.6x12.6x14 inch rear chamber, and 1/2" NPT water/gas connectors.

Figure 2.1: VEVOR RV Tankless Water Heater (Black 42000 BTU model).
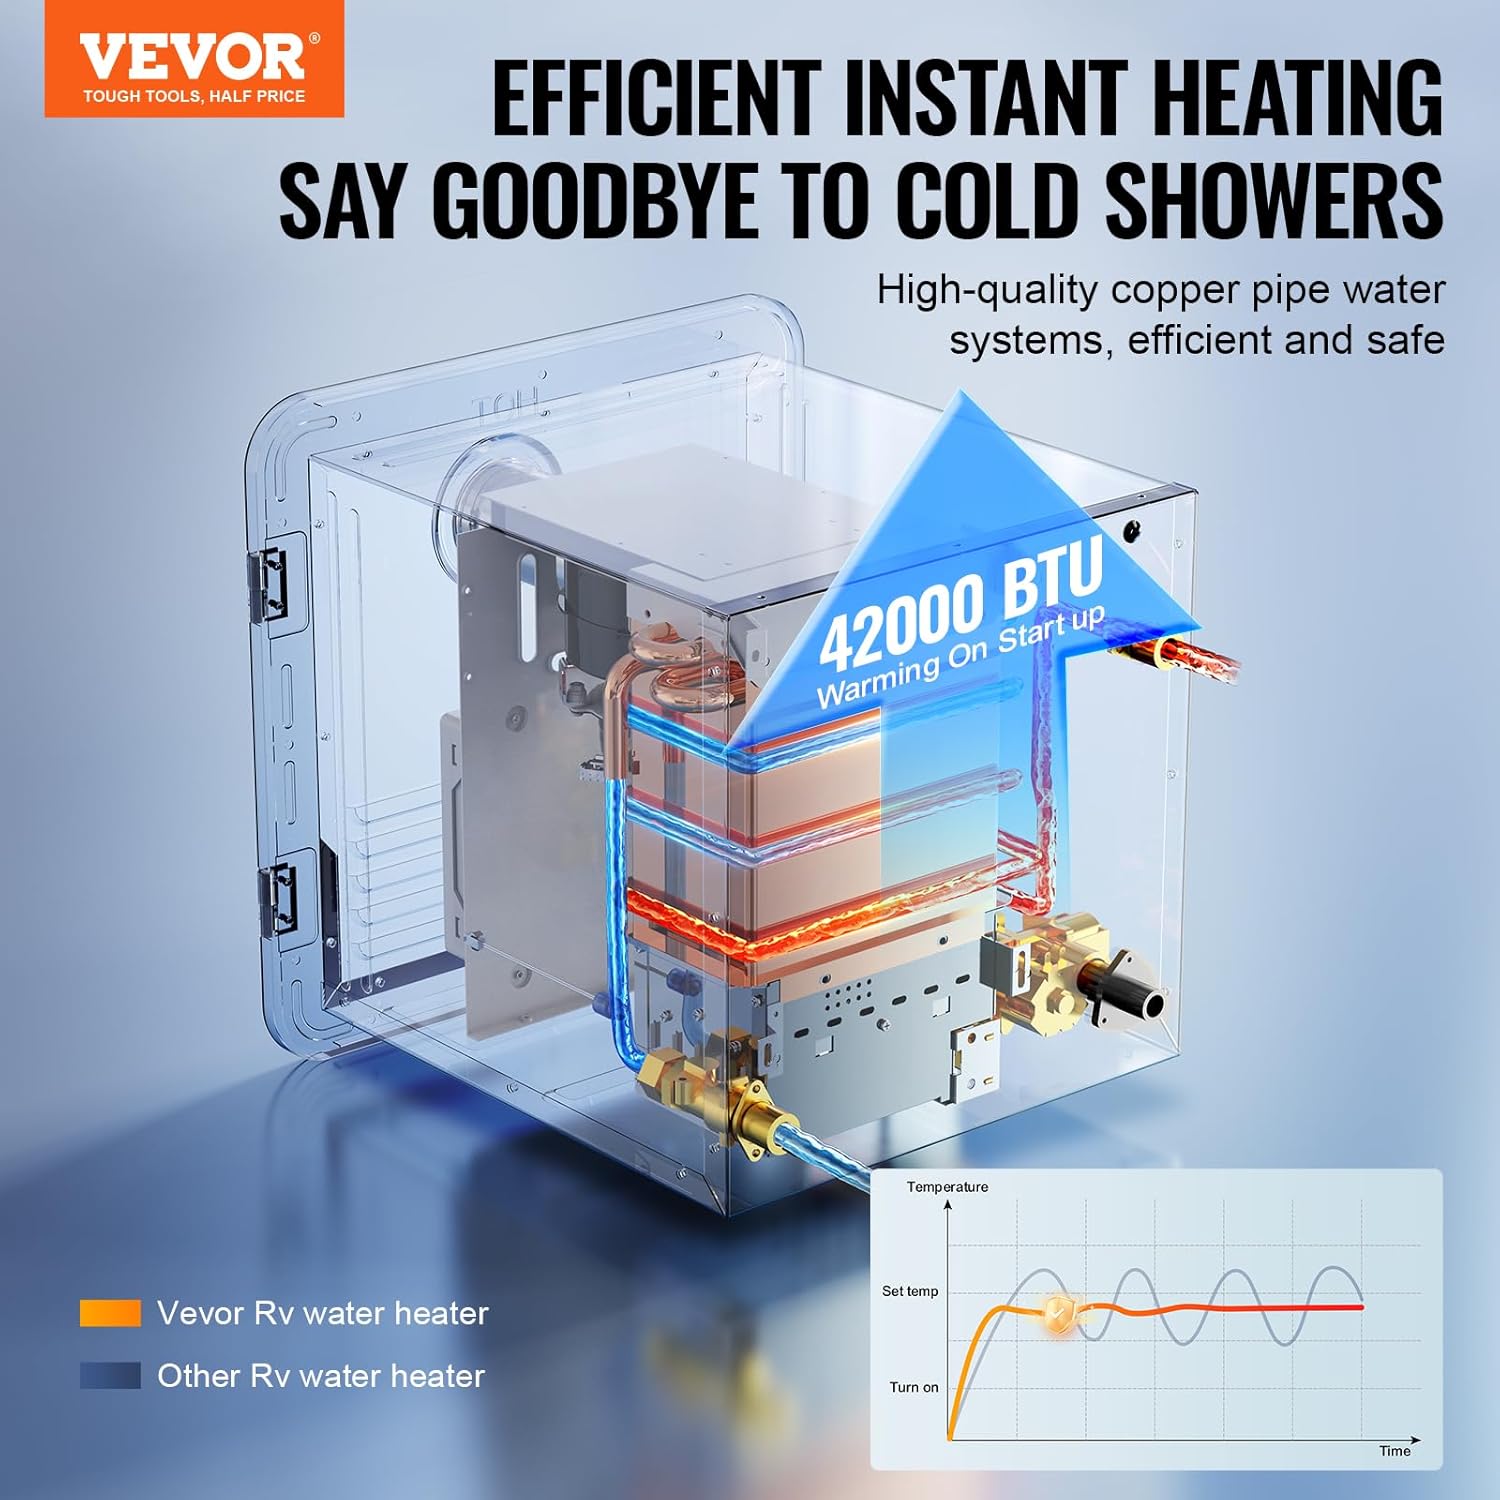
Figure 2.2: Internal heating process and rapid temperature rise.
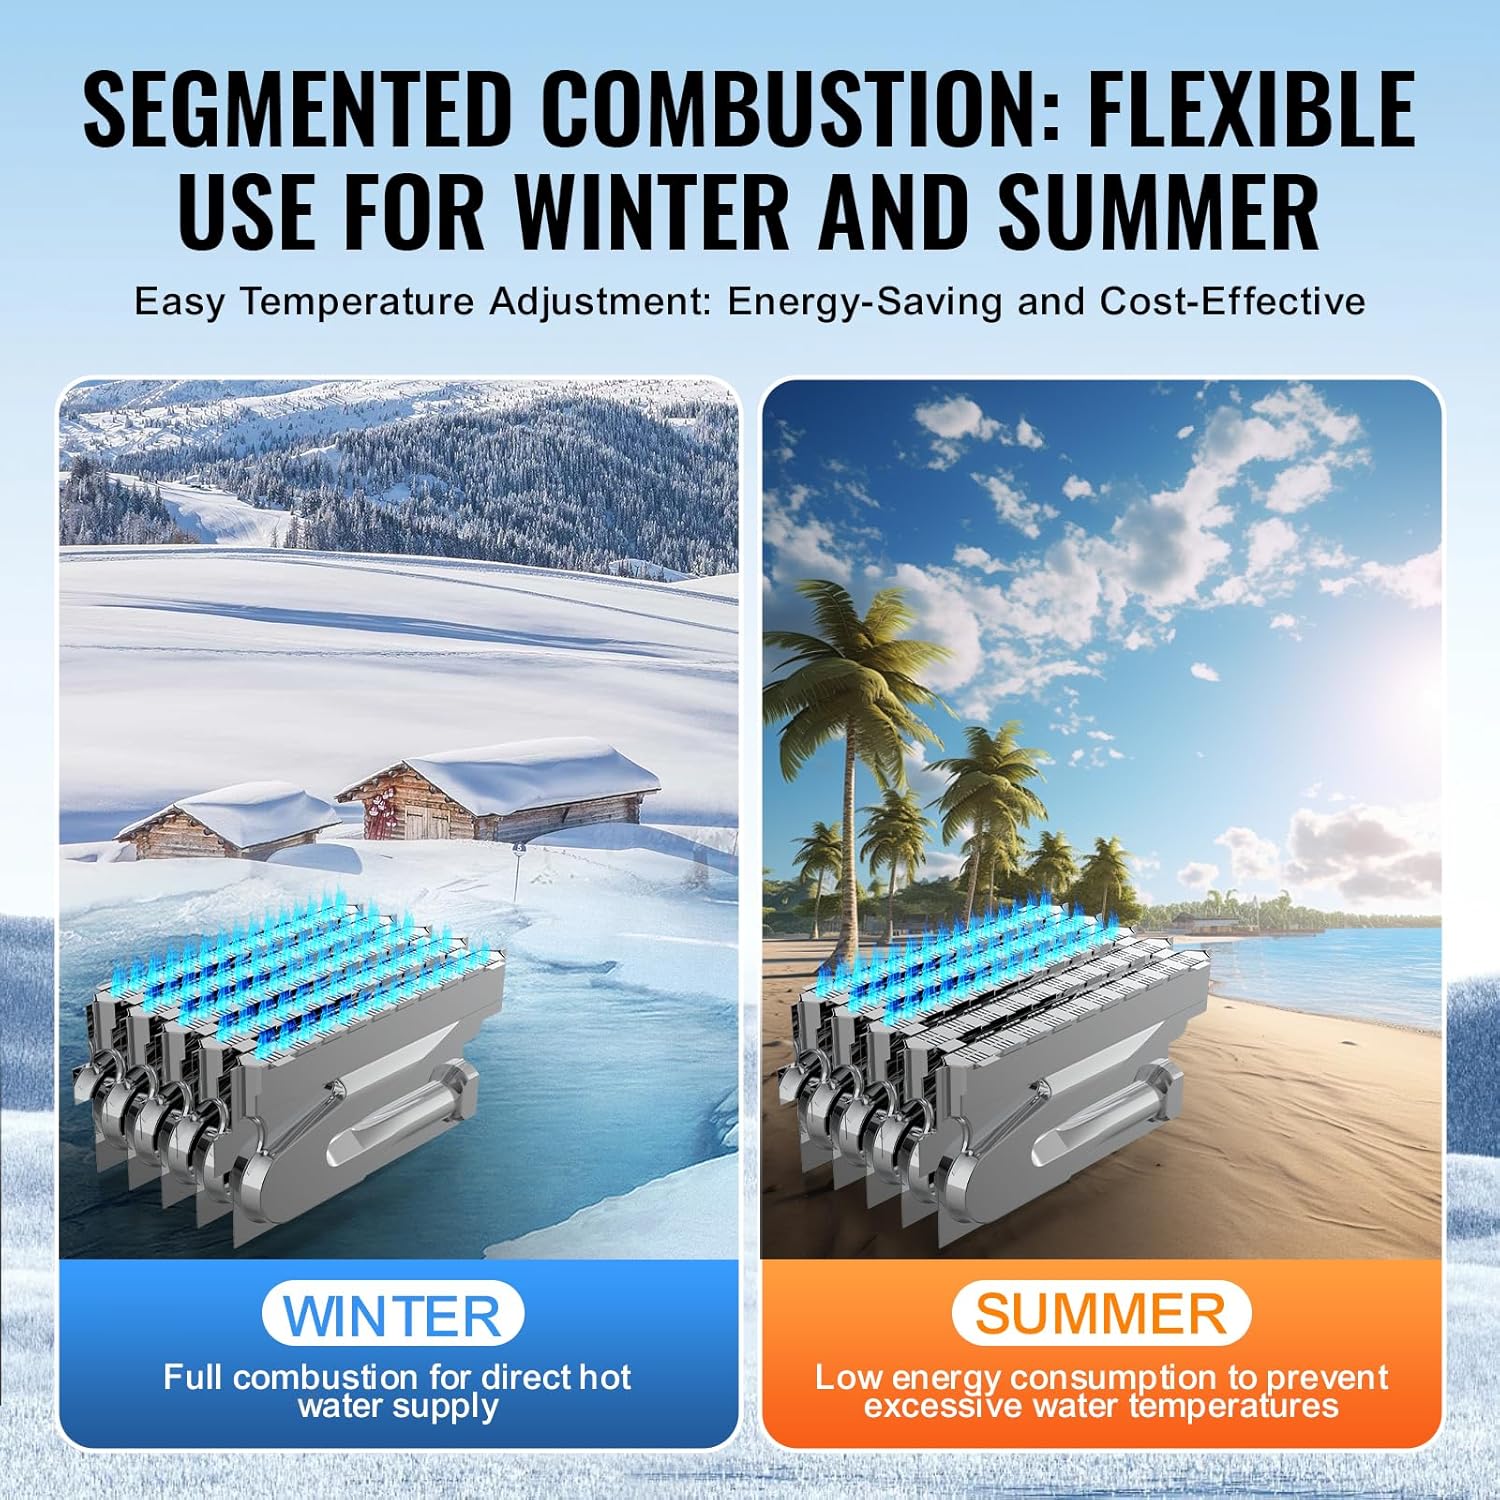
Figure 2.3: Segmented combustion for optimized performance in different seasons.
3. Configuració i instal·lació
Proper installation is crucial for the safe and efficient operation of your water heater. It is recommended that installation be performed by a qualified professional.
Eines necessàries (no incloses):
- Water heater gas connector
- Sealant (e.g., 1-inch wide butyl tape, not silicone)
- Clau ajustable
- Tornavís
- Alicates
Passos d'instal·lació:
- Seleccioneu la ubicació d'instal·lació: Choose an appropriate location on the RV wall or floor, ensuring proper ventilation and a clear path for exhaust fumes.
- Install Front Door Panel: Rotate the handle of the front door panel to open the cover. Align the inner lining cover with the holes of the water heater and fix it with screws.
- Install Water Pipes: Connect the shower to the water outlet (upper right corner) and the water inlet (lower left corner). Use thread sealant tape and tighten connections. The inlet and outlet threads are 1/2" NPT. The torque must not exceed 80Nm.
- Connect Gas Pipe: Apply glue pad to the 1/2" NPT gas inlet. Connect the pressure reducing valve and adapter (1/2" NPN to 5/8" UNF). Tighten and lock to prevent air leakage. The torque must not exceed 40Nm. Check for air leakage using a soapy water solution. This product uses propane, with a standard gas pressure of 2.8kPa.
- Connectar el controlador: Connect one end of the controller to the machine's outlet and the other end to the wall wires. The two blue power wires in the accessories can be connected without regard to polarity.
- Install Circuit: Connect the red and black wires of the water heater power cord to the 12V DC power supply. The red wire is positive, and the black wire is negative.
- Test and Debug: After all connections are made, conduct testing to ensure the water heater functions correctly and is free from leaks.
- Muntar dispositiu: Slide the device completely through the cutout until the forward flange contacts the RV sidewall. Secure the flange to the sidewall with fasteners.
- Instal·lació del segell: Apply a sufficient amount of water sealing material (e.g., butyl tape) around the entire backside of the forward convex and all holes to ensure a watertight seal.

Figure 3.1: RV compatibility dimensions and connection types.

Figura 3.2: posterior view with labeled water and gas inlets/outlets.
Guia de vídeo d'instal·lació:
Video 3.1: Official installation guide video for the VEVOR RV Tankless Water Heater, demonstrating step-by-step setup and connection procedures.
4. Instruccions de funcionament
The VEVOR RV Tankless Water Heater is operated via its remote controller.
Ús del comandament a distància:
- Encès/apagat: Press the power button (usually marked with a circle and vertical line) to turn the unit on or off.
- Ajust de temperatura: Use the up and down arrow buttons to set your desired water temperature. The LED display will show the current temperature.
- Canvi d'unitat: A dedicated button allows switching between temperature units (e.g., Celsius and Fahrenheit).
- Seguiment: The LED display provides real-time temperature readings and may show error codes if issues arise.

Figure 4.1: LED smart display and touch controls for easy operation.
Outdoor Water Outlet:
To use the outdoor water outlet, connect your own water hose or showerhead to the designated front port. This feature is ideal for tasks such as washing pets or cleaning outdoor equipment.

Figure 4.2: Utilizing the outdoor water outlet for convenience.
5. Manteniment
Regular maintenance ensures the longevity and optimal performance of your VEVOR RV Tankless Water Heater.
Consells generals de manteniment:
- Inspecció periòdica: Periodically check all water and gas connections for leaks. Look for any signs of corrosion or damage to the unit.
- Neteja: Keep the exterior of the unit clean and free from debris. Ensure the exhaust and intake vents are unobstructed.
- Hivernització: If operating in freezing temperatures, ensure the unit is properly winterized to prevent damage from frozen water. This typically involves draining all water from the system. Consult a professional if unsure.
- Descalcificació: Depending on water hardness, periodic descaling may be necessary to maintain efficiency. Refer to a qualified technician for this procedure.
6. Solució De Problemes
This section addresses common issues you might encounter with your water heater. For problems not listed here, or if solutions do not resolve the issue, contact customer support.
Problemes comuns i solucions:
| Problema | Causa possible | Solució |
|---|---|---|
| Sense aigua calenta | No gas supply, low water pressure, power issue, error code displayed | Check propane tank, ensure water supply is on and pressure is adequate (14.5-110 psi), verify 12V DC power connection, check remote controller for error codes. |
| L'aigua no és prou calenta | Temperature setting too low, high water flow rate, cold ambient temperature | Increase temperature setting on the remote controller. Reduce water flow rate. Ensure unit is protected from extreme cold. |
| Es mostra el codi d'error | Internal malfunction, sensor issue, flame-out, fan failure | Consult the specific error code in the full product manual (if available) or contact VEVOR customer support for diagnosis. |
| S'han detectat fuites de gas | Loose gas connections, damaged seals | Immediately shut off gas supply. Check all gas connections for tightness and apply soapy water to detect bubbles. Do not operate until leak is resolved by a qualified technician. |
7. Especificacions
Technical details for the VEVOR RV Tankless Water Heater, Model TMRVQ-05010242.
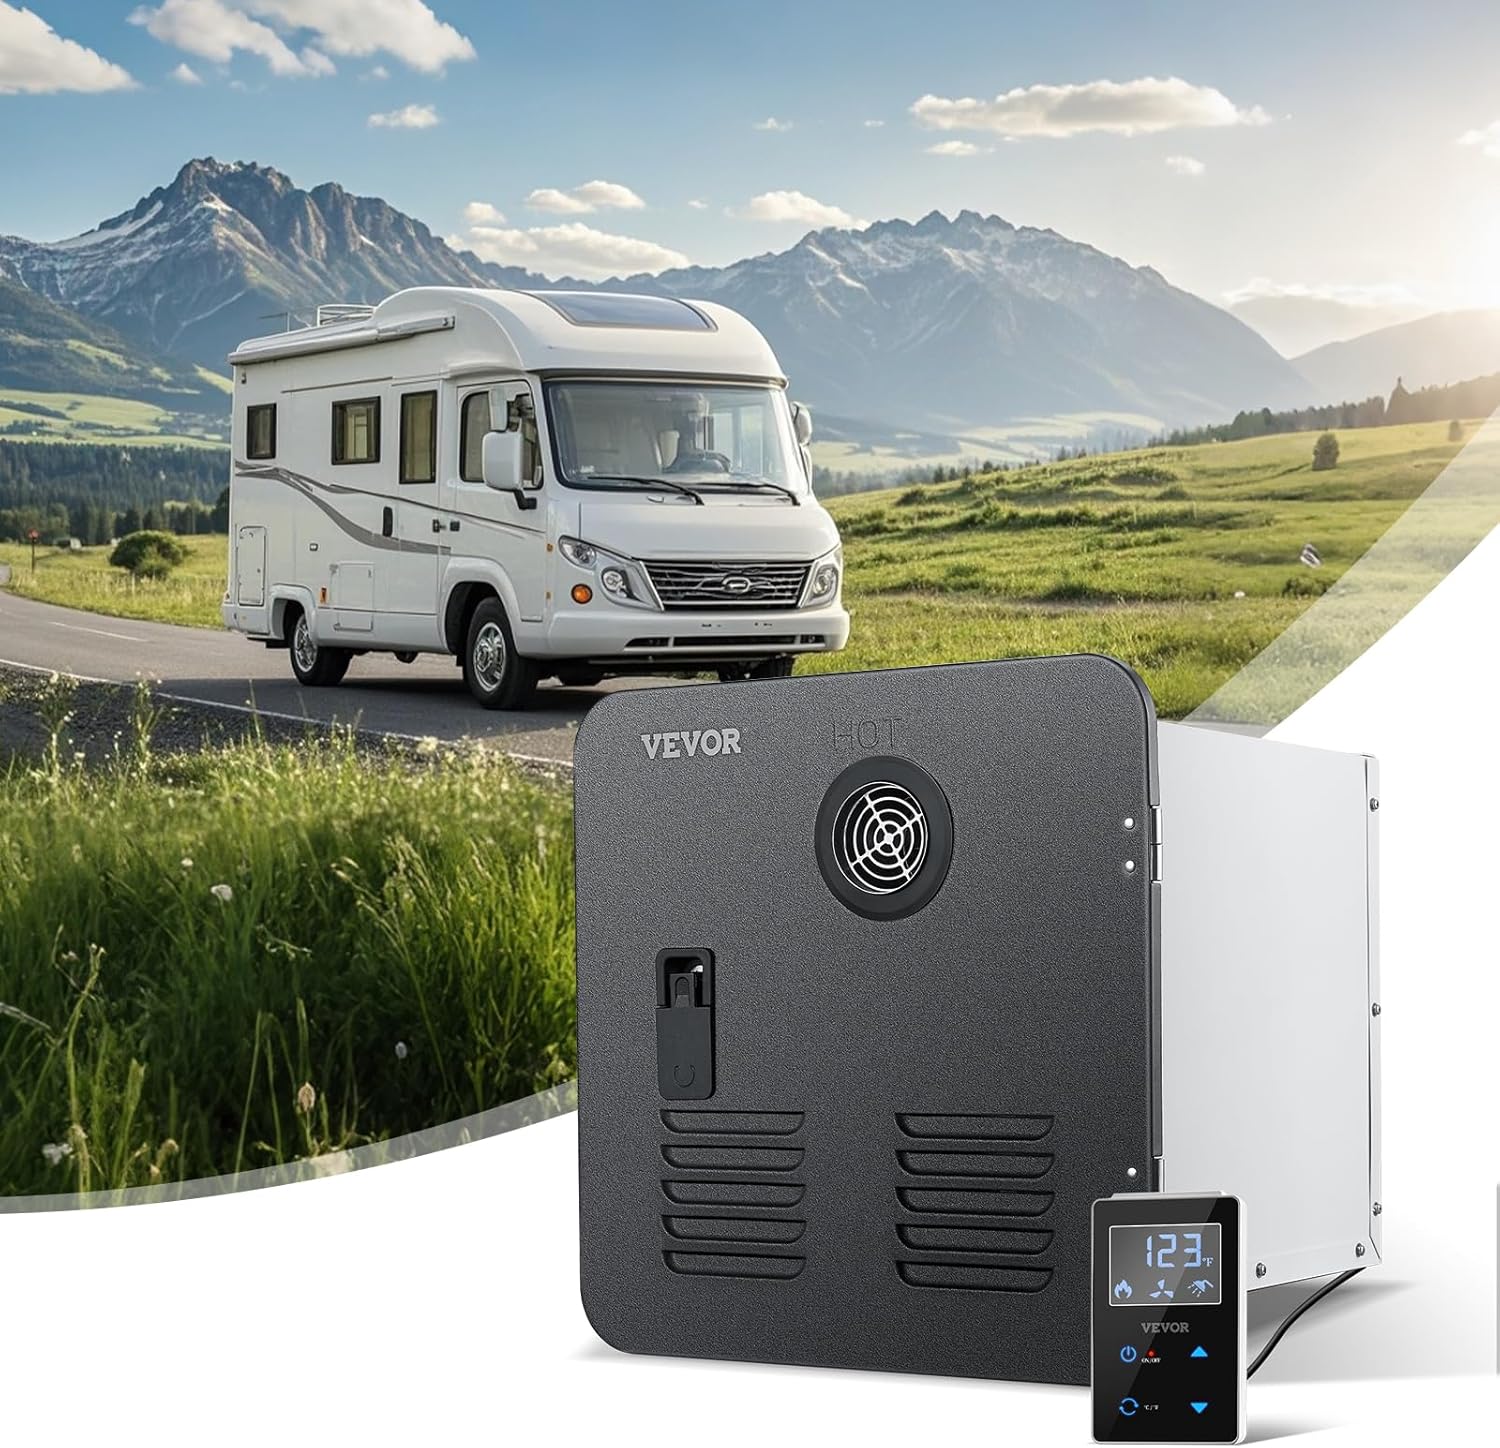
Figura 7.1: Paràmetres del producte i components inclosos.
| Especificació | Detall |
|---|---|
| Número de model | TMRVQ-05010242 |
| Sortida de calor | 42,000 BTU |
| Alimentació Voltage | DC 12V |
| Interval de pressió d'aigua | 14.5 - 110 psi |
| Minimum Starting Flow Rate | 2.8 L/min |
| Pes net | 25.79 lliures / 11.7 kg |
| Dimensions del producte | 15"W x 15"H x 14"D (depth excluding fittings) |
| Water/Gas Connectors | 1/2" NPT |
| Diàmetre del tub d'escapament | φ2.36" |
| Característiques especials | Forced Exhaust, Anti-Dry Burning Protection, Flame-Out Protection, Fan Failure Protection, Automatic Pressure Release, Anti-Freeze Protection |
8. Garantia i Suport
Per obtenir informació sobre la garantia, assistència tècnica o consultes de servei, consulteu la pàgina oficial de VEVOR. weblloc web o contacteu directament amb el servei d'atenció al client de VEVOR. Mantingueu a mà el rebut de compra i el número de model del producte per obtenir una assistència més ràpida.


