Introducció
This manual provides detailed instructions for the installation, operation, and maintenance of your KICKER LX3000.1 Mono Class-D Subwoofer Amplifier. Please read this manual thoroughly before attempting installation or operation to ensure proper use and to prevent damage to the unit or your vehicle.
The KICKER LX3000.1 is a high-efficiency Class-D amplifier designed to deliver powerful and clear bass output for your car audio system. It features advanced controls for precise sound customization and includes a remote for convenient bass level adjustment.
Informació de seguretat
- Desconnecteu sempre el terminal negatiu de la bateria del vehicle abans d'instal·lar o fer el manteniment de qualsevol component d'àudio.
- Assegureu-vos que tot el cablejat estigui correctament encaminat i fixat per evitar danys causats per peces mòbils o vores afilades.
- Use appropriate gauge power and ground wires as specified in the installation section to prevent overheating and potential fire hazards.
- No opereu el amplifier en humit o damp condicions.
- Eviteu muntar el amplifier in locations where it may be exposed to direct sunlight or excessive heat.
- Si no esteu segurs de cap part del procés, busqueu una instal·lació professional.
Contingut del paquet
Comproveu que el vostre paquet contingui els elements següents:
- KICKER LX3000.1 Mono Class-D Subwoofer Amplifier (Model 51LX30001)
- LX Remote Control (LXRC)
- Maquinari de muntatge
- Manual d'usuari (aquest document)
Configuració i instal·lació
Proper installation is crucial for optimal performance and safety. Refer to the following guidelines for setting up your ampmés viu.
Muntatge del Ampmés viu
Choose a mounting location that is dry, well-ventilated, and protected from direct sunlight. Ensure there is sufficient space around the amplifier for proper cooling. Secure the amplifier firmly using the provided mounting hardware.

Imatge: Superior view of the KICKER LX3000.1 amplifier, showing its compact design.

Imatge: Anglesa view of the KICKER LX3000.1 amplifier, highlighting the KICKER logo and model number.
Connexions de cablejat
All power, ground, and remote turn-on connections should be made with appropriate gauge wiring. Refer to the diagram below for typical wiring connections.

Image: Rear panel of the KICKER LX3000.1 amplifier, showing power, ground, remote, input, output, and control connections.
- Potència (+12 V): Connect to the positive terminal of the vehicle's battery using a fuse or circuit breaker within 18 inches of the battery.
- Terra (GND): Connect to a clean, solid metal point on the vehicle's chassis, ensuring good electrical contact.
- Engegada remota (REM): Connecteu-lo al cable d'encesa remota de la unitat principal.
- Entrada: Connect RCA cables from your head unit's subwoofer output to the amplifier's input. The amplifier also supports high-level input via the speaker-level input terminals.
- Sortida de l'altaveu: Connect your subwoofer(s) to the speaker output terminals. Ensure correct polarity and impedance matching.
El ampcaracterístiques del lifier FIT+ technology to eliminate unwanted noise and interference, ensuring a clean audio signal.

Imatge: Primer pla de la amplifier's input section, highlighting the FIT+ technology logo and high-level input terminals.
El amplifier also includes a reversible center panel and 11 RGB LED accent colors for aesthetic customization. Refer to the full manual for instructions on changing LED colors.
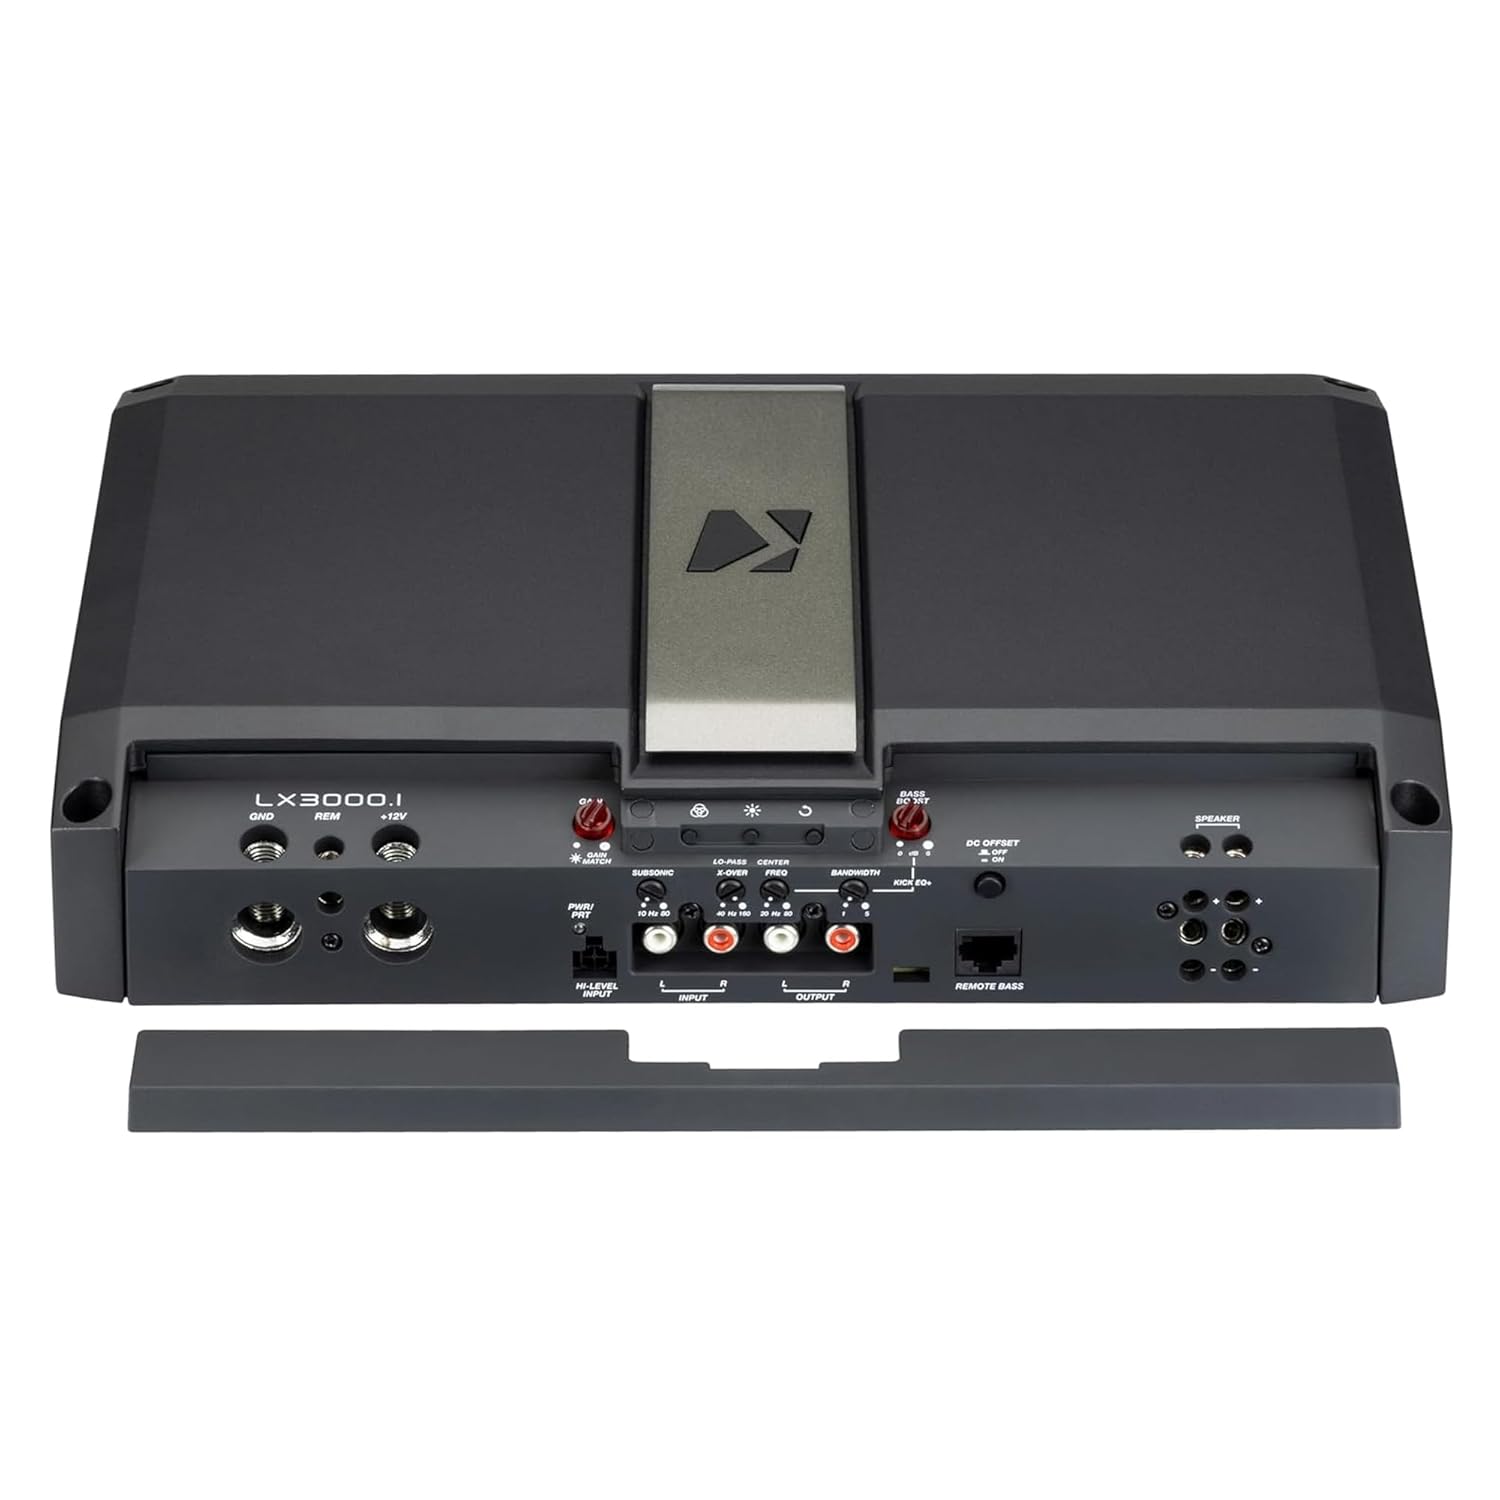
Image: KICKER LX3000.1 amplifier with the top panel removed, revealing internal controls and customization options.
Funcionament i ajustos
The LX3000.1 amplifier offers various controls to fine-tune your bass output.
LX Remote Control (LXRC)
The included LXRC provides convenient fingertip control over your bass level. It also features real-time battery voltage monitoring and SHOCwave2.0 digital bass restoration for enhanced low-frequency response.

Image: The KICKER LX Remote Control (LXRC) with illuminated indicators for bass level and clipping.
KickEQ+ Parametric Bass Boost
Customize your sound with the KickEQ+ parametric bass boost. This feature allows you to adjust the gain (0–6dB), center frequency, and bandwidth to achieve your desired bass characteristics.

Image: Close-up of the Bass Boost control knob on the ampmés viu.
Crossover and Subsonic Filter
El amplifier includes a fully adjustable 24dB/octave electronic crossover and a subsonic filter. These controls help you optimize the frequency response for your subwoofer(s) and protect them from damaging ultra-low frequencies.

Imatge: Anglesa view of the KICKER LX3000.1 amplifier, showing the various control knobs and switches for tuning.
High-Efficiency Class-D Technology
The Class-D design ensures maximum efficiency, allowing the amplifier to run cooler and draw less power, which contributes to extended play times without compromising performance.
Manteniment
To ensure the longevity and optimal performance of your KICKER LX3000.1 amplificador, seguiu aquestes pautes de manteniment:
- Neteja: Feu servir un drap suau i sec per netejar el ampl'exterior del purificador. Eviteu utilitzar productes químics agressius o netejadors abrasius.
- Ventilació: Assegureu-vos que el ampLes aletes de refrigeració del purificador estan lliures de pols i deixalles per mantenir un flux d'aire adequat.
- Connexions: Reviseu periòdicament totes les connexions del cablejat per assegurar-vos que estiguin ben fixades i que no presentin corrosió.
Resolució de problemes
Si teniu problemes amb el vostre amplificador, consulteu els passos següents per a la resolució de problemes habituals:
- Sense energia: Check the main fuse near the battery and the amplifier's internal fuse (if applicable). Verify all power, ground, and remote turn-on connections are secure.
- Sense so: Ensure RCA cables are properly connected and not damaged. Check speaker wiring for correct polarity and secure connections. Verify head unit output is active.
- So distorsionat: Redueix l'ajust de guany a la amplifier. Check for proper impedance matching with your subwoofer(s). Ensure the input signal from the head unit is not clipping. The LXRC's clip indicator can help identify this.
- Ampsobreescalfament del lificador: Assegureu-vos una ventilació adequada al voltant amplifier. Check speaker impedance to ensure it's within the amplifier's specified range.
If problems persist after following these steps, contact KICKER customer support or your authorized KICKER dealer.
Especificacions
| Característica | Especificació |
|---|---|
| Model | 51LX30001 |
| Potència RMS @ 1Ω | 3000W |
| Potència RMS @ 2Ω | 2000W |
| Potència RMS @ 4Ω | 1100W |
| AmpClasse lifier | Classe D |
| Dimensions del producte | 15 x 22 x 10 polzades |
| Pes de l'article | 13.27 lliures |
| Encreuament | Adjustable 24dB/octave electronic crossover |
| Filtre subsònic | Ajustable |
| Bass Boost | KickEQ+ parametric (0–6dB gain, adjustable center frequency, bandwidth) |
| Característiques especials | FIT+ technology, SHOCwave2.0 digital bass restoration, LX Remote Control (LXRC) with battery voltage monitoring and clip indicator, reversible center panel, 11 RGB LED accent colors. |
Garantia i Suport
KICKER products are designed and engineered to provide years of reliable performance. This product is covered by a limited warranty against defects in materials and workmanship under normal use. The specific warranty period may vary by region and product type. Please refer to the warranty card included with your product or visit the official KICKER weblloc per obtenir informació detallada sobre la garantia.
For technical support, troubleshooting assistance, or warranty claims, please contact your authorized KICKER dealer or KICKER customer service directly. You can find contact information on the official KICKER website or through the provided documentation.
Recursos en línia:
Vídeo del producte
Mireu aquest vídeo per un finalview of the KICKER LX series ampaixecadors.
Video: An official product video providing a general overview of the KICKER LX series amplifiers, demonstrating features and design.


