1. Introducció
Thank you for choosing the ORION Cobalt CPE120 Active Down-Firing Subwoofer. This unit is designed to provide powerful, deep bass in a compact, space-saving enclosure, enhancing your vehicle's audio system. This manual provides essential information for proper installation, operation, and maintenance of your subwoofer.
The CPE120 features a built-in amplifier, eliminating the need for a separate external amplifier. Its design focuses on delivering robust bass performance while maintaining a slim profile suitable for various vehicle interiors, including under seats or in trunks.

Image 1.1: ORION Cobalt CPE120 12-inch active down-firing subwoofer enclosure with included remote bass knob.
2. Informació de seguretat
Please read all instructions carefully before installation and use. Failure to follow these guidelines may result in damage to the product, vehicle, or personal injury.
- Instal·lació professional recomanada: Installation of car audio equipment can be complex. If you are unsure about any part of the installation process, seek assistance from a qualified professional.
- Desconnecta la bateria: Desconnecteu sempre el terminal negatiu de la bateria del vehicle abans de començar qualsevol treball elèctric per evitar curtcircuits i riscos elèctrics.
- Cablejat adequat: Ensure all wiring is correctly connected and insulated to prevent short circuits and potential fire hazards. Use appropriate gauge wires as specified in the installation section.
- Muntatge segur: Munteu el subwoofer de manera segura per evitar que es mogui durant el moviment del vehicle, cosa que podria causar lesions o danys.
- Evitar obstruccions: No instal·leu el subwoofer en un lloc que obstrueixi la vista del conductor. viewinterfereix amb els controls del vehicle o impedeix el desplegament de l'airbag.
- Ventilació: Ensure adequate ventilation around the subwoofer's amplifier section to prevent overheating.
- Nivells de volum: L'exposició prolongada a nivells de volum elevats pot causar danys auditius. Ajusteu el volum a un nivell segur i còmode.
3. Contingut del paquet
Verifiqueu que tots els elements siguin presents al paquet:
- ORION Cobalt CPE120 Active Down-Firing Subwoofer Enclosure
- Remote Bass Knob with Cable
- High-Level Input Harness (if applicable, for direct speaker wire connection)
- Power Wiring Kit (typically sold separately, but essential for installation)
- Manual d'usuari (aquest document)
4. Característiques clau
- Integrat Ampmés viu: Built-in 2000W peak power (500W RMS) amplifier for clear and powerful bass reproduction.
- 12-inch Down-Firing Subwoofer: Optimized for deep bass response and efficient use of space.
- Compact Enclosure: Slim profile (21" x 7" x 14") designed for installation in tight spaces such as under seats or in vehicle trunks.
- Entrades versàtils: Features both High-Level (speaker level) and Low-Level (RCA) inputs for compatibility with various head units.
- Crossover ajustable: Low Pass Crossover (LPF) adjustable from 50Hz to 200Hz to fine-tune bass frequencies.
- Intensificació dels sons més greus: Adjustable bass boost from 0 to +12dB for enhanced low-frequency impact.
- Control de fase: Switchable phase (0°/180°) to optimize bass integration with existing speakers.
- Control de baix a distància: Included wired remote for convenient adjustment of bass level from the driver's seat.
- Construcció duradora: Constructed with a sealed MDF enclosure, spun aluminum cone, EPDM rubber surround, and copper-wound Kapton voice coil for enhanced sound quality and longevity.
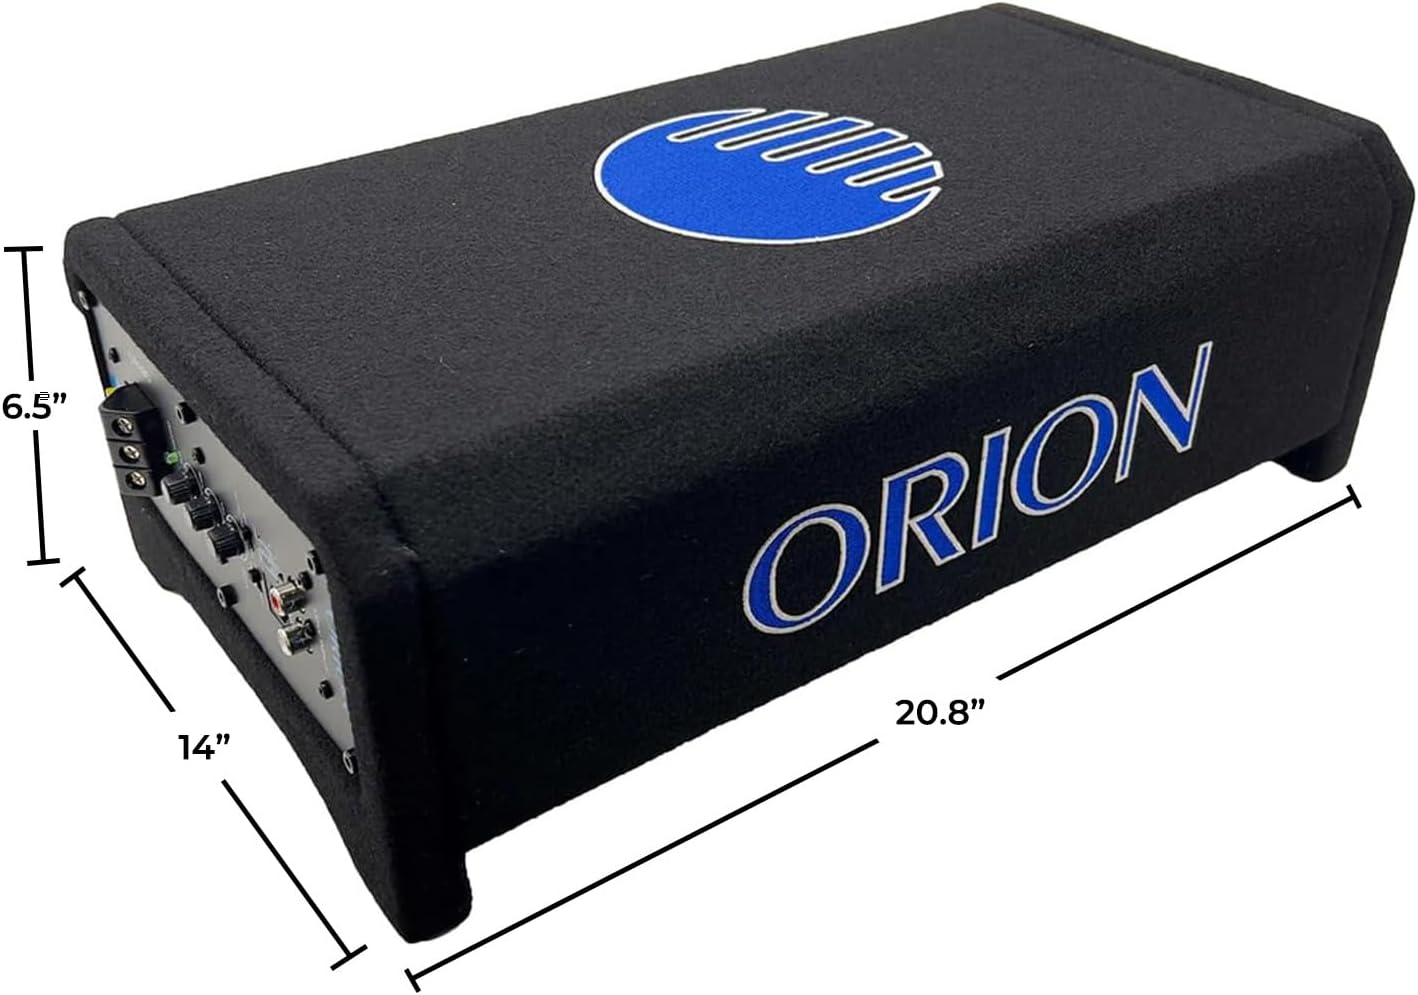
Image 4.1: Dimensions of the ORION Cobalt CPE120 subwoofer enclosure.
5. Instal·lació i configuració
5.1. Col·locació
The compact design of the CPE120 allows for flexible placement. Common locations include:
- Underneath a car seat (ensure adequate clearance and ventilation).
- In the trunk of a sedan.
- Behind or under the rear seat of a truck or SUV.
Ensure the subwoofer is securely mounted to prevent movement. Consider the proximity to the vehicle's battery for power wiring and the head unit for signal wiring.
5.2. Connexions de cablejat
Before making any connections, disconnect the negative (-) terminal of your vehicle's battery.
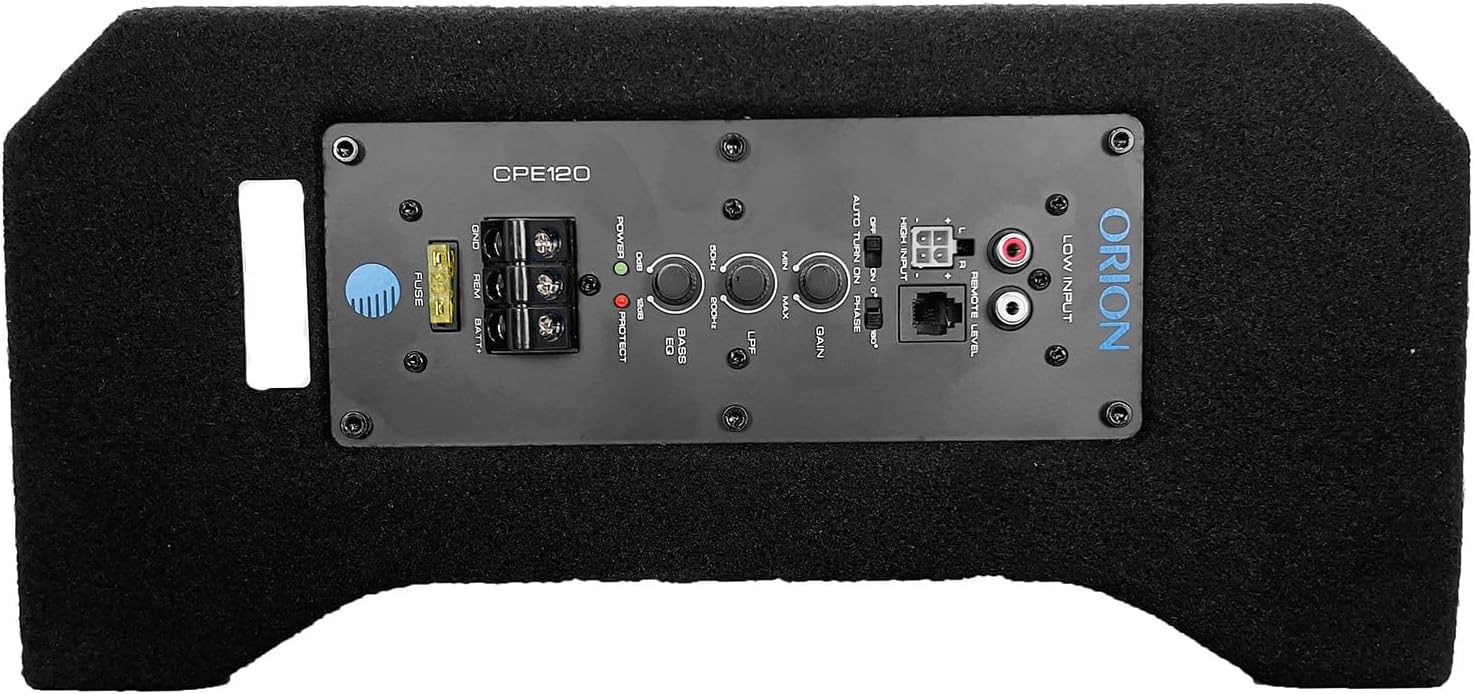
Image 5.1: Control panel with wiring terminals and adjustment knobs.
- Potència (BATT+): Connect a suitable gauge power wire (e.g., 8 AWG or 4 AWG depending on total system power) directly from the vehicle's positive battery terminal to the BATT+ terminal on the subwoofer. Install an in-line fuse holder (with an appropriate fuse, typically 40A-60A) as close to the battery as possible (within 18 inches).
- Terra (GND): Connect a short (less than 3 feet) and equally suitable gauge ground wire from the GND terminal on the subwoofer to a clean, unpainted metal surface on the vehicle's chassis. Ensure a good electrical connection by scraping away any paint or rust.
- Engegada remota (REM): Connect a remote turn-on wire from your head unit's remote output (usually a blue/white wire) to the REM terminal on the subwoofer. This wire tells the subwoofer to turn on and off with your head unit. If your head unit does not have a remote output, you may use the "Auto Turn On" feature (see Section 6.1).
- Entrada d'àudio:
- Entrada de baix nivell (RCA): If your head unit has RCA pre-outs, connect RCA cables from the head unit's subwoofer or full-range outputs to the "LOW INPUT" RCA jacks on the subwoofer.
- Entrada d'alt nivell (nivell d'altaveu): If your head unit does not have RCA outputs, use the included high-level input harness. Connect the speaker wires from your head unit's rear speakers (or full-range speakers) to the corresponding wires on the high-level input harness. Plug the harness into the "HIGH INPUT" connector on the subwoofer.
- Control de nivell remot: Connect the remote bass knob cable to the "REMOTE LEVEL" port on the subwoofer. Mount the remote knob in an accessible location for easy adjustment.
After all connections are made, reconnect the negative battery terminal.
6. Funcionament i ajustos
The control panel on the subwoofer allows for fine-tuning of the audio output. Refer to Image 5.1 for control locations.
6.1. Funcions del tauler de control
- FUSIBLE: Main power fuse for protection. Replace only with a fuse of the same rating.
- GND, REM, BATT+: Power and remote turn-on terminals (as described in Section 5.2).
- POWER/PROTECT LED:
- Green (POWER): Indicates the subwoofer is powered on and operating normally.
- Red (PROTECT): Indica el amplifier is in protection mode due to overheating, short circuit, or low voltage. Turn off the system and troubleshoot.
- AUTO TURN ON (ON/OFF): This switch enables or disables the automatic turn-on feature. When set to "ON" and using high-level inputs, the subwoofer will detect an audio signal and turn on automatically, eliminating the need for a remote turn-on wire. If using a remote turn-on wire, set this to "OFF".
- FASE (0°/180°): Adjusts the phase of the subwoofer output. If the bass sounds weak or out of sync with your main speakers, try switching the phase. One setting will typically sound better than the other.
- LPF (Low Pass Filter) (50Hz-200Hz): This knob controls the upper frequency limit of the subwoofer. Set it to allow only low frequencies to pass through to the subwoofer. A common starting point is around 80-100Hz, but adjust to blend smoothly with your main speakers.
- BASS EQ (0-+12dB): This control boosts the bass output at a specific frequency. Use sparingly to avoid distortion.
- GAIN (MIN/MAX): This control matches the output level of your head unit to the input sensitivity of the subwoofer's amplifier. Start with the gain at minimum, then slowly increase it until the bass output is balanced with your main speakers without distortion. Do not use the gain control as a volume knob.
- ENTRADA ALTA: Connector for the high-level input harness.
- ENTRADA BAIXA: RCA jacks for low-level input.
- REMOTE LEVEL: Port for connecting the wired remote bass knob.
6.2. Remote Bass Knob

Image 6.1: Remote bass level control knob.
The remote bass knob provides convenient control over the subwoofer's output level from your driving position. This allows for quick adjustments to the bass intensity without needing to access the subwoofer's control panel.
7. Manteniment
- Neteja: Use a soft, dry cloth to clean the enclosure. Do not use harsh chemicals or abrasive cleaners.
- Inspeccions: Reviseu periòdicament totes les connexions del cablejat per assegurar-vos que estiguin ben fixades i que no presentin corrosió.
- Ventilació: Assegureu-vos que el amplifier section of the subwoofer remains unobstructed to allow for proper heat dissipation.
- Substitució de fusibles: If the fuse blows, replace it only with a fuse of the exact same type and rating (e.g., 40A). Using a fuse with a higher rating can cause serious damage or fire.
8. Solució De Problemes
| Problema | Causa possible | Solució |
|---|---|---|
| No hi ha so del subwoofer |
|
|
| Weak or distorted bass |
|
|
| El subwoofer s'escalfa |
|
|
Note on Tuning: Some users have found that maximizing the gain and bass EQ, while keeping the LPF at minimum, can yield optimal results for this unit. Experiment with settings to achieve your preferred sound.
9. Especificacions
| Nom del model | CPE120 |
| Tipus d'altaveu | Subwoofer actiu de baixada |
| Diàmetre del woofer | 12 polzades |
| Potència màxima de sortida | 2000 watts |
| Potència de sortida RMS | 500 watts |
| Impedància | 4 ohms |
| Resposta de freqüència | (Not explicitly stated, but LPF 50Hz-200Hz implies operating range) |
| Crossover de pas baix (LPF) | 50 Hz - 200 Hz |
| Bass Boost | De 0 a + 12 dB |
| Tipus de muntatge | Under Seat / Trunk |
| Material de tancament | MDF (tauler de fibra de densitat mitjana) |
| Material del con | Alumini filat |
| Material envoltant | Goma EPDM |
| Bobina de veu | Copper-wound Kapton |
| Dimensions del producte (P x A x A) | 14" x 21" x 7" |
| Pes de l'article | 28.9 lliures |
| Mètode de control | Remote / On-unit controls |
| Tecnologia de connectivitat | Coaxial (for RCA inputs) |
10. Garantia i Suport
10.1. Informació de la garantia
The ORION Cobalt CPE120 is covered by a Garantia limitada del fabricant d'1 any. This warranty covers defects in materials and workmanship under normal use. It does not cover damage resulting from improper installation, accident, misuse, abuse, neglect, unauthorized modification, or normal wear and tear.
Conserveu el vostre comprovant de compra per a reclamacions de garantia.
10.2. Atenció al client
For technical assistance, warranty inquiries, or further information, please contact ORION customer support. Refer to the ORION official weblloc web o la documentació de compra per obtenir les dades de contacte més actualitzades.
També podeu visitar el ORION Store on Amazon per obtenir informació i recursos addicionals sobre el producte.


