1. Introducció
This manual provides detailed instructions for the assembly, operation, and maintenance of your chartustriable 95-inch Farmhouse Fireplace TV Stand. This entertainment center features a rustic design, a 60-inch electric fireplace, integrated LED lighting, and a convenient charging station. Please read all instructions carefully before assembly and use to ensure safe and proper operation.

Figure 1.1: Assembled Fireplace TV Stand with Electric Fireplace and LED Lights.
Vídeo 1.1: Acabatview of the 95-inch Farmhouse Entertainment Center with 60-inch Electric Fireplace, demonstrating its features and aesthetic.
2. Instruccions de seguretat importants
Failure to follow these instructions may result in electric shock, fire, or personal injury. Please retain this manual for future reference.
- Llegiu totes les instruccions abans d'utilitzar aquest aparell.
- Do not operate any fireplace with a damaged cord or plug, or if the heater has been dropped or damaged in any manner.
- No passeu el cable sota la catifa. No cobriu el cable amb catifes, corredors o revestiments similars. Col·loqueu el cable lluny de la zona de trànsit i on no s'ensopegui.
- To disconnect the fireplace, turn controls to off, then remove plug from outlet.
- No introduïu ni deixeu que entrin objectes estranys a cap obertura de ventilació o d'escapament, ja que això podria provocar una descàrrega elèctrica o incendi, o danyar l'escalfador.
- Per evitar un possible incendi, no bloquegeu de cap manera les entrades d'aire o l'escapament. No l'utilitzeu en superfícies toves, com un llit, on les obertures es poden bloquejar.
- This fireplace is hot when in use. To avoid burns, do not let bare skin touch hot surfaces. Keep combustible materials, such as furniture, pillows, bedding, papers, clothes, and curtains at least 3 feet (0.9 m) from the front of the heater, and keep them away from the sides and rear.
- Cal extremar la precaució quan qualsevol escalfador és utilitzat per o a prop de nens o persones invàlides i sempre que la xemeneia es deixi en funcionament i sense vigilància.
- Desendolleu sempre la llar de foc quan no la feu servir.
- Utilitzeu aquesta xemeneia només tal com es descriu en aquest manual. Qualsevol altre ús no recomanat pel fabricant pot provocar incendis, descàrregues elèctriques o ferides a les persones.
3. Package Contents & Pre-Assembly
Your chartustriable Fireplace TV Stand is delivered in two separate packages, which may arrive on different days. Please ensure you have received both packages before beginning assembly.

Figure 3.1: Product delivered in two packages.
Eines necessàries (no incloses):
- Tornavís Phillips
- Power Drill (optional, for faster assembly)
- Ganivet multiusos (per obrir l'embalatge)
Desembalatge i classificació:
Carefully open the packaging. It is recommended to install this product on carpets to effectively reduce friction damage between the boards and the ground. Remove all components and hardware. Handle furniture panels carefully to avoid scratching the veneer. Arrange panels by category and place hardware pieces in the provided hardware box according to their numbers for easy access during assembly.
4. Instruccions de muntatge
Assembly is recommended for two people. Please refer to the detailed assembly video for visual guidance.
Video 4.1: Full Assembly Video for the 95-inch Fireplace TV Stand.
Muntatge pas a pas:
- Prepare Boards: Locate boards No. 1, 2, 11, and 12. Install hardware B (x26) into the designated positions on these four boards.
- Muntar els panells base: Locate boards No. 3 and 15. Install hardware B (x12) into the designated positions on these boards.
- Attach Support Beams: Locate boards No. 13, 14, 16, and 20. Install hardware B (x16) into the designated positions on these boards.
- Instal·leu els panells laterals: Locate boards No. 6 and 7. Install hardware B (x6) into the designated positions on these boards. Repeat for boards No. 4 and 5, installing hardware B (x6).
- Connect Vertical Supports: Find two pieces of board No. 21. Install hardware D (x2) into the designated positions on these boards. Align these two No. 21 boards with piece No. 20 and secure them with hardware A (x2).
- Join Main Sections: Install hardware D (x4) on board No. 16. Join piece No. 16 with the completed assembly from the previous step and secure it with hardware E (x4).
- Assemble Inner Shelves: Join two No. 19 boards with two No. 18 boards and secure them with hardware E (x2). Repeat this process for the other side.
- Attach Inner Supports: Install hardware D (x4) at the locations shown in the video.
- Connect Top Panels: Join the combination of board No. 13 and board No. 15 with the completed assembly, securing it with hardware E (x4) and hardware A (x2).
- Install Side Vertical Panels: Install two No. 17 boards as shown in the video, securing them with hardware A (x4).
- Assemble Remaining Side Panels: Install hardware D (x6) in the positions shown in the video. Install the No. 6 board as shown in the video, securing it with hardware E (x5). Install hardware D (x6) in the positions shown in the video. Install the No. 5 board as shown in the video, securing it with hardware E (x5).
- Assemble Small Shelves: Install hardware B (x2) and hardware D (x2) on plate No. 10. Assemble plate 22 with plate No. 10 and secure with hardware A (x2). Repeat this process to obtain two sets of plate No. 22 and plate No. 10 assemblies.
- Install Small Shelves into Main Unit: Install hardware D (x2) on plate No. 7. Assemble the plate No. 22 and plate No. 10 combination with plate No. 7 and secure with hardware A (x3). Install hardware D (x2) on plate No. 4. Assemble the plate No. 22 and plate No. 10 combination with plate No. 4 and secure with hardware A (x3).
- Install Side Frames: Install panel No. 11 as shown in the video. Install hardware D (x6) in the position shown in the video. Install panel No. 12 as shown in the video. Install hardware A (x6) at the location shown in the video.
- Install Top Panels: Install panel No. 3, panel No. 1, and panel No. 2 as shown in the video and secure them with hardware A (x3 for each panel).
- Instal·leu els panells posteriors: Install three panel No. 28 as shown in the video. Install hardware O (x2) on panel No. 3 and secure it with hardware G (x2). Install hardware D (x4) at the location shown in the video.
- Instal·leu l'estació de càrrega: Disassemble hardware Q1 (x1). Install hardware Q1 as shown in the video. Install hardware R (x1) as shown in the video, securing it with hardware I (x2).
- Instal·lar llums LED: Install hardware Q2 (x1) as shown in the video. Install hardware P (x2) as shown in the video.
- Instal·lació de portes: Install hardware F (x4) on No. 24 and No. 25 boards, and secure with hardware G (x12). Flip these two boards. Install two hardware H (x2) at the positions shown in the video, and secure with hardware G (x4). Install No. 24 and No. 25 boards to the positions shown in the video, and secure with hardware G (x4).
- Instal·lació de xemeneia elèctrica: Remove the two hardware T from the back of No. 29 board. Install hardware S (x2) on No. 29 board, and secure with hardware T (x2). Install No. 29 board as shown in the video. Secure with hardware G (x1).
- Ajustaments finals: If the cabinet is wobbly, adjust the screws promptly. If stable, install hardware U (x1) as shown in the video.
5. Electric Fireplace Operation
The integrated 60-inch electric fireplace provides realistic 3D flame effects and heating functionality. It can be controlled via the included remote control.
Característiques:
- Realistic 3D Flame Effect: Enjoy a quiet and visually appealing flame display with clear crystal and charcoal ember bed.
- Calefacció: 5000 BTU output capable of heating up to 400 square feet.
- Funció de temporitzador: Set the fireplace to operate for 0.5 to 8 hours.
- Overheat Cut-off: Funció de seguretat per evitar el sobreescalfament.
- Configuració ajustable: Customize flame color (6 options), ember bed color (14 options), brightness (5 levels), and temperature (60°F to 99°F).
- Bloqueig per a nens: For added safety.
Ús del comandament a distància:
The remote control allows you to power on/off, adjust flame color, bed color, dimmer, temperature, and set the timer. Refer to the remote control diagram for specific button functions.

Figure 5.1: 60-inch Electric Fireplace with Remote Control Functions.
6. LED Lights Operation
The fireplace TV stand includes LED light strips to enhance the ambiance of your living space. These lights can be matched with the fireplace flame colors for a cohesive look.
Característiques:
- Multi-color LED light strip with over 6000 color options.
- Lluminositat ajustable.
- Funció de temporitzador.
- Music mode and Microphone mode for dynamic lighting effects.
Opcions de control:
The LED lights can be controlled via a dedicated remote control or a smartphone application (APP Control).

Figure 6.1: Multi-Color LED Light Strip Features.
7. Charging Station Usage
The TV stand is equipped with a built-in charging station for your convenience.
Característiques:
- Two standard power outlets.
- Dos ports USB.
Ús:
Simply plug in your mobile phones, tablets, or other electronic devices into the available outlets or USB ports for charging.
8. Manteniment i cura
Proper care will ensure the longevity and appearance of your TV stand.
Neteja general:
- Netegeu les superfícies amb un suau, damp drap. Eviteu productes químics agressius o netejadors abrasius.
- For the electric fireplace glass, use a glass cleaner and a soft cloth.
Components elèctrics:
- Ensure the fireplace and LED lights are unplugged before cleaning or performing any maintenance.
- Regularly check power cords for any signs of damage.
9. Solució De Problemes
If you encounter any issues with your TV stand or electric fireplace, refer to the following common solutions:
- Fireplace not turning on: Check if the power cord is securely plugged into a working outlet. Ensure the power switch on the fireplace unit is in the 'ON' position. Verify remote control batteries.
- Sense producció de calor: Confirm the temperature setting is above the current room temperature. Check for any obstructions around the heater's air intakes or exhaust.
- Els llums LED no funcionen: Ensure the LED light strip is properly connected to its power source. Check remote control batteries or the smartphone app connection.
- Wobbly cabinet: Re-check all assembly screws and tighten them as necessary. Ensure the unit is placed on a flat, level surface.
Per a problemes persistents, poseu-vos en contacte amb l'atenció al client.
10. Especificacions
| Característica | Detall |
|---|---|
| Marca | cartustriable |
| Nom del model | Fireplace TV Stand (Model 4LKFKQU03814) |
| Dimensions del producte | 15.8 "P x 95.29" W x 33.1" H |
| Material | Fusta d'enginyeria |
| Tipus d'acabat | Pintat |
| Font d'alimentació | Elèctric amb cable |
| Sortida de calor | 5000 unitats tèrmiques britàniques |
| Cobertura de calefacció | 400 peus quadrats |
| TV Size Accommodation | Fins a 100 polzades |
| Pes de l'article | 206 lliures |
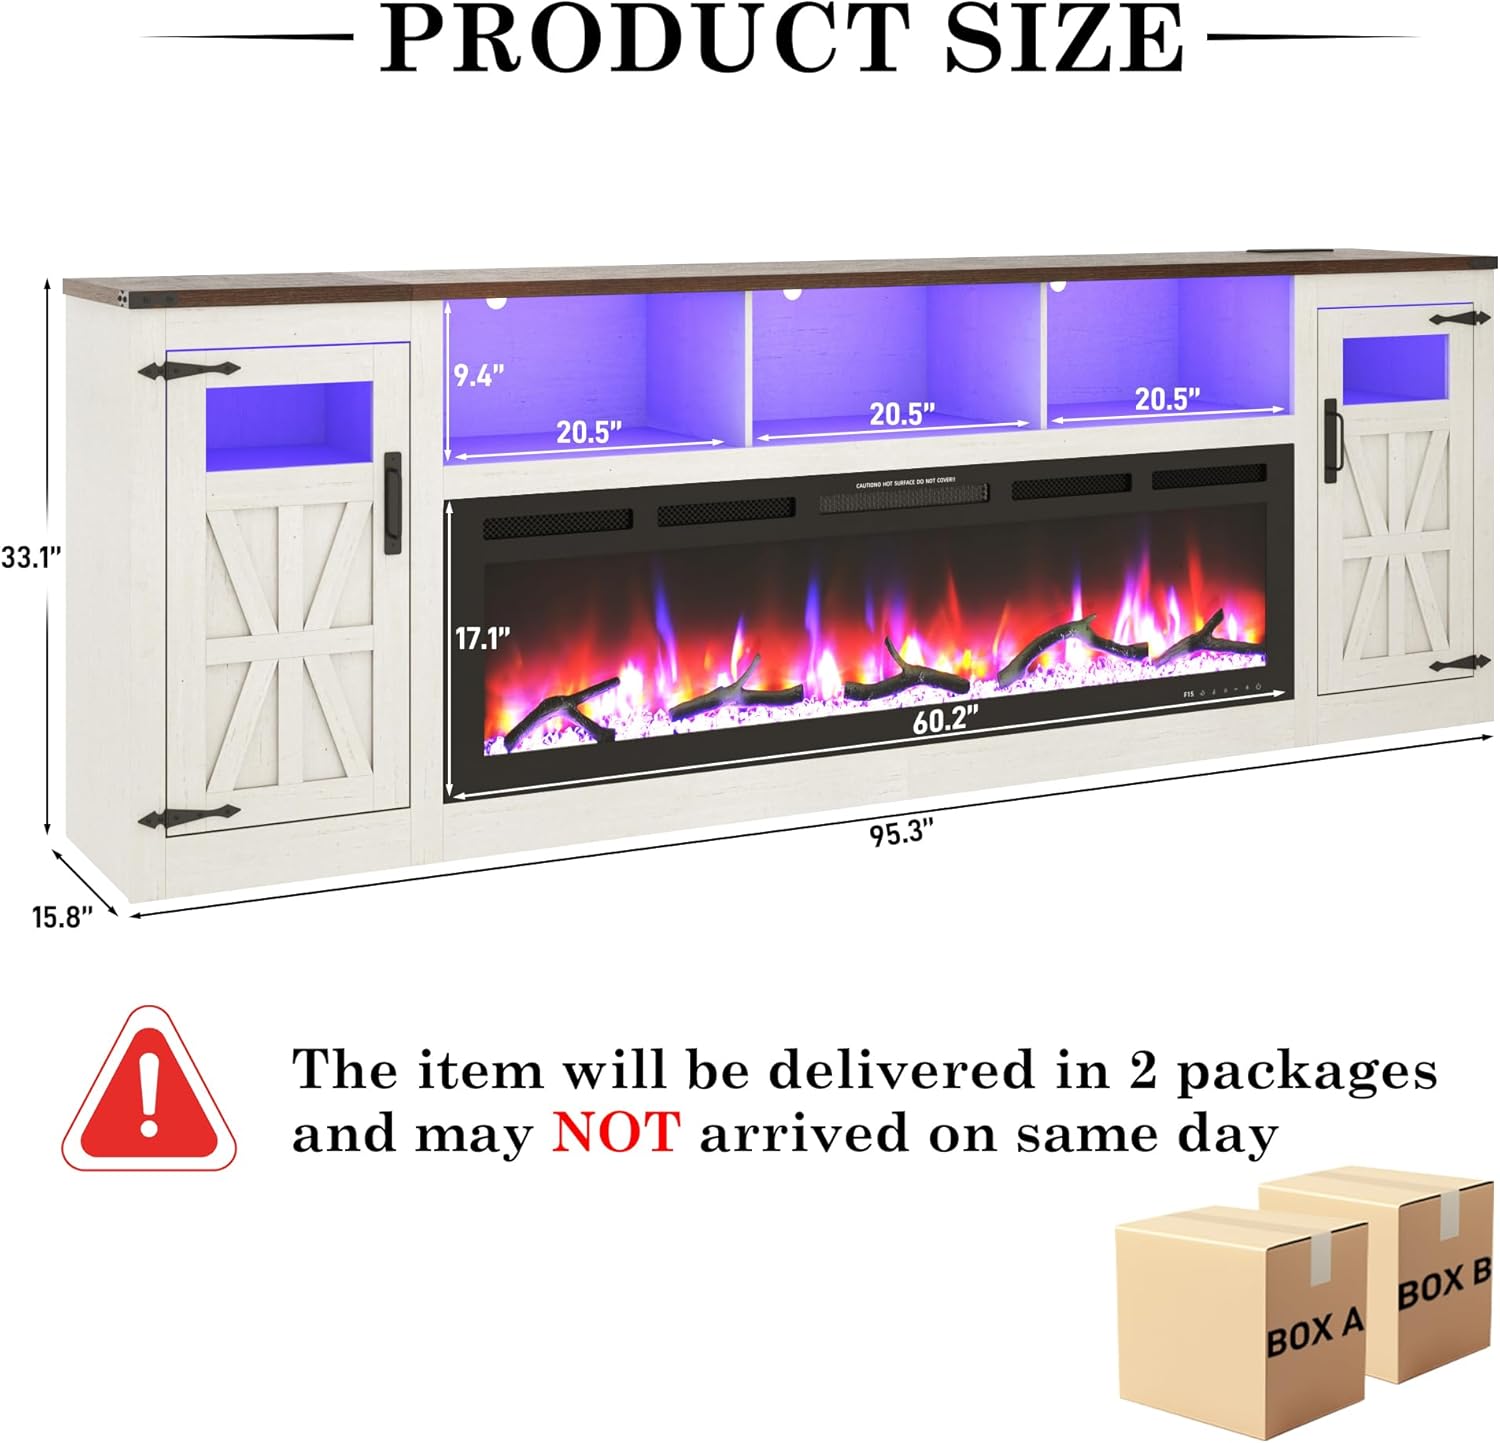
Figura 10.1: Dimensions del producte.

Figure 10.2: TV Size Compatibility.
11. Garantia i Suport
The chartustriable Fireplace TV Stand comes with a limited warranty. For any questions regarding assembly, missing parts, or product operation, please contact our customer service team.
Atenció al client:
We offer 24-hour customer service to assist you with any inquiries.

Figure 11.1: Customer Service Contact Information.