1. Introducció
The Radioddity HF-009 is a portable High-Frequency (HF) antenna designed for amateur radio enthusiasts requiring a versatile and easy-to-deploy solution. This antenna covers a wide frequency range from 5 MHz to 50 MHz, making it suitable for various HF bands. Its quick-tuning mechanism and durable construction are optimized for field operations and mobile use.
2. Contingut del paquet
Abans del muntatge, comproveu que tots els components que s'enumeren a continuació siguin presents al paquet:
- Tunable Loading Coil (44.5 cm / 17.5 in)
- Telescopic Whip (30-230 cm / 11.8-90.6 in)
- Extension Rods (2 pieces, 45 cm / 17.7 in each)
- Ground Spike with Premounted Antenna Base (26 cm / 10.2 in)
- Antenna Coax Cable (5m / 16.4 feet)
- Ground Radial Wires (3 pieces)
- BNC-M to SO239 Adapter
- Bossa de transport
- Corretja

Image 2.1: All components included in the Radioddity HF-009 Portable HF Antenna package. This includes the main antenna elements, cables, ground spike, and carrying bag.
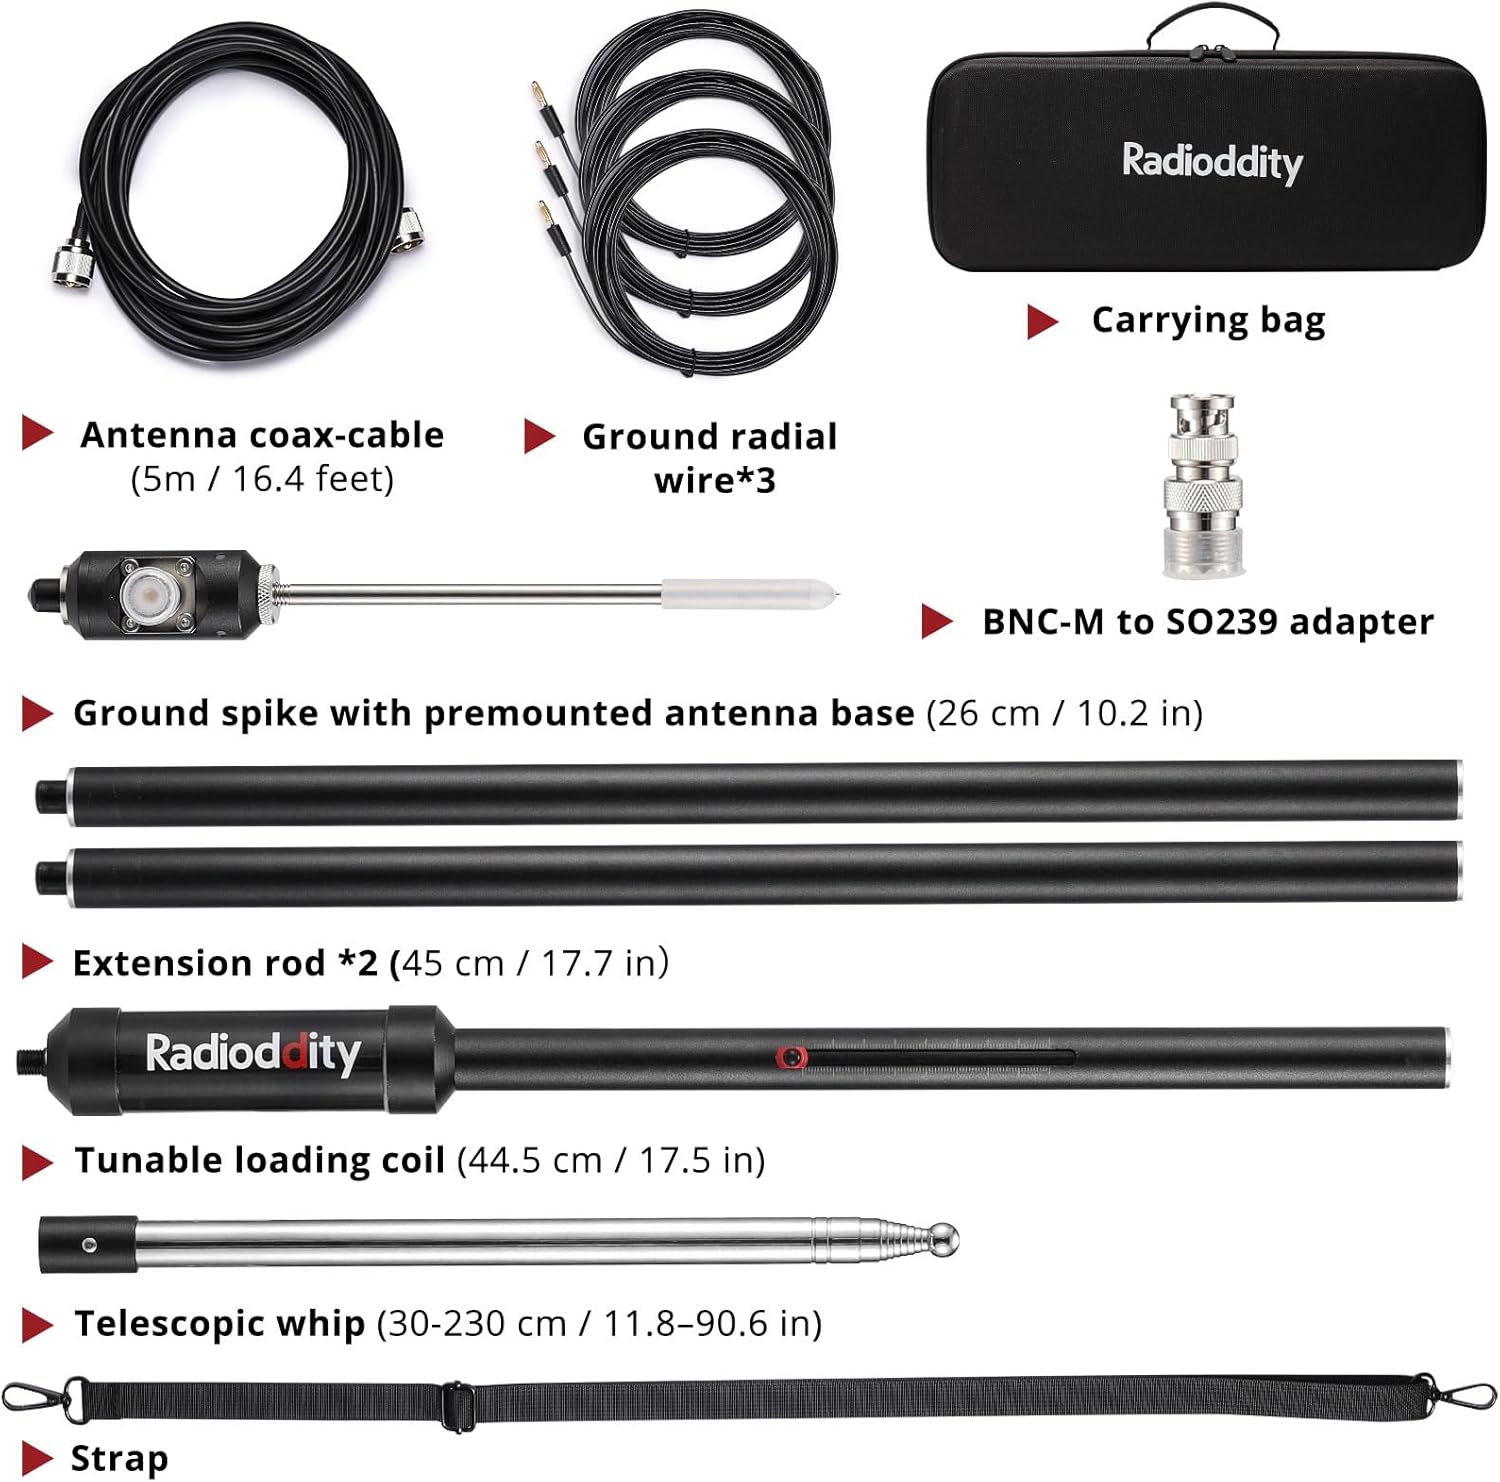
Image 2.2: A detailed breakdown of the Radioddity HF-009 antenna components, including the coax cable, ground radial wires, BNC-M to SO239 adapter, ground spike, extension rods, tunable loading coil, telescopic whip, and carrying bag.
3. Instruccions de configuració
Follow these steps to assemble and deploy your Radioddity HF-009 antenna:
- Attach the Ground Spike: Securely screw the ground spike with the pre-mounted antenna base into the bottom of the tunable loading coil. Ensure it is hand-tightened.
- Connect Extension Rods: If desired for increased height, screw the extension rods onto the tunable loading coil. The antenna can be used with one or both extension rods, or none, depending on the desired configuration and band.
- Insert Telescopic Whip: Insert the telescopic whip into the top of the tunable loading coil or the uppermost extension rod. Extend the whip to its full length for initial setup.
- Instal·lació a terra: Drive the integrated stainless steel ground spike firmly into suitable ground (soil, sand, or grass). Ensure the antenna is stable and vertical.
- Connect Ground Radials: Attach the three ground radial wires to the designated terminals on the antenna base. Spread these wires out radially on the ground to improve antenna performance.
- Connecteu el cable coaxial: Connect one end of the provided 5-meter pure copper coax cable to the SO239 connector on the antenna base. Use the BNC-M to SO239 adapter if your radio requires a BNC connection. Connect the other end of the coax cable to your HF transceiver.

Image 3.1: Visual guide for assembling the Radioddity HF-009 antenna. Steps include connecting the ground spike, adding extension rods, attaching the telescopic whip, and securing the ground radials.

Image 3.2: A six-step visual sequence demonstrating the assembly of the antenna components and the final ground installation with radial wires spread out.
4. Instruccions de funcionament
The HF-009 antenna features a quick-tuning system for efficient band changes.
4.1. Sintonització de freqüència
The antenna covers a frequency range of 5-50MHz. Tuning is achieved by adjusting the slide-and-lock mechanism on the tunable loading coil. To tune:
- Identify the desired operating frequency band.
- Loosen the locking mechanism on the tunable loading coil.
- Slide the tuning element up or down to adjust the resonant frequency. Markings on the coil provide a general guide.
- Tighten the locking mechanism to secure the tuning element in place.
- Use an antenna analyzer or the SWR meter on your transceiver to fine-tune for the lowest Standing Wave Ratio (SWR), ideally between 1.0 and 1.5. Minor adjustments to the telescopic whip length may also be necessary for optimal SWR.
4.2. Maneig de potència
The antenna is rated for up to 100W CW (Continuous Wave) and 150W PEP (Peak Envelope Power) SSB (Single Sideband). Ensure your transceiver's output power does not exceed these limits to prevent damage to the antenna.

Image 4.1: The Radioddity HF-009 antenna deployed in a field setting next to an HF transceiver, illustrating its wide frequency range capability (5-50MHz) and stable SWR (1-1.5).
5. Manteniment
The Radioddity HF-009 antenna is designed for durability and minimal maintenance.
- Neteja: Wipe down the antenna elements with a damp cloth after use, especially in dusty or sandy environments, to remove dirt and debris.
- Inspecció: Periodically inspect all connections and components for signs of wear, corrosion, or damage. Ensure all screws and locking mechanisms are secure.
- Emmagatzematge: When not in use, disassemble the antenna and store it in the provided carrying bag. Keep it in a dry, cool place away from direct sunlight.
- Internal Coil Design: The antenna features an internally housed tuning coil, which provides enhanced durability and waterproofing compared to designs with exposed coils. This reduces the need for frequent internal maintenance.

Image 5.1: A visual comparison highlighting the Radioddity HF-009's internal coil design (left), which offers waterproofing and dustproofing, versus an external coil design (right) that is prone to rust and environmental exposure.
6. Solució De Problemes
If you encounter issues with your HF-009 antenna, consider the following:
- SWR alt:
- Assegureu-vos que totes les connexions estiguin estretes i segures.
- Verify the ground radials are properly spread out and making good contact with the ground.
- Adjust the tuning coil and telescopic whip length carefully for the desired frequency. Use an antenna analyzer for precise tuning.
- Check the coax cable for damage or shorts.
- Recepció/transmissió deficient del senyal:
- Confirm the antenna is tuned to the correct frequency band.
- Ensure the antenna is deployed in an open area, away from obstructions like buildings, trees, or power lines that could interfere with signal propagation.
- Check the connection to your transceiver.
- Danys físics:
- Inspect all antenna elements for bends, cracks, or breaks. Replace any damaged parts if necessary.
7. Especificacions
| Característica | Especificació |
|---|---|
| Model | HF-009 |
| Interval de freqüència | 5-50MHz (60m to 6m bands) |
| SWR | 1.0-1.5 (típic) |
| Impedància | 50 ohms |
| Potència màxima | 100W CW / 150W PEP SSB |
| Tipus d'antena | Portable Vertical HF Antenna |
| Material | High-grade Aluminum Alloy, Stainless Steel |
| Pes | Approximately 1 kg (2.2 lbs) / 4.69 pounds (packaged) |
| Maximum Visible Length | 3.7 m |
| Connectors | SO239 (UHF Female) |
| Posada a terra | Integrated Ground Spike, 3 Ground Radials |
8. Garantia i Suport
Radioddity products are designed for reliability and performance. For warranty information, technical support, or service inquiries, please refer to the official Radioddity weblloc web o contacteu directament amb el servei d'atenció al client. Conserveu el rebut de compra com a comprovant de compra per a reclamacions de garantia.
Fabricant: Radioditat
Weblloc: www.radioddity.com


