1. Introducció
This manual provides essential information for the safe and efficient use of your Poafamx 1/3 HP Water Chiller. This unit is designed to cool water for cold plunge ice baths, supporting athlete recovery and cold therapy. It features a powerful compressor, an integrated pump and filter system, and an intuitive LED touch control screen. Please read these instructions thoroughly before installation and operation.
2. Contingut del paquet
Verifiqueu que tots els elements que s'enumeren a continuació s'inclouen al vostre paquet:
- 1/3 HP Chiller Unit
- External Filter & Pump System
- 3 Insulated Hoses
- 7 Connectors
- 4 cargols
- Tornavís
- Cinta de segellat
- Cable d'alimentació
- 6 Mànega Clamps

3. Configuració i instal·lació
Proper installation is crucial for the chiller's performance and longevity. Follow these steps carefully.
Vídeo 1: A quick guide on how to install the chiller unit and connect the hoses.
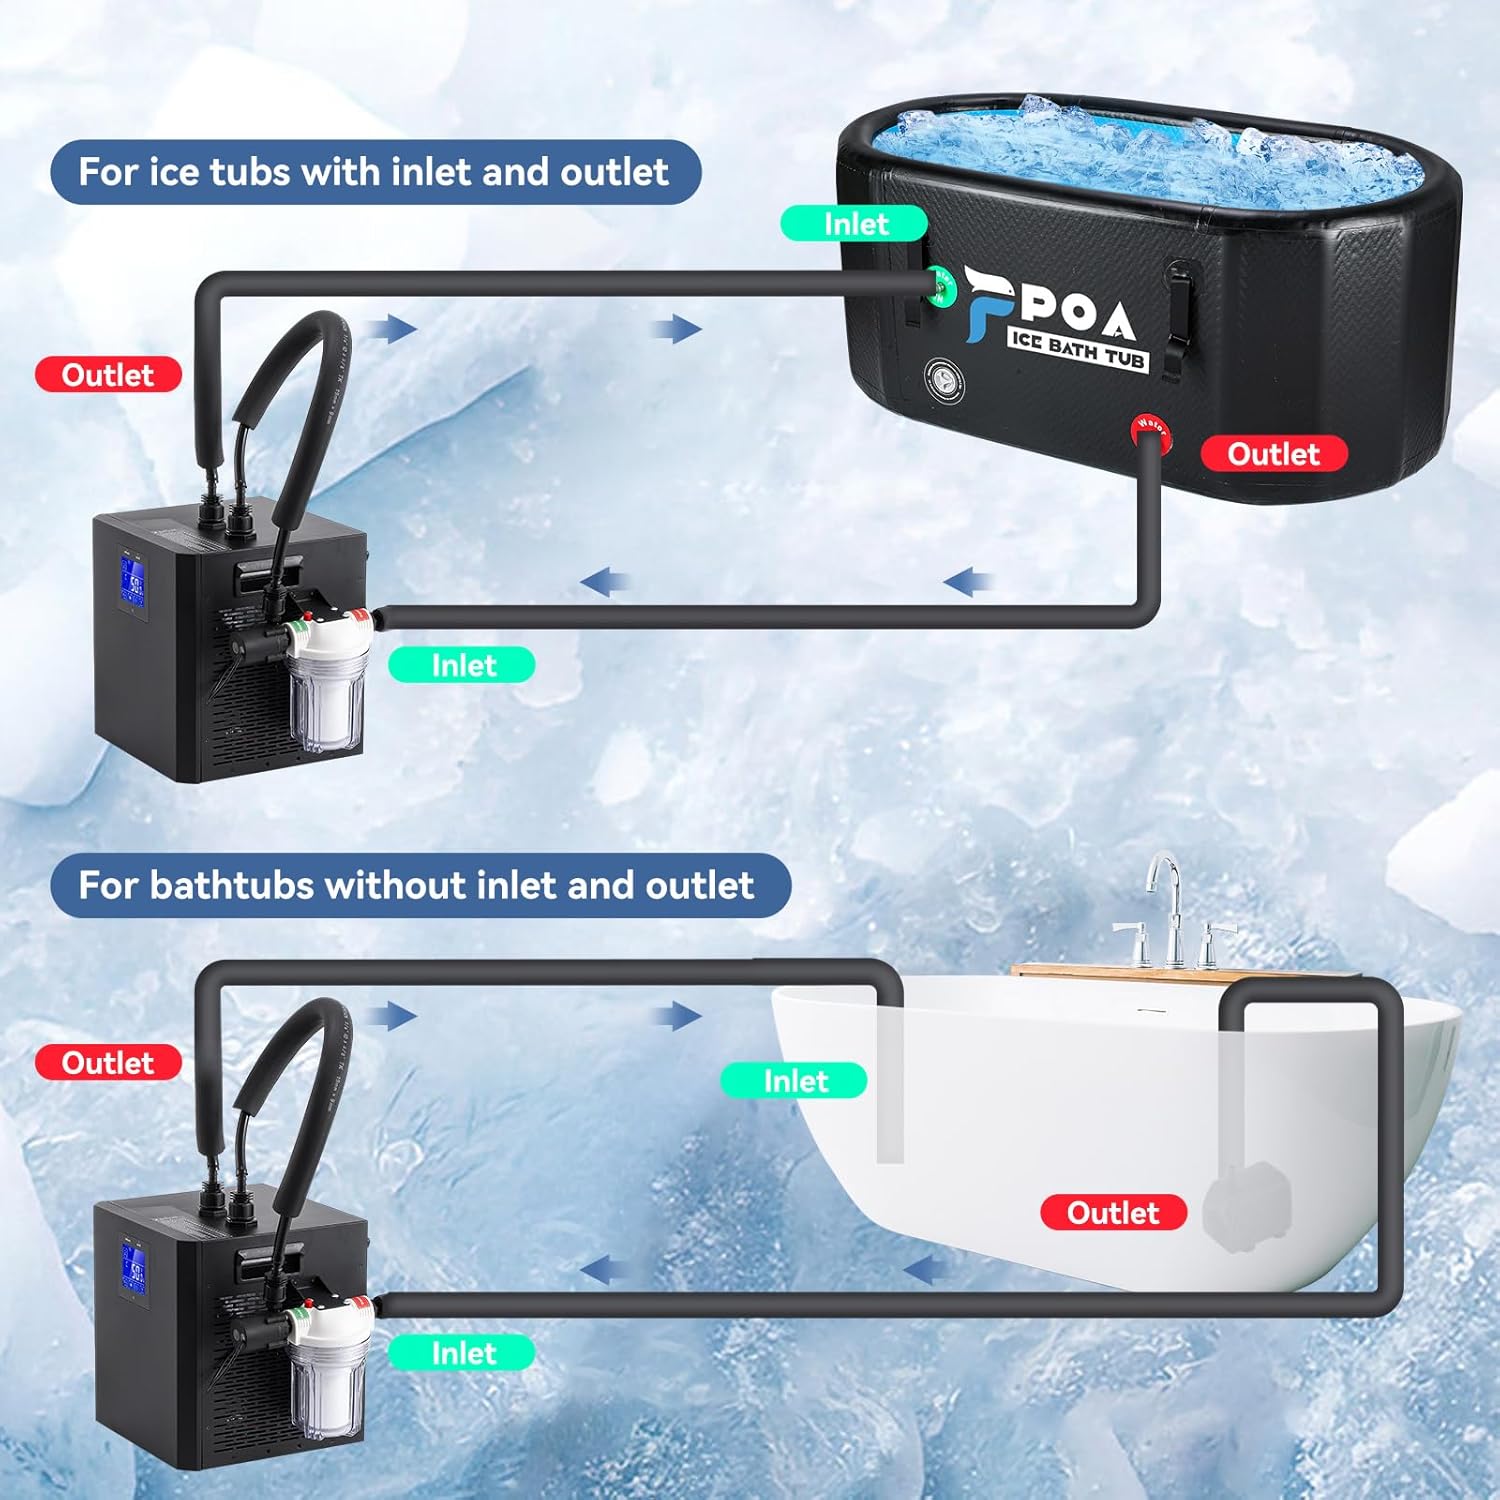
3.1 Connecting to an Ice Bath Tub with Inlet/Outlet Ports
For ice bath tubs equipped with dedicated inlet and outlet ports:
- Connect one insulated hose from the ice bath tub's outlet to the chiller's inlet (bottom port).
- Connect a second insulated hose from the chiller's outlet (top port) to the ice bath tub's inlet.
- Ensure all connections are secure and tightened with hose clamps per evitar fuites.
3.2 Connecting to a Bathtub without Inlet/Outlet Ports (Requires Submersible Pump)
If your bathtub does not have dedicated ports, a submersible pump (included in the kit) is required:
- Connect one insulated hose from the submersible pump to the external filter system's inlet.
- Connect a second insulated hose from the external filter system's outlet to the chiller's inlet (bottom port).
- Connect a third insulated hose from the chiller's outlet (top port) and place the open end into the bathtub.
- Place the submersible pump fully into the water inside the bathtub.
- Ensure all connections are secure and tightened with hose clamps.
Vídeo 2: Detailed instructions on setting up the chiller with a submersible pump for a home bathtub.
3.3 Initial Water Circulation Check
After connecting all hoses and placing the pump (if applicable) in the water:
- Ensure the air release valve on top of the filter is closed.
- Plug in the chiller unit and the external pump (if separate).
- Check for proper water circulation and any leaks. Address any leaks immediately by tightening connections.
4. Instruccions de funcionament
4.1 Engegada/apagada
To power on the chiller, ensure it is plugged into a 110V power source and press the power button on the LED touch control screen. To power off, press the power button again.
4.2 Configuració de la temperatura
The chiller features an intuitive LED touch screen for easy temperature adjustment.

Vídeo 3: Instructions on how to set the desired temperature on the chiller's control panel.
Use the 'Up' and 'Down' arrows to set your desired water temperature. The chiller will automatically maintain this temperature, ensuring consistent cold therapy.
4.3 Rendiment de refrigeració
The 1/3 HP compressor efficiently cools up to 79 gallons of water down to a refreshing 41°F. For optimal performance, especially in warmer environments or with larger volumes, ensure your ice bath tub is insulated or consider adding a handful of ice cubes initially.

5. Manteniment
5.1 Manteniment del filtre
The integrated external filter system uses a PP cotton filter cartridge to trap hair, debris, and particles. Regularly inspect and clean or replace the filter cartridge to ensure clear water quality and protect the chiller's operation.

5.2 Neteja general
Keep the exterior of the chiller unit clean and free from dust. Ensure the air vents are not obstructed to allow for efficient heat dissipation.
6. Solució De Problemes
If you encounter issues with your chiller, consider the following common troubleshooting steps:
- Sense energia: Check if the power cord is securely plugged into both the chiller and a working 110V outlet. Ensure the main power switch on the back of the unit is in the 'ON' position.
- Sense refrigeració: Verify that the desired temperature is set correctly and is below the current water temperature. Ensure water is circulating properly through the system. Check if the air vents are clear.
- Fuites d'aigua: Inspect all hose connections and ensure they are tightly secured with hose clamps. Check O-rings for proper seating.
- Poor Water Circulation: Check the filter cartridge for clogs and clean or replace it if necessary. Ensure the submersible pump (if used) is fully submerged and operating.
For persistent issues, please refer to the warranty and support information.
7. Especificacions
| Característica | Detall |
|---|---|
| Color | Negre |
| Material | Acer inoxidable |
| Capacitat | 79 galons |
| Marca | Poafamx |
| Dimensions del producte | 11.4 "P x 12.8" W x 11.6" H |
| Estil | Tradicional |
| Tipus d'instal·lació | Autònom |
| Classificació de temperatura superior | 122 graus Fahrenheit |
| Font d'alimentació | Elèctric amb cable |
| Classificació de temperatura més baixa | 36 graus Fahrenheit |
| Fabricant | Poafamx |
| Pes de l'article | 41.2 lliures |
| Número de model de l'article | LG-300 |
8. Garantia i Suport
Your Poafamx Water Chiller is backed by a reliable 1-year warranty. For any questions, technical assistance, or warranty claims, please contact Poafamx customer support. Refer to the contact information provided in your product packaging or visit the official Poafamx website for dedicated support.


