1. Introducció
Thank you for choosing the RAINPOINT Sprinkler Timer with 4 Outlets and 25ft Soaker Hose. This product is designed to automate your garden watering, providing efficient and precise irrigation for various plants and landscapes. Please read this manual carefully before installation and operation to ensure proper use and longevity of your device.

Image: The RAINPOINT Sprinkler Timer and the included 25ft Soaker Hose.
2. Característiques del producte
- 4 Individual Programmable Zones: Allows for independent watering schedules for up to four different areas.
- 3 Timed Watering Cycle Modes: Offers flexible scheduling options to suit various plant needs and weather conditions.
- Water Saving Design: The included 25ft soaker hose is designed to save up to 80% water by delivering it directly to the plant roots.
- DIY Irrigation System: Provides components for creating a customized and efficient watering setup.
- Large LCD & Dial: Features an easy-to-read display and intuitive dial for straightforward setup and programming.
3. Contingut del paquet
Si us plau, comproveu el contingut del paquet per assegurar-vos que hi hagi tots els elements:
- RAINPOINT 4-Outlet Sprinkler Timer
- 25ft Flat Soaker Hose
- Manual d'usuari (aquest document)
- Required connectors and adapters for installation
4. Informació de seguretat
Per garantir un funcionament segur i evitar danys, tingueu en compte el següent:
- No submergiu el temporitzador a l'aigua.
- Use only fresh alkaline batteries of the specified type (typically AA, not included).
- Protegiu el temporitzador de les temperatures de congelació. Traieu les piles i guardeu-lo a l'interior durant l'hivern.
- Assegureu-vos que totes les connexions estiguin ajustades per evitar fuites.
- Mantenir fora de l'abast dels nens.
5. Configuració
5.1 Instal·lació de la bateria
- Localitza el compartiment de les piles a la part posterior del temporitzador.
- Obriu la tapa de la bateria.
- Insert new alkaline batteries (e.g., 4 x AA batteries) according to the polarity indicators (+/-).
- Close the battery cover securely to ensure a watertight seal.
5.2 Connecting the Timer to the Faucet
- Assegureu-vos que l'aixeta estigui tancada.
- Enrosqueu el connector d'entrada del temporitzador a l'aixeta exterior. Estrenyeu-lo només a mà. No l'estrenyeu massa.
- Ensure the rubber washer is properly seated in the connector to prevent leaks.

Image: The sprinkler timer attached to an outdoor faucet, showing its dimensions and display.
5.3 Connecting Hoses to Outlets
- Connect your garden hoses or the included soaker hose to the four individual outlets at the bottom of the timer.
- Ensure each connection is secure to prevent leaks.
5.4 Initial Clock Setting
- Gireu el dial a "CONFIGURAR RELLOTGE".
- Feu servir els botons '+' i '-' per ajustar l'hora actual.
- Press 'OK' to confirm and move to the next setting (e.g., AM/PM).
- Once the clock is set, turn the dial to 'ON' to return to the main screen.
6. Instruccions de funcionament
6.1 Programació de zones de reg
The timer features four independent zones (1, 2, 3, 4) that can be programmed individually.

Image: The sprinkler timer mounted on a wall, illustrating its four programmable outlets and how they can water different zones.
- Turn the dial to 'START TIME'. Use the 'ZONE' button to select the zone you wish to program (1, 2, 3, or 4).
- Adjust the desired start time using '+' and '-' buttons. Press 'OK' to confirm.
- Turn the dial to 'HOW LONG'. Select the zone and set the watering duration (e.g., minutes, hours). Press 'OK'.
- Turn the dial to 'HOW OFTEN'. Select the zone and set the watering frequency (e.g., every X hours, every X days). Press 'OK'.
- Repeat for each zone as needed.
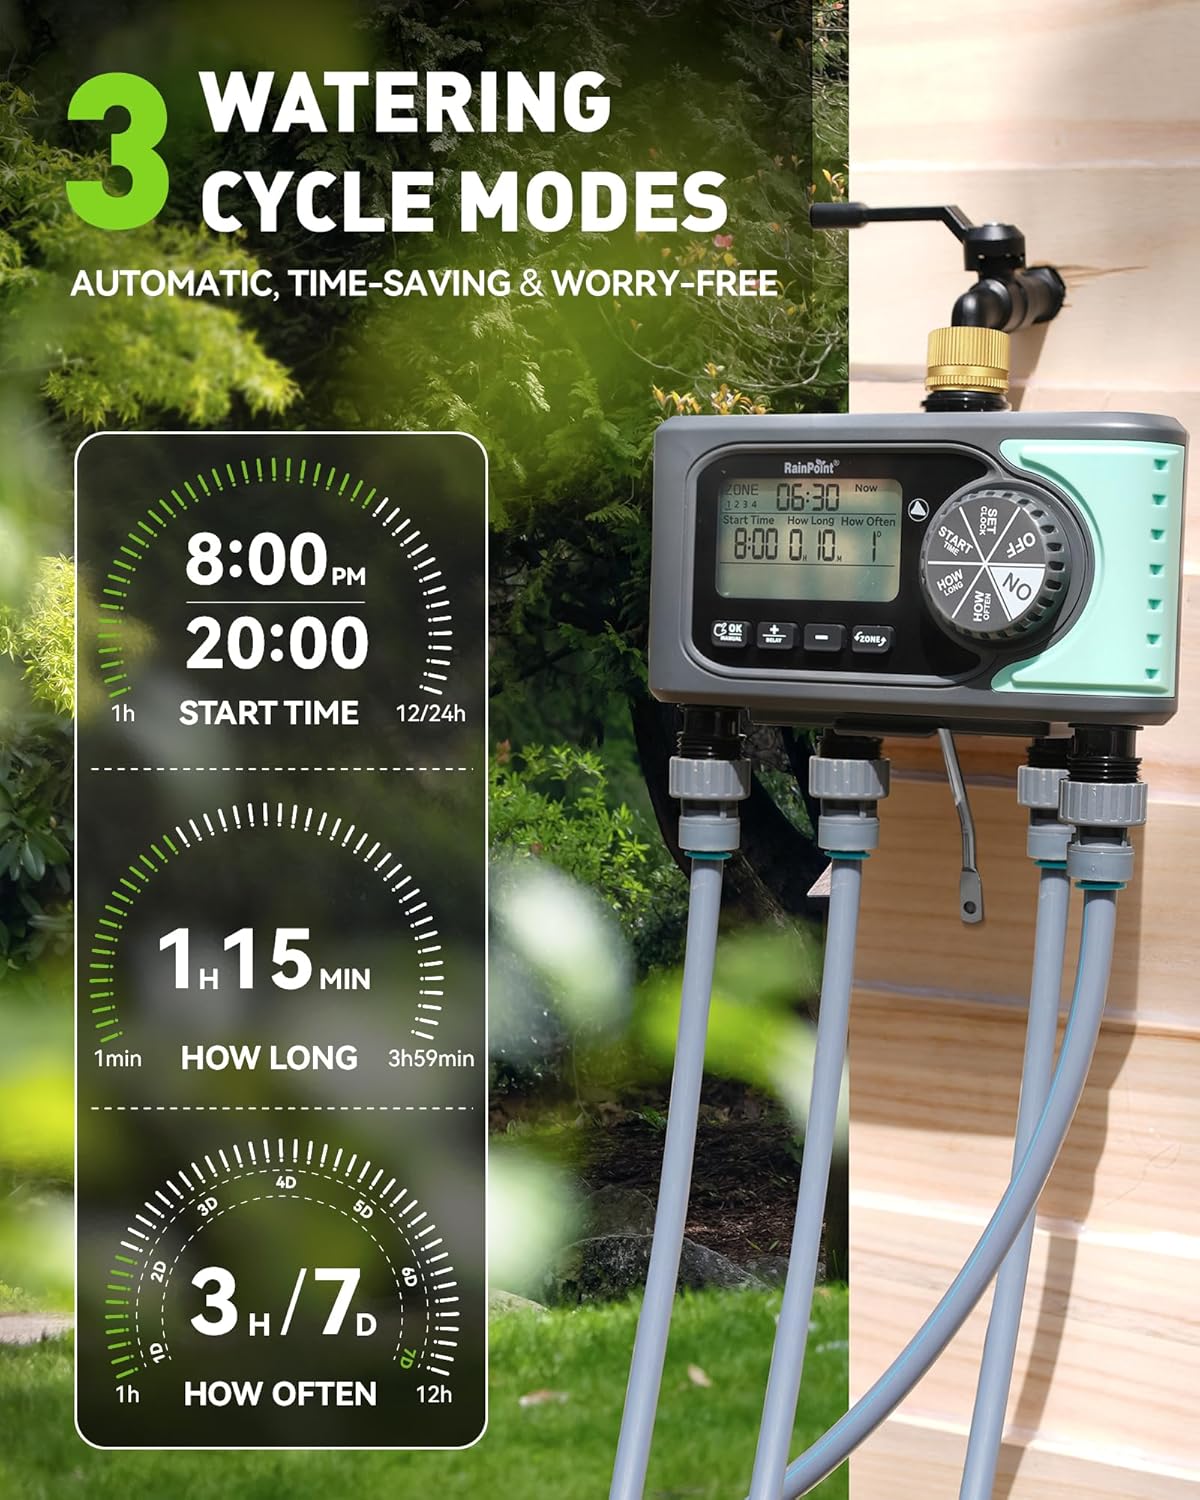
Image: The sprinkler timer displaying its three watering cycle modes: Start Time, How Long, and How Often, with examples of settings.
6.2 Reg manual
Per regar manualment sense afectar la programació:
- Turn the dial to 'ON'.
- Press the 'MANUAL' button.
- Use the 'ZONE' button to select the zone(s) you wish to water manually (e.g., Zone 1, Zone 2, Zone 3, Zone 4, or ALL).
- Use '+' and '-' buttons to set the desired manual watering duration.
- Press 'OK' to start manual watering. The timer will automatically revert to its programmed schedule after the manual watering is complete.

Image: The sprinkler timer displaying manual watering options, including setting duration and selecting specific zones or all zones.
6.3 Funció de retard
The delay function allows you to pause your watering schedule for a set period, useful during rain or when you need to perform garden tasks.
- Turn the dial to 'ON'.
- Press the 'DELAY' button.
- Use '+' and '-' buttons to set the desired delay duration (e.g., 24 hours, 48 hours).
- Press 'OK' to activate the delay. The timer will resume its programmed schedule after the delay period ends.
6.4 Desactivació del temporitzador
To stop all watering and turn off the timer, simply turn the dial to 'OFF'.
7. Soaker Hose Usage
The included 25ft flat soaker hose is designed for efficient, targeted watering, reducing water waste.

Image: Close-up of the soaker hose with water droplets, illustrating its water-saving capability by delivering water directly to the roots.
7.1 Placement and Configuration
The soaker hose can be laid out in various configurations to suit your garden layout:
- Circle Around Plants: Ideal for individual plants, shrubs, or trees. Lay the hose in a circle around the base of the plant.
- S-shape or Straight Lines: Suitable for rows of vegetables, flower beds, or hedges. Weave the hose through the plants or lay it in straight lines.

Imatge: Examples of soaker hose layouts, including a circular arrangement around a tree and an S-shape layout in a garden bed, demonstrating its versatility.
7.2 Water Pressure Recommendation
For optimal performance and longevity of the soaker hose, maintain water pressure between 30-40 PSI. Excessive pressure (above 60 PSI) can damage the hose and lead to inefficient watering.

Image: A soaker hose in a garden setting, with an overlay indicating the recommended water pressure range of 30-40 PSI and a warning against pressure exceeding 60 PSI.
8. Manteniment
8.1 Neteja
Periodically check the filter washer at the timer's inlet for debris. Clean it by rinsing under running water. Do not use harsh chemicals or abrasive materials on the timer or hose.
8.2 Substitució de la bateria
Replace batteries when the low battery indicator appears on the display or if the timer's functions become erratic. Always use new alkaline batteries.
8.3 Hivernització
Before the first frost, disconnect the timer from the faucet and hoses. Remove the batteries. Store the timer and soaker hose indoors in a dry, protected area to prevent damage from freezing temperatures.
9. Solució De Problemes
| Problema | Causa possible | Solució |
|---|---|---|
| El temporitzador no rega | Low batteries; Faucet off; Incorrect programming; Filter clogged. | Replace batteries; Turn on faucet; Check programming; Clean filter. |
| Fuita d'aigua per les connexions | Loose connections; Missing/damaged washer. | Tighten connections; Replace washer. |
| La pantalla està en blanc o tènue | Bateries esgotades. | Substituïu les piles. |
| Soaker hose not dripping evenly | Insufficient water pressure; Kink in hose. | Check water pressure (aim for 30-40 PSI); Straighten hose. |
10. Especificacions
- Model: B0F6XNLFM1
- Punts de venda: 4 Independents
- Font d'alimentació: Piles (tipus no especificat, normalment AA)
- Interval de pressió d'aigua: 30-40 PSI (recommended for soaker hose)
- Soaker Hose Length: 25 peus
11. Garantia i Suport
RAINPOINT products are manufactured to high-quality standards. For warranty information, technical support, or assistance with your product, please refer to the contact information provided on the product packaging or visit the official RAINPOINT weblloc web. Si us plau, conserveu el comprovant de compra per a reclamacions de garantia.


