1. Introducció
The Awgem SH2 Handheld Battery Spot Welder is a portable and efficient tool designed for precise spot welding of various battery types and metal sheets. Its integrated ergonomic design allows for one-handed operation, making it suitable for DIY projects, battery pack maintenance, and other detailed welding tasks. The device features an LCD screen for real-time display of welding parameters and supports both automatic and manual welding modes.
2. Informació de seguretat
Llegiu totes les advertències i instruccions de seguretat abans d'utilitzar aquest producte.
- Always wear appropriate personal protective equipment, including safety glasses, during operation.
- Assegureu-vos que l'àrea de treball estigui ben ventilada i lliure de materials inflamables.
- Do not operate the spot welder near water or in damp condicions.
- Keep hands and fingers away from the welding pins during operation to prevent injury.
- Avoid touching the welding pins immediately after use, as they may be hot.
- Do not attempt to weld materials thicker than recommended specifications.
- If the device displays a temperature warning (≥65℃), allow it to cool down before further use.
- Si la bateria voltage is below 3.2V, a red light alarm will activate, and welding will be cut off. Recharge the device promptly.
- Guardeu el dispositiu en un lloc sec i segur, lluny dels nens.
3. Contingut del paquet
Verifiqueu que tots els elements siguin presents al paquet:
- Awgem SH2 Handheld Mini Spot Welder (1 unit)
- CuO-Al Welding Needles (2 pairs, including those pre-installed)
- Nickel-Plated Strip (2 meters)
- Cable de càrrega tipus C (1 unitat)
- Sandpaper (1 sheet)
- Manual d'usuari (1 unitat)

Figure 3.1: Awgem SH2 Handheld Battery Spot Welder with its accessories, including the welder unit, charging cable, nickel strip, sandpaper, and spare welding needles.
4. Producte acabatview
The Awgem SH2 features an integrated design for ease of use and a clear LCD screen for monitoring operations.

Figure 4.1: Labeled diagram of the Awgem SH2 Spot Welder, highlighting the display, gear adjustment button, Type-C input interface, ON/OFF/Manual mode button, and spot welding pins with adjustable tip spacing (0.5-3mm).
4.1 LCD Screen Display Functions

Figura 4.2: Detallada view of the LCD screen, showing indicators for battery level, charging, temperature abnormal icon, welding mode (Auto/Manual), trigger and preheat setting unit (seconds/milliseconds), temperature unit (°C), preheating output, welding output gear, welding output trigger time, and internal temperature.
- Battery Level and Charging Icon: Indicates current battery charge and charging status.
- Temperature Abnormal Icon: Alerts if the internal temperature exceeds safe operating limits.
- Welding Mode (A/M): Displays whether the device is in Automatic (A) or Manual (M) welding mode.
- Trigger and Preheat Setting Unit (S/MS): Shows the unit for trigger and preheat times (seconds or milliseconds).
- Temperature Unit (°C): Indicates the temperature unit.
- Preescalfament: Displays the preheating output setting.
- Engranatge: Shows the current welding output gear (power level).
- Activador: Displays the welding output trigger time.
- Temp: Shows the internal temperature of the spot welding machine.
5. Configuració i ús inicial
5.1 Càrrega del dispositiu
Before first use, fully charge the spot welder using the provided Type-C charging cable. Connect the cable to the Type-C input interface on the device and a suitable USB power source. The battery icon on the LCD screen will indicate charging status.
5.2 Encès/Apagat
To power on or off the device, press and hold the ON/OFF/Option Toggle Key (located near the Type-C port) for 2 seconds.
5.3 Adjusting Welding Pin Spacing
The welding pins can be adjusted to suit different welding requirements. Use a small screwdriver to loosen the fixing screws on both sides of the welding pins. Adjust the pin spacing as needed (0.5mm to 3mm), then tighten the screws to secure the pins.
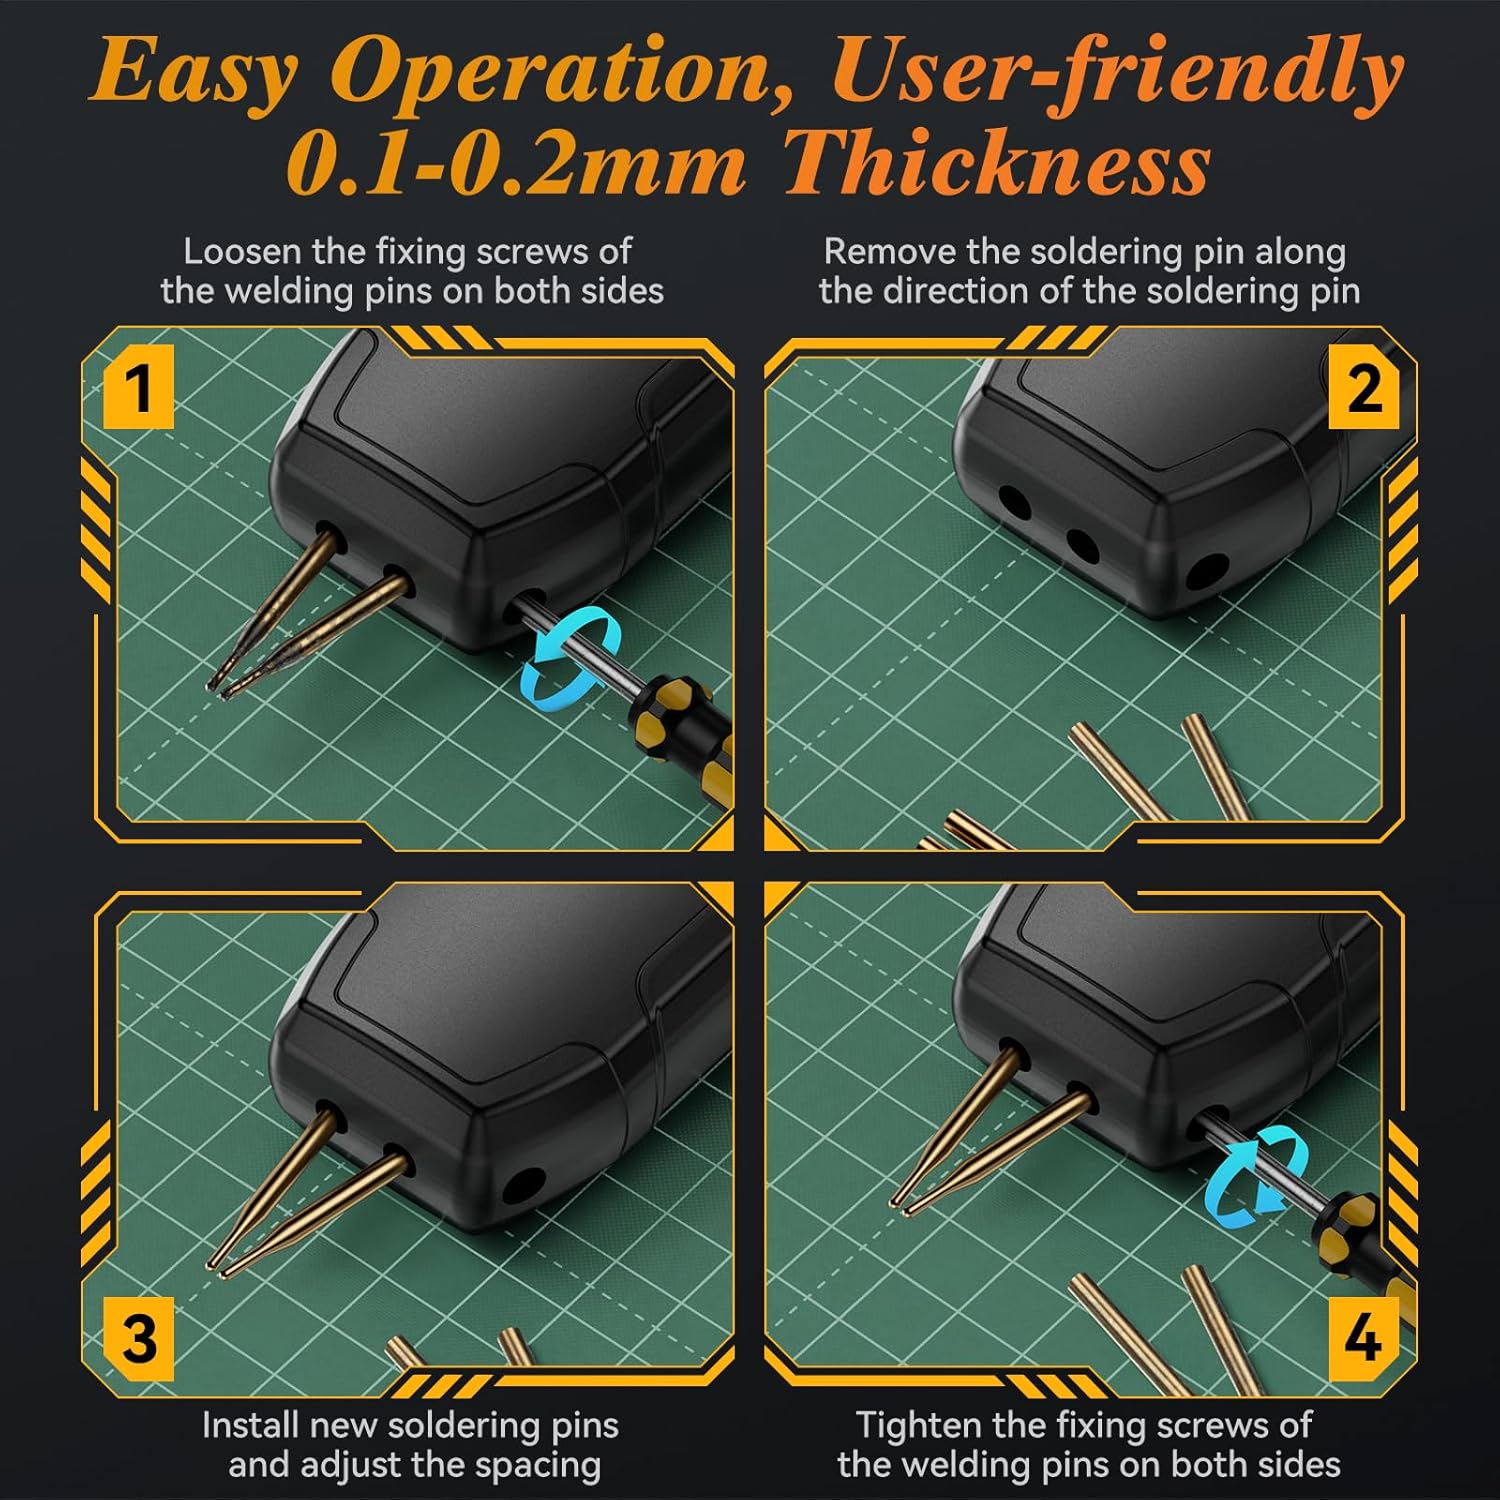
Figure 5.1: Step-by-step guide for loosening screws, removing old pins, installing new pins, and tightening screws to adjust welding pin spacing.
6. Instruccions de funcionament
6.1 Selecting Welding Mode (Auto/Manual)
The Awgem SH2 supports both automatic and manual welding modes. To switch between modes, press and hold the Manual Welding Key (the circular button on the front of the device) for 2 seconds. The LCD screen will display 'A' for Automatic mode or 'M' for Manual mode.
6.2 Adjusting Welding Gear (Power Level)
The device offers 99 adjustable gears (power levels) to accommodate various material thicknesses. Short press the Adjustment Key (located on the top, next to the ON/OFF button) to cycle through parameters. Press and hold the Adjustment Key to toggle between integer and decimal values for fine-tuning the gear setting.
Video 6.1: Demonstration of the Awgem SH2 Handheld Spot Welder in use, showing automatic and manual welding modes, gear adjustment, and pin spacing adjustment. This video illustrates the device's functionality for welding nickel-plated strips to batteries and other small metal components.
6.3 Procés de soldadura
Follow these general steps for effective spot welding:
- Preparació de superfícies: Ensure the nickel strip and battery terminals are clean and free of oxidation. Use the provided sandpaper if necessary.
- Materials de la posició: Place the nickel strip firmly against the battery terminal or other material to be welded.
- Apply Welder: Position the welding pins at a 45°-60° angle to the surface, ensuring both pins make firm contact with the nickel strip.
- Iniciar la soldadura:
- In Mode automàtic, the device will detect contact and automatically trigger the weld after a short delay.
- In Mode manual, press the Manual Welding Key to initiate the weld.
- Inspeccionar la soldadura: After welding, gently test the connection to ensure a strong bond. Adjust the gear setting if the weld is too weak or too strong.

Figure 6.1: Visual guide to operating the spot welder, including powering on, adjusting gear, selecting mode, and performing a weld at the recommended angle.
6.4 Compatibilitat de materials
The Awgem SH2 is designed for welding various materials within specified thicknesses:
- Nickel Plating: Up to 0.25mm (MAX)
- Iron Sheet: Up to 0.2mm (MAX)
- Steel Sheet: Up to 0.2mm (MAX)
- Pure Nickel Sheet: Up to 0.15mm (MAX)

Figure 6.2: Illustration of the maximum thickness for different materials compatible with the Awgem SH2 spot welder.
The device is suitable for cylindrical batteries (e.g., 18650, 26650, 36650), mobile phone batteries, and other electronic devices requiring battery connections.
7. Manteniment
7.1 Neteja
Regularly clean the welding pins and the device body to ensure optimal performance. Use a soft, dry cloth. Do not use abrasive cleaners or solvents.
7.2 Replacing Welding Pins
Over time, welding pins may wear down. Replace them when they become dull or damaged to maintain welding quality. Refer to Section 5.3 for instructions on adjusting and replacing pins.
7.3 Emmagatzematge
When not in use, store the spot welder in its original packaging or a protective case in a cool, dry place.
8. Solució De Problemes
| Problema | Causa possible | Solució |
|---|---|---|
| No weld or weak weld |
|
|
| Overheating warning (≥65℃) | Ús prolongat i continuat | Deixeu que el dispositiu es refredi abans de reprendre el funcionament. |
| Red light alarm / Welding cut off | Bateria voltage per sota de 3.2V | Recarregueu el dispositiu immediatament. |
| El dispositiu no s'encén |
|
|
9. Especificacions
| Característica | Detall |
|---|---|
| Número de model | SH2 |
| Fabricant | Awgem |
| Pes de l'article | 8.4 unces |
| Dimensions del producte | 0.6 x 1.5 x 6 polzades |
| Font d'alimentació | Funciona amb bateria |
| Tipus de bateria | Polímer de liti (1 inclòs) |
| Material | Plàstic (habitatge) |
| Welding Gear | 99 engranatges ajustables |
| Max Welding Thickness (Nickel-Plated) | 0.25 mm |
| Max Welding Thickness (Iron/Steel) | 0.2 mm |
| Max Welding Thickness (Pure Nickel) | 0.15 mm |
| Característiques de seguretat | Vol baixtage alarm (<3.2V), Over-temperature warning (≥65℃) |
10. Garantia i Suport
For warranty information and customer support, please refer to the contact details provided with your purchase or visit the official Awgem weblloc web. Conserveu el rebut de compra com a comprovant de compra per a reclamacions de garantia.
Fabricant: Awgem
Weblloc: Awgem Store on Amazon


