1. Introducció
This manual provides detailed instructions for the installation, operation, and maintenance of your AINAVI 10.25 inch Touch Screen Multimedia System for Audi Q5 (2009-2017). Please read this manual thoroughly before installation and use to ensure proper functionality and safety.
2. Informació de seguretat
- Desconnecteu sempre la bateria del vehicle abans de realitzar qualsevol treball elèctric.
- Ensure all connections are secure to prevent short circuits or malfunctions.
- Do not attempt to modify the device or its components. Unauthorized modifications can void the warranty and pose safety risks.
- Consulteu un professional si teniu dubtes sobre algun dels passos d'instal·lació.
- Avoid performing software updates over the air (OTA) as this may lead to system bricking. Use hardline updates via USB if available and instructed by technical support.
3. Compatibilitat
This multimedia system is exclusively designed for Audi Q5 models manufactured between 2009 and 2017, specifically those equipped with the original Audi multimedia radio system.
Important: Aquesta unitat és NO compatible with Audi Concert or Audi Symphony original radio systems. Please verify your car's original system before installation.
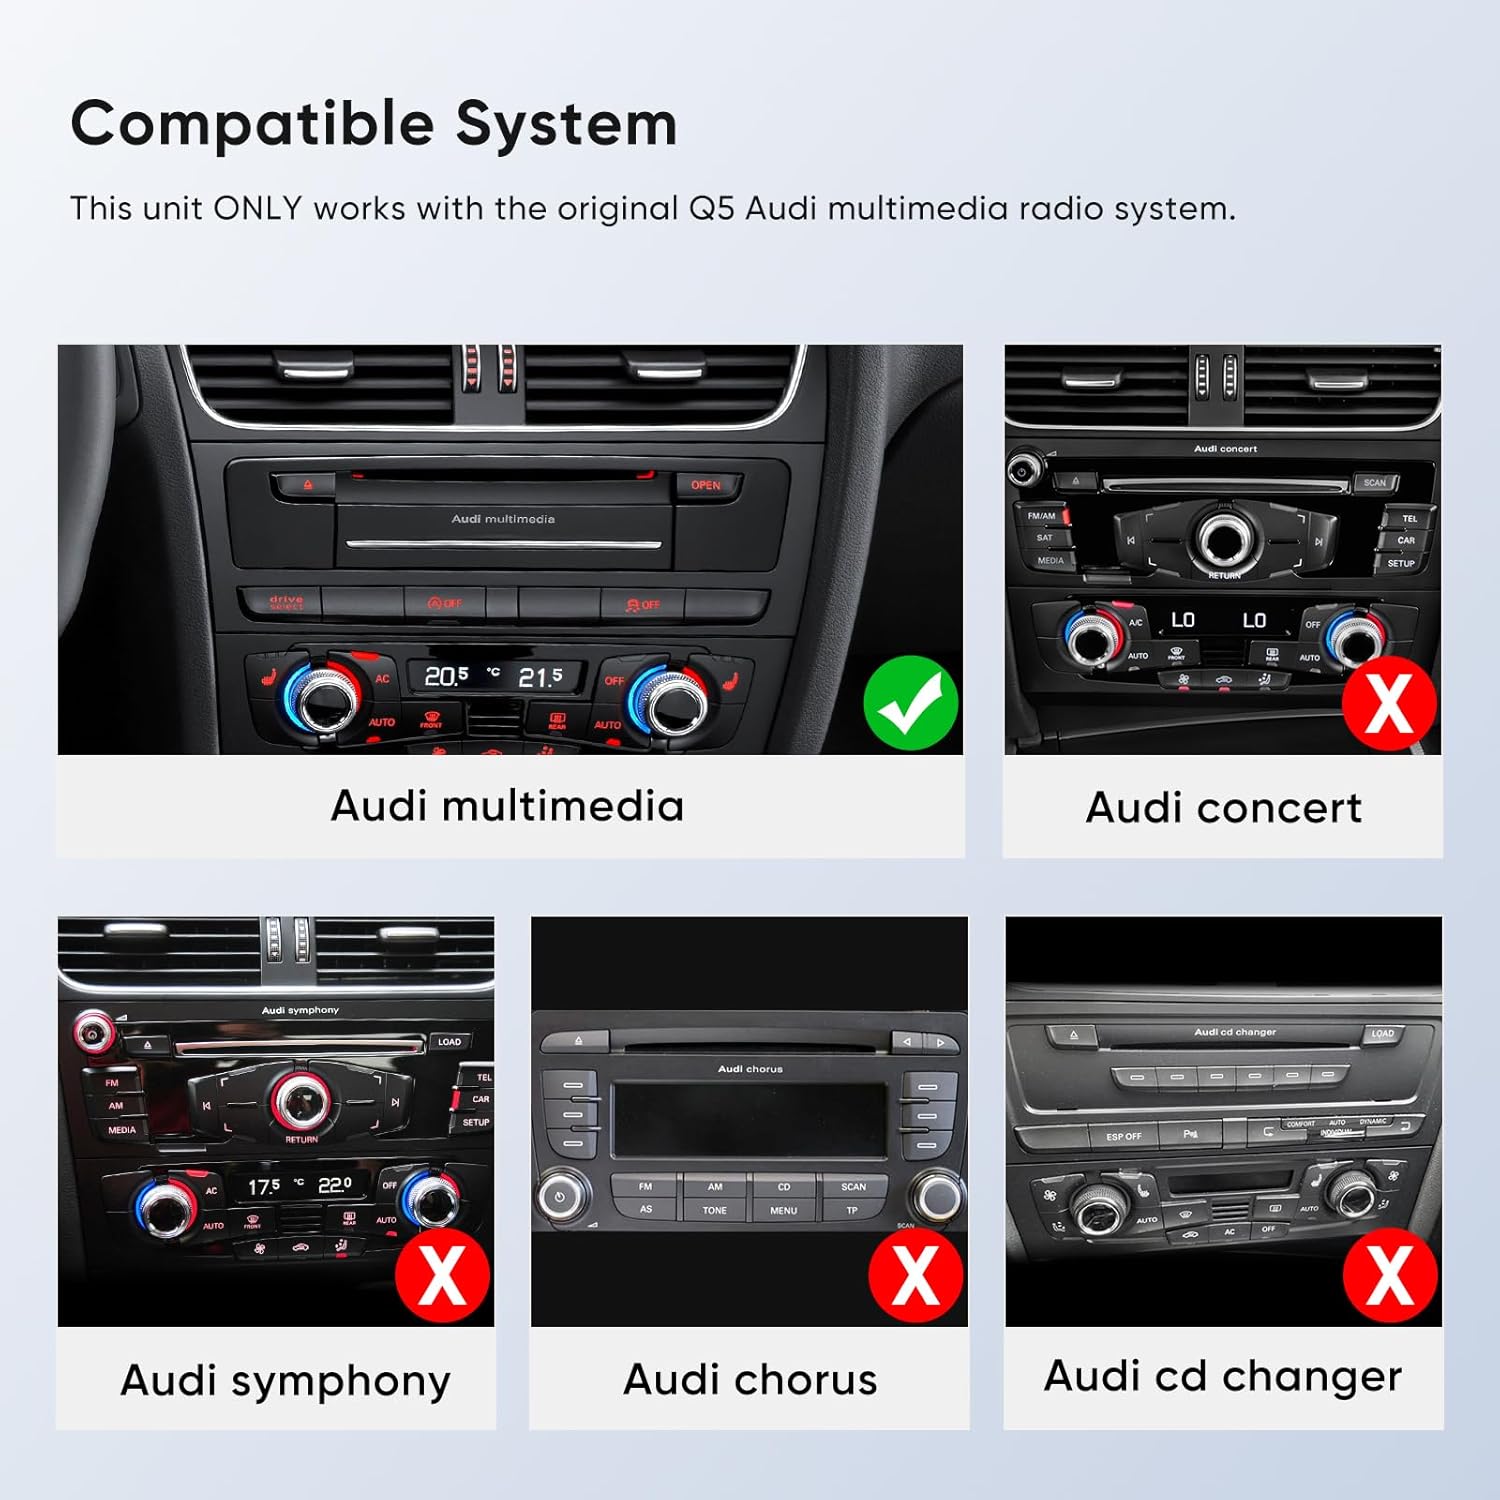
Descripció de la imatge: A visual guide illustrating compatible and incompatible Audi radio systems. The "Audi multimedia" system is marked with a green check, while "Audi concert," "Audi symphony," "Audi chorus," and "Audi CD changer" systems are marked with a red 'X', indicating incompatibility.
4. Contingut del paquet
Si us plau, assegureu-vos que tots els elements següents estiguin inclosos al vostre paquet:
- 10.25" Head Unit (1x)
- ISO Wiring Harness Cable (1x)
- Installation Frame (1x)
- LVDS Cable (1x)
- Metal Bracket (1x)
- Cargols (8x)
- 24 Hours Engineer Customer Support (Service)

Descripció de la imatge: A visual representation of all components included in the product package, such as the 10.25-inch head unit, ISO wiring harness, LVDS cable, metal bracket, and screws.
5. Configuració i instal·lació
Follow these steps carefully for proper installation. It is recommended to watch the installation video for a visual guide.
5.1. Guia de vídeo d'instal·lació
Descripció del vídeo: A detailed video guide demonstrating the step-by-step installation process of the AINAVI Touchscreen CarPlay Auto system into an Audi vehicle. This video covers removal of existing components, wiring, and reassembly.
5.2. Instal·lació pas a pas
- Elimina la placa frontal: Use a pry tool to carefully remove the original faceplate surrounding the display. Disconnect the cable on the right side of the faceplate.
- Elimina la pantalla original: Use a T20 screwdriver to remove the four screws securing the original display. Unplug the display screen connection cable by holding the buckle and gently wiggling it.
- Access Passenger Side Panel: Remove the side cover on the passenger side of the dashboard. Use an 8mm socket to remove the screws securing this panel.
- Remove CD Player: Use a special tool (radio removal keys) to pull out the original CD player from the glove box. Unplug all cables from the back of the CD player.
- Remove Storage Box: Use an 8mm socket tool to remove the screws inside and at the bottom of the storage box to fully remove it. Unplug the storage box connection cable.
- Connecteu l'arnès d'alimentació: Connect the main power cable from the original host panel to the provided adapter cable. Then, insert the adapter cable into the device's power interface.
- Cables de ruta: Thread the main power harness from the host compartment and out from under the passenger side. Leave the USB cable outside for easy access. Thread other cables back into the radio compartment from under the passenger side.
- Connect Gateway Plug: Press the buckle to unplug the original car gateway plug (often red) and connect the adapter plug. Plug the other end of the adapter cable back into the original car gateway plug.
- Install CD Player: Plug the CD player plug tightly and reinstall it. Nota: If the CD player host is not plugged in and installed tightly, the original car information may not be displayed.
- Install Storage Box: Use an 8mm socket tool to install the bottom screws of the storage box.
- Prepare for New Display: Expose the three required cables. Two of these cables should pass through the cover plate.
- Install Iron Cover Plate: Install the iron cover plate. Ensure the protruding side faces outwards and the double-hole side faces upwards. Tighten the four fixing screws.
- Airbag Light Switch: When installing the decorative faceplate, check if your car has the original car airbag light.
- If the original car has an airbag light, turn the switch on the small circuit board to the ON posició.
- If the original car does not have an airbag light, turn the switch to the OFF position (the other side).

Descripció de la imatge: A comparison image showing the Audi Q5 dashboard before and after the installation of the 10.25-inch multimedia screen, highlighting the visual upgrade.
- Connecta una nova pantalla: Connect the cables from the new display to the corresponding holes.
- Instal·la una nova pantalla: Insert and install the device on-site according to the corresponding holes. Install and fix it from top to bottom.
6. Instruccions de funcionament
6.1. Wireless CarPlay and Wired Android Auto
The system supports both wireless CarPlay and wired Android Auto, allowing seamless integration with your smartphone.
- CarPlay sense fil: Connect your iPhone wirelessly via Bluetooth to access GPS navigation, make calls, send/receive messages, and listen to music.
- Android Auto per cable: Connect your Android phone via a USB cable to use similar functionalities.

Descripció de la imatge: The 10.25-inch touch screen displaying the Apple CarPlay interface, showing icons for Phone, Music, Maps, Messages, Now Playing, Car, Podcasts, Audiobooks, Calendar, and Settings.
6.2. Funcionalitat Bluetooth
The system features Bluetooth v2.1 + EDR and v4.1 Low Energy (LE) for enhanced transmission rate and effective working distance. It supports audio streaming, automatic phone book transfer, and hands-free calls.
Important: When using CarPlay, ensure no device is connected to the Audi original Bluetooth system to avoid conflicts.
Descripció del vídeo: A video demonstrating how to connect the original car's Bluetooth to resolve audio issues for the Q5 multimedia system, ensuring proper sound output.
6.3. Retaining Original Functions
The system operates with dual systems, retaining all original car CD system functions while adding Linux system features. This includes compatibility with:
- iDrive Knob control
- Original Bluetooth
- Ràdio original
- OEM rear camera
- Sistema de radar
- Comandaments al volant

Descripció de la imatge: A collage of images highlighting the retained original Audi Q5 functions after the multimedia system upgrade, such as steering wheel controls, radio, ampamplificador, reproductor de CD, Bluetooth i càmera de marxa enrere.
6.4. HD Touch Screen and AHD Backup Camera
The 10.25-inch, 1920x720 HD QLED display offers an excellent visual experience. The Linux screen supports AHD 720P backup cameras, providing a clearer image than CVBS cameras.

Descripció de la imatge: The 10.25-inch screen displaying a clear view from a reverse camera, complete with parking guidelines, demonstrating its compatibility with factory reverse view càmeres.
6.5. Control de veu intel·ligent
Once connected to CarPlay or Android Auto, Siri and Google Assistant can be activated by simply saying "Hey Siri" and "Hey Google" or by touching the microphone button. This allows for hands-free navigation, calls, messages, and music control.

Descripció de la imatge: A graphic demonstrating the voice control capabilities of the system, showing both CarPlay and Android Auto interfaces with examples of voice commands for navigation, calls, and music.
7. Solució De Problemes
7.1. No Sound Through AUX/AMI
If you experience no sound through the AUX or AMI cables:
- Go to the system settings on the new display.
- Navega a Sistema, doncs Fàbrica (password: 8866).
- Find the "CPAA voice-grade channel" (or similar function) and ensure it is set to Telèfon, no Cotxe. The device will restart after this change.
- After restart, connect your phone's Bluetooth to the original car's Bluetooth (e.g., "Audi MMI 6821"). Confirm pairing on both devices.
- If the original car has an AMI port and there is still no sound, check if the AMI cable is connected to the AMI port. If so, unplug the AMI cable and try again.
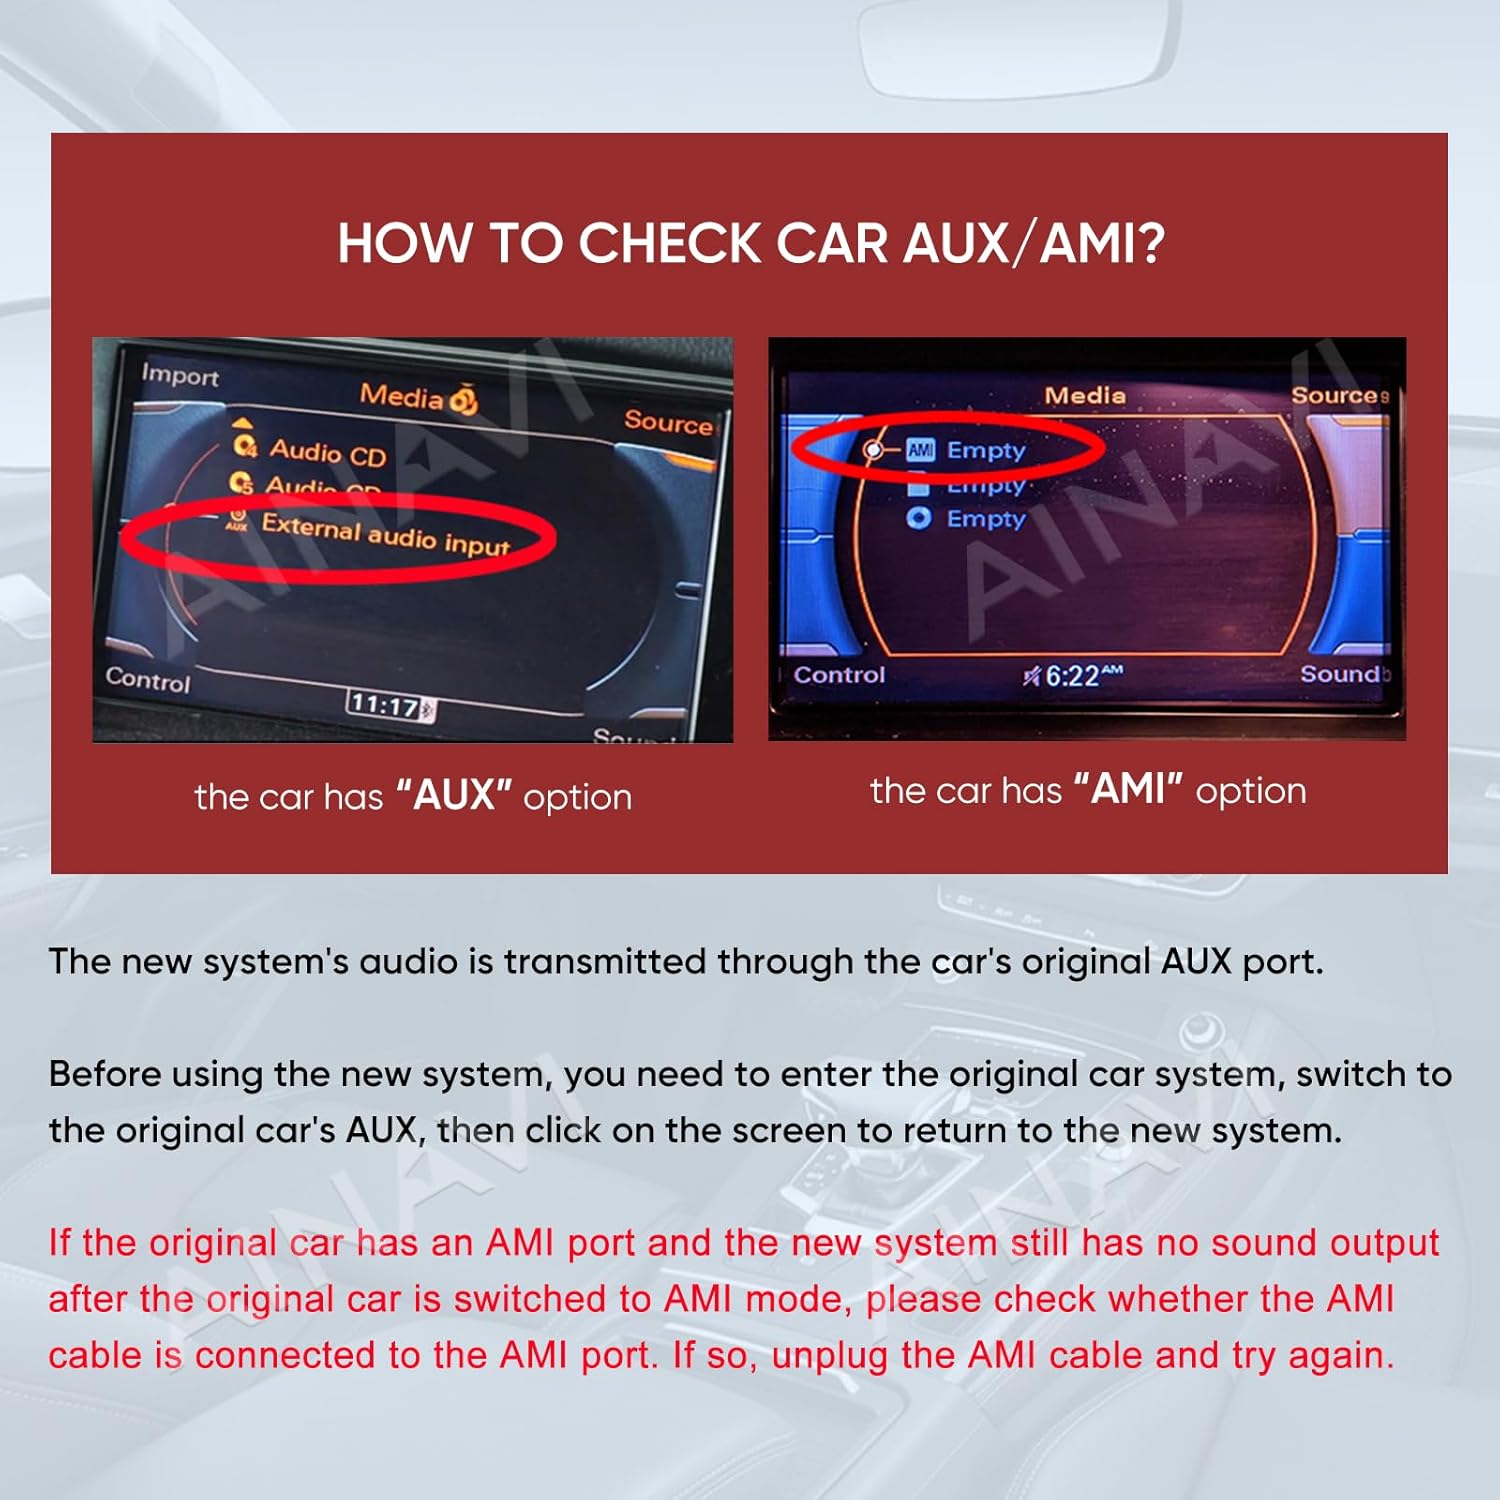
Descripció de la imatge: A guide on how to check for AUX or AMI options in the original car system, with instructions on how to resolve sound issues if the AMI cable is incorrectly connected.
7.2. Blurry Screen or Abnormal Display
If the screen appears blurry or the display is abnormal after installation:
- Tap on the main menu "Original Car".
- If the display is abnormal, tap the small gray floating icon on the right side of the screen.
- Select your original car screen size to display normally (e.g., Q5 High Configuration: 800*480).
- Tap "OK" to save and normalize the display.
Descripció de la imatge: A screenshot of the system settings, demonstrating how to adjust the screen resolution to correct blurry or abnormal display issues, with a focus on the 800x480 setting for Audi Q5 High Configuration.
7.3. Original Car Information Not Displayed
Ensure the original CD player host is plugged in and installed tightly. If it is loose or not properly connected, the original car information will not be displayed on the new screen.
7.4. Over-The-Air (OTA) Updates
WARNING: Do not connect the device to Wi-Fi and perform Over-The-Air (OTA) updates. OTA updates may brick the device. Use USB for hardline updates if available and instructed by technical support.
8. Especificacions
| Característica | Detall |
|---|---|
| Número de model | Linux Q5 Multimedia |
| Mida de la pantalla | 10.25 polzades |
| Sistema operatiu | Linux |
| Resolució | QLED HD de 1920 x 720 |
| Connectivitat | Wireless/Wired CarPlay & Android Auto, Bluetooth v2.1 + EDR, v4.1 LE |
| Comandament de veu | Microphone, Touchscreen (Siri, Google Assistant) |
| Suport de càmera de seguretat | AHD 720P |
| Mode de sortida d'àudio | estèreo |
| Pes de l'article | 14.1 unces (400 grams) |
| Dimensions del paquet | 16.22 x 8.78 x 7.05 polzades |
9. Informació de la garantia
This AINAVI multimedia system comes with a 12 mesos de garantia from the date of purchase. Please retain your proof of purchase for warranty claims. The warranty covers manufacturing defects and malfunctions under normal use. It does not cover damage caused by improper installation, misuse, accidents, or unauthorized modifications.
10. Suport tècnic
Our professional technical support team is available to assist you with installation and any operational questions. Please reach out to us if you require assistance.
For support, please contact the seller directly through the platform where you purchased the product or refer to the contact information provided with your purchase.


