1. Introducció
This manual provides comprehensive instructions for the installation, operation, and maintenance of your PUTORSEN Quad Monitor Mount (Model: B0FLXV7B8D). This monitor mount is designed to support multiple displays, enhancing your workspace ergonomics and productivity. Please read this manual thoroughly before installation and retain it for future reference.

Imatge 1.1: acabatview of the PUTORSEN Quad Monitor Mount supporting four displays.
2. Informació de seguretat
Si us plau, observeu les següents precaucions de seguretat durant la instal·lació i l'ús:
- Do not exceed the maximum weight capacity for each arm and the top bracket. Refer to the Specifications section for details.
- Ensure the mounting surface (desk) is stable and capable of supporting the combined weight of the mount and all attached monitors.
- Verify that all screws and connections are securely tightened before use. Loose connections can lead to instability and potential damage.
- Keep children and pets away from the installation area. Small parts may pose a choking hazard.
- If you encounter any difficulties during installation, consult a qualified professional.
3. Contingut del paquet
Verify that all components are present and undamaged before proceeding with installation. If any parts are missing or damaged, contact customer support.
- Main Pole and Base Assembly
- Upper Monitor Bracket
- Lower Monitor Arms (2)
- Plaques VESA (4)
- C-Clamp Maquinari de muntatge
- Grommet Base Mounting Hardware
- Clips de gestió de cables
- Assembly Tools (Hex Keys, Wrench)
- Manual d'instruccions
4. Especificacions
| Característica | Detall |
|---|---|
| Número de model | B0FLXV7B8D |
| Marca | PUTORS |
| Upper Monitor Support | Up to 49" Ultrawide (Flat: 44 lbs / 20 kg, Curved: 30.8 lbs / 14 kg) |
| Lower Monitor Support | Three 27" monitors or two 32" monitors (15.4 lbs / 7 kg each) |
| Compatibilitat VESA | 75x75mm, 100x100mm |
| Gruix de l'escriptori (C-Cl)amp/Ullerol) | 0.39" - 1.77" (10 mm - 45 mm) |
| Alçada del pol | 800 mm (16.1") |
| Extensió completa del braç | 1322 mm (52.04") |
| Tilt (Center Bracket) | +50° / -20° |
| Tilt (Lower Arms) | ±35° |
| Giratòria | 180° |
| Rotació | 360° |
| Pes de l'article | 18.04 lliures |
| Dimensions del paquet | 17.83 x 10.04 x 7.17 polzades |
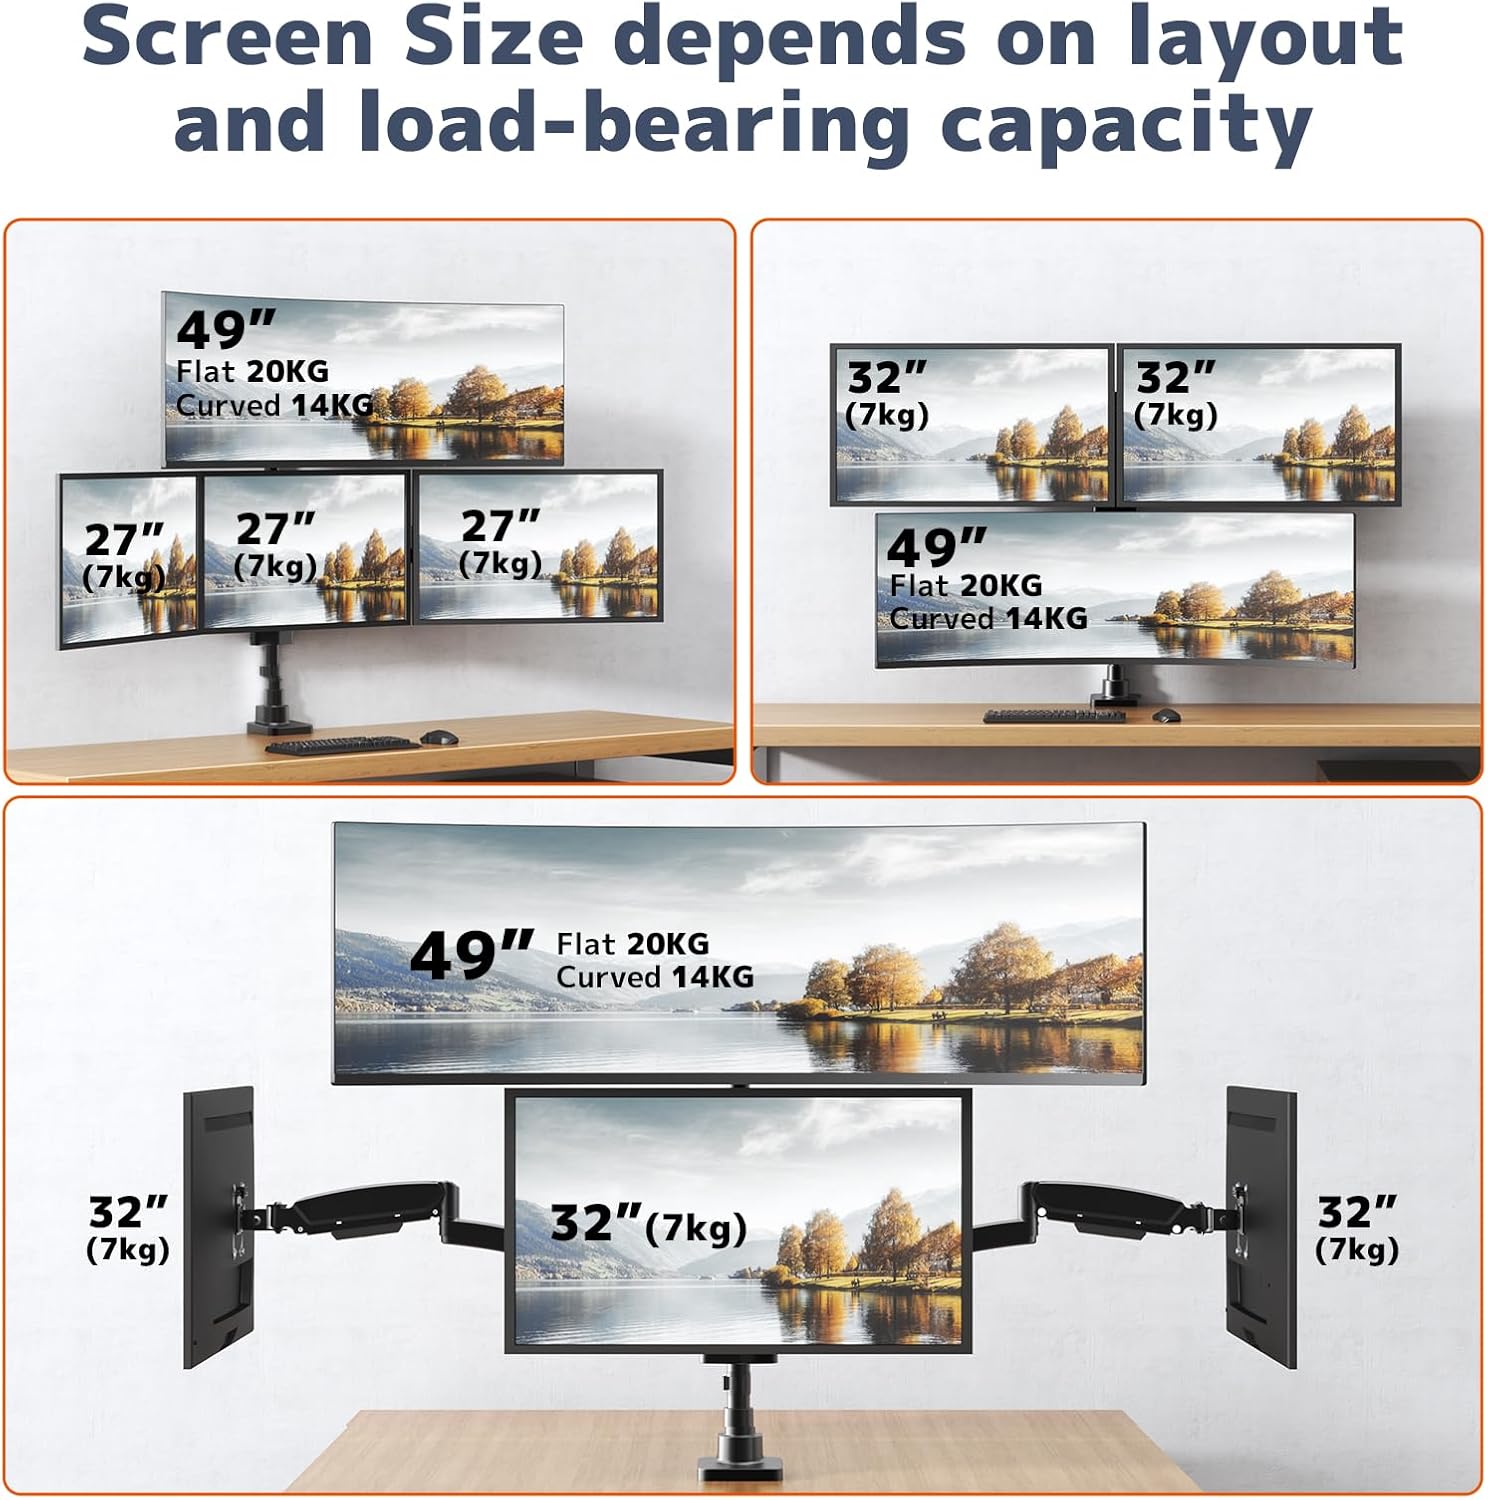
Image 4.1: Supported screen sizes and load capacities for different monitor layouts.

Image 4.2: Detailed product dimensions and articulation ranges for tilt, swivel, and rotation.
5. Configuració i instal·lació
Follow these steps to assemble and install your monitor mount:
5.1 Trieu la vostra opció de muntatge
The mount supports both C-clamp and grommet base installation. Select the option best suited for your desk.
- C-Clamp Instal·lació: Enganxeu el C-clamp to the edge of your desk. Ensure the desk thickness is between 0.39" and 1.77". Tighten the clamp de forma segura.
- Instal·lació de la base de l'oxell: If your desk has a grommet hole, use the grommet base hardware. Ensure the hole diameter and desk thickness are compatible with the provided hardware.
5.2 Assemble the Pole and Arms
- Attach the main pole to your chosen base (C-clamp o ojal).
- Slide the upper monitor bracket onto the pole and secure it at the desired height.
- Attach the two lower monitor arms to the pole, positioning them below the upper bracket.
- Assegureu-vos que totes les connexions siguin fermes.
5.3 Attach Monitors
- Attach the VESA plates to the back of each monitor using the appropriate screws.
- Carefully slide the monitors (with VESA plates attached) onto the corresponding arms/bracket until they click into place.
- Tighten any security screws on the VESA plates to prevent accidental detachment.

Image 5.1: Fully assembled monitor mount with monitors attached.
5.4 Adjusting Arm Length
The 3-section arm design allows for adjustment of arm length. If a monitor is too close or too far from the wall, you can remove one or two segments from the arm to shorten its extension.
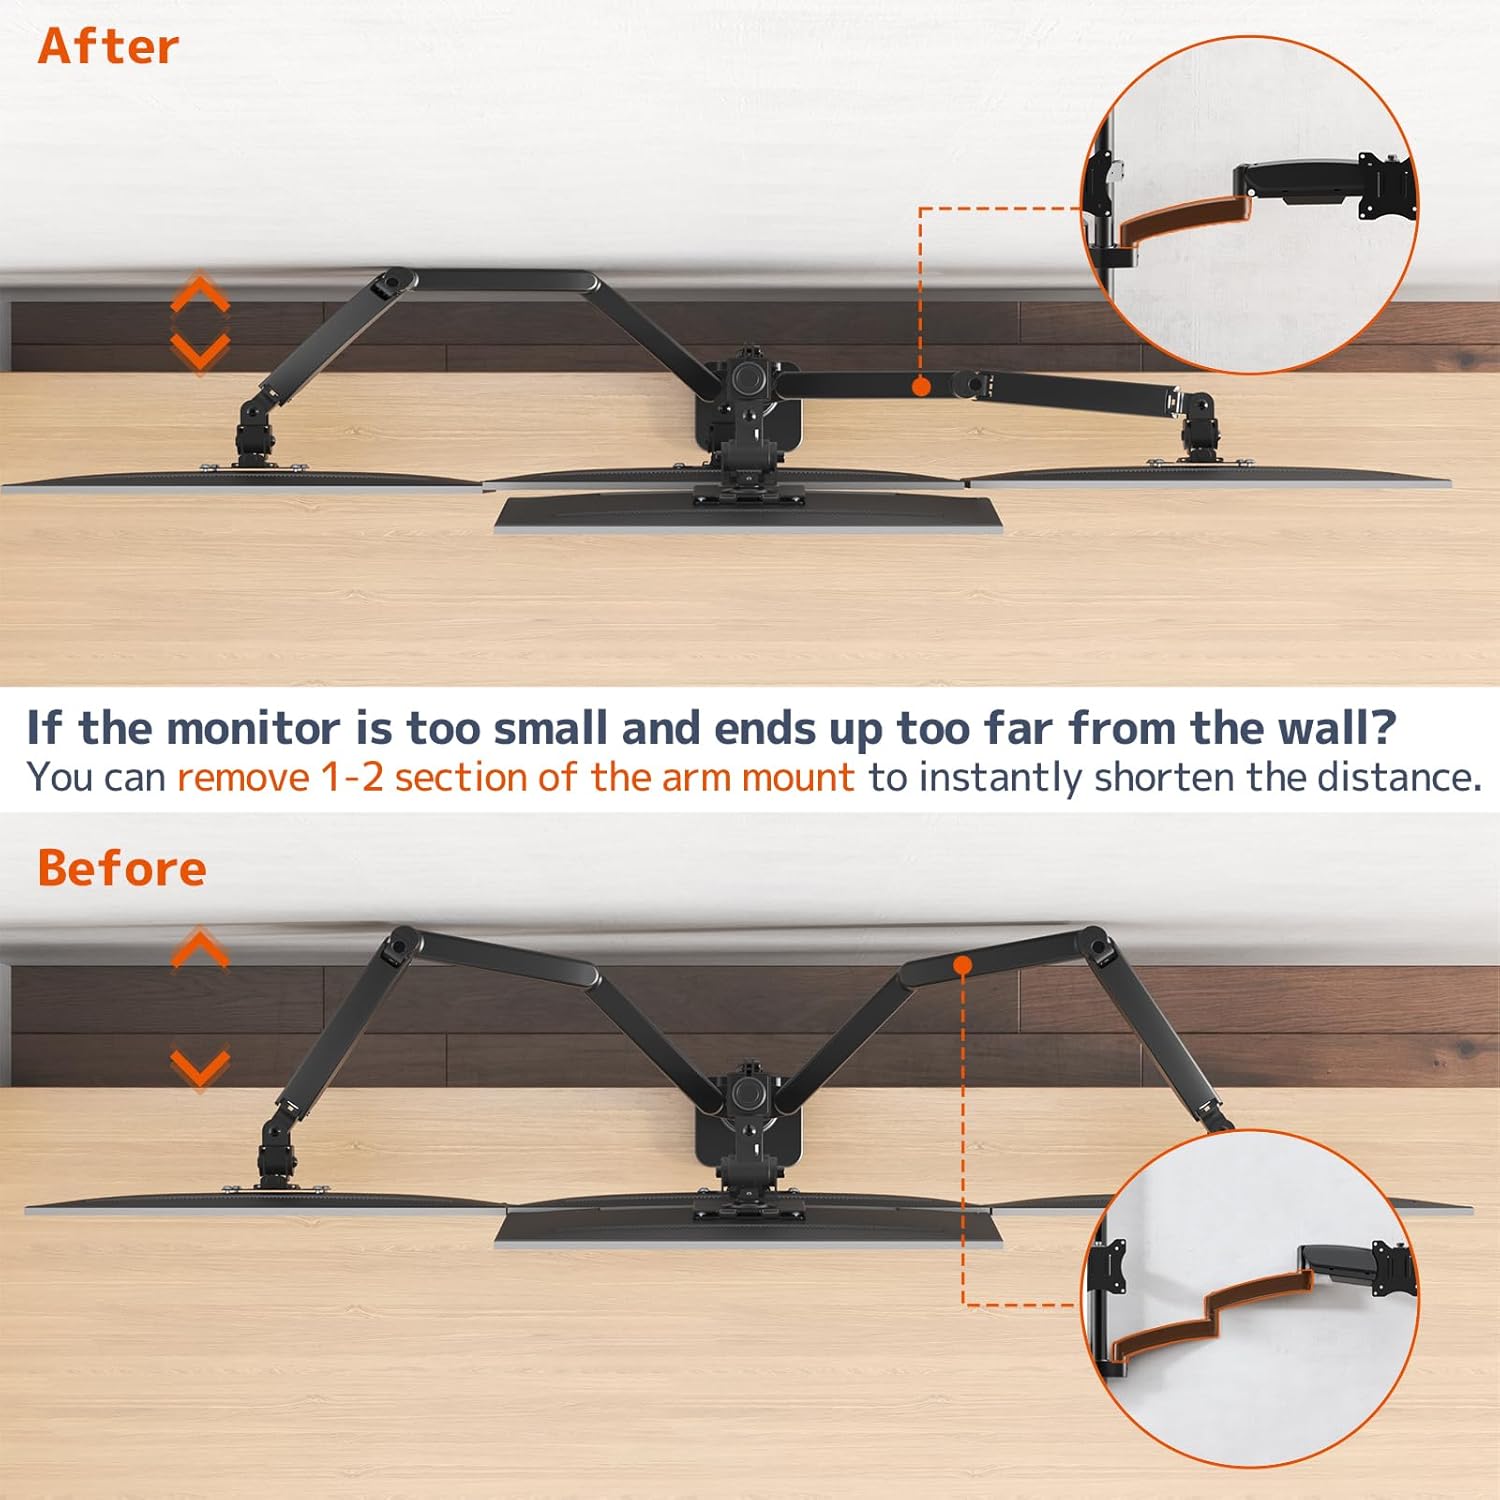
Image 5.2: Illustration of shortening the monitor arm by removing segments.

Image 5.3: Guide for required desk-to-wall distance based on screen width.
6. Funcionament i ajustos
The PUTORSEN Quad Monitor Mount offers extensive adjustability for optimal viewcomoditat.
6.1 Ajust de la tensió de la molla de gas
The gas spring arms allow for smooth height adjustment. If a monitor sags or rises too easily, adjust the gas spring tension using the provided hex key. Turn clockwise to increase tension (for heavier monitors) or counter-clockwise to decrease tension (for lighter monitors).

Image 6.1: Illustration of the sturdy gas spring arm design for stable equilibrium.
6.2 Inclinació, gir i rotació
- Inclinació: Adjust the monitor screen vertically to reduce glare and optimize viewing angles. The center bracket tilts +50°/-20°, and lower arms tilt ±35°.
- Girar: Pivot the monitor horizontally up to 180° to share your screen or change viewdirecció.
- Rotació: Gireu el monitor 360° per canviar entre les orientacions horitzontal i vertical.

Image 6.2: Users adjusting the position of their monitors for ergonomic comfort.

Imatge 6.3: Ex.amples of flexible monitor arrangements, including stacked and side-by-side setups.
7. Manteniment
Un manteniment regular garanteix la longevitat i el funcionament segur del suport del monitor.
- Neteja: Netegeu les superfícies de muntatge amb un drap suau iamp drap. Eviteu productes de neteja abrasius o dissolvents que puguin danyar l'acabat.
- Comproveu les connexions: Inspeccioneu periòdicament tots els cargols i perns per assegurar-vos que romanen ajustats. Torneu a apretar-los si cal.
- Gas Spring Check: If you notice a change in the gas spring's performance, re-adjust the tension as described in the Operating section.
8. Solució De Problemes
Consulteu aquesta secció per obtenir solucions a problemes comuns.
8.1 Monitor Sags or Does Not Stay in Position
- Causa: La tensió de la molla de gas és massa baixa per al pes del monitor.
- Solució: Increase the gas spring tension by turning the adjustment screw clockwise with the provided hex key.
- Causa: Monitor weight exceeds the arm's capacity.
- Solució: Verify your monitor's weight against the specifications. Do not exceed the maximum weight capacity.
8.2 Monitor Rises Too Easily
- Causa: La tensió de la molla de gas és massa alta per al pes del monitor.
- Solució: Decrease the gas spring tension by turning the adjustment screw counter-clockwise with the provided hex key.
8.3 Mount Feels Unstable
- Causa: Muntatge clamp/grommet is not sufficiently tightened.
- Solució: Torneu a apretar el C-clamp or grommet base to the desk. Ensure the desk surface is robust.
- Causa: Monitor arm connections are loose.
- Solució: Check and tighten all screws connecting the arms to the pole and the VESA plates to the monitors.

Image 8.1: Illustration demonstrating improved stability of the current design compared to older models.
9. Garantia i Suport
For warranty information or technical support, please refer to the product packaging or contact PUTORSEN customer service directly. Keep your purchase receipt as proof of purchase.


