Introducció
This manual provides essential information for the safe and effective operation, maintenance, and troubleshooting of your INGCO CIDLI20558E 20V Brushless Cordless Impact Drill. Please read this manual thoroughly before using the tool to ensure proper handling and to prevent injury or damage.
Informació general de seguretat
Seguiu sempre les precaucions de seguretat bàsiques quan utilitzeu eines elèctriques per reduir el risc d'incendi, descàrrega elèctrica i lesions personals.
- Seguretat de l'àrea de treball: Mantingueu la vostra zona de treball neta i ben il·luminada. Les zones desordenades o fosques conviden als accidents. No feu servir eines elèctriques en atmosferes explosives, com ara en presència de líquids, gasos o pols inflamables.
- Seguretat elèctrica: Eviteu el contacte corporal amb superfícies connectades a terra. No exposeu les eines elèctriques a la pluja ni a condicions humides.
- Seguretat personal: Utilitzeu sempre protecció ocular. Feu servir protecció auditiva quan feu servir l'eina durant períodes prolongats. Vestiu-vos correctament; eviteu roba ampla o joies. Assegureu-vos els cabells llargs.
- Ús i cura de l'eina: No forceu l'eina elèctrica. Feu servir l'eina elèctrica adequada per a la vostra aplicació. Desconnecteu la bateria de l'eina elèctrica abans de fer qualsevol ajust, canviar accessoris o guardar eines elèctriques.
- Ús i cura de la bateria: Recarrega només amb el carregador especificat pel fabricant. No utilitzeu bateries amb altres eines elèctriques.
Contingut del paquet
Upon unpacking, ensure all items listed below are present and undamaged. If any parts are missing or damaged, contact your retailer.
- 1 x INGCO CIDLI20558E Cordless Impact Drill
- 2 x 2.0Ah Batteries (FBLI2001)
- 1 x Charger (FCLI2001E) - Input: 220-240V~50/60Hz
- 47 x Accessories (various drill bits, screwdriver bits, etc.)
- 3 x Masonry Drill Bits
- 1 x Maletí de transport
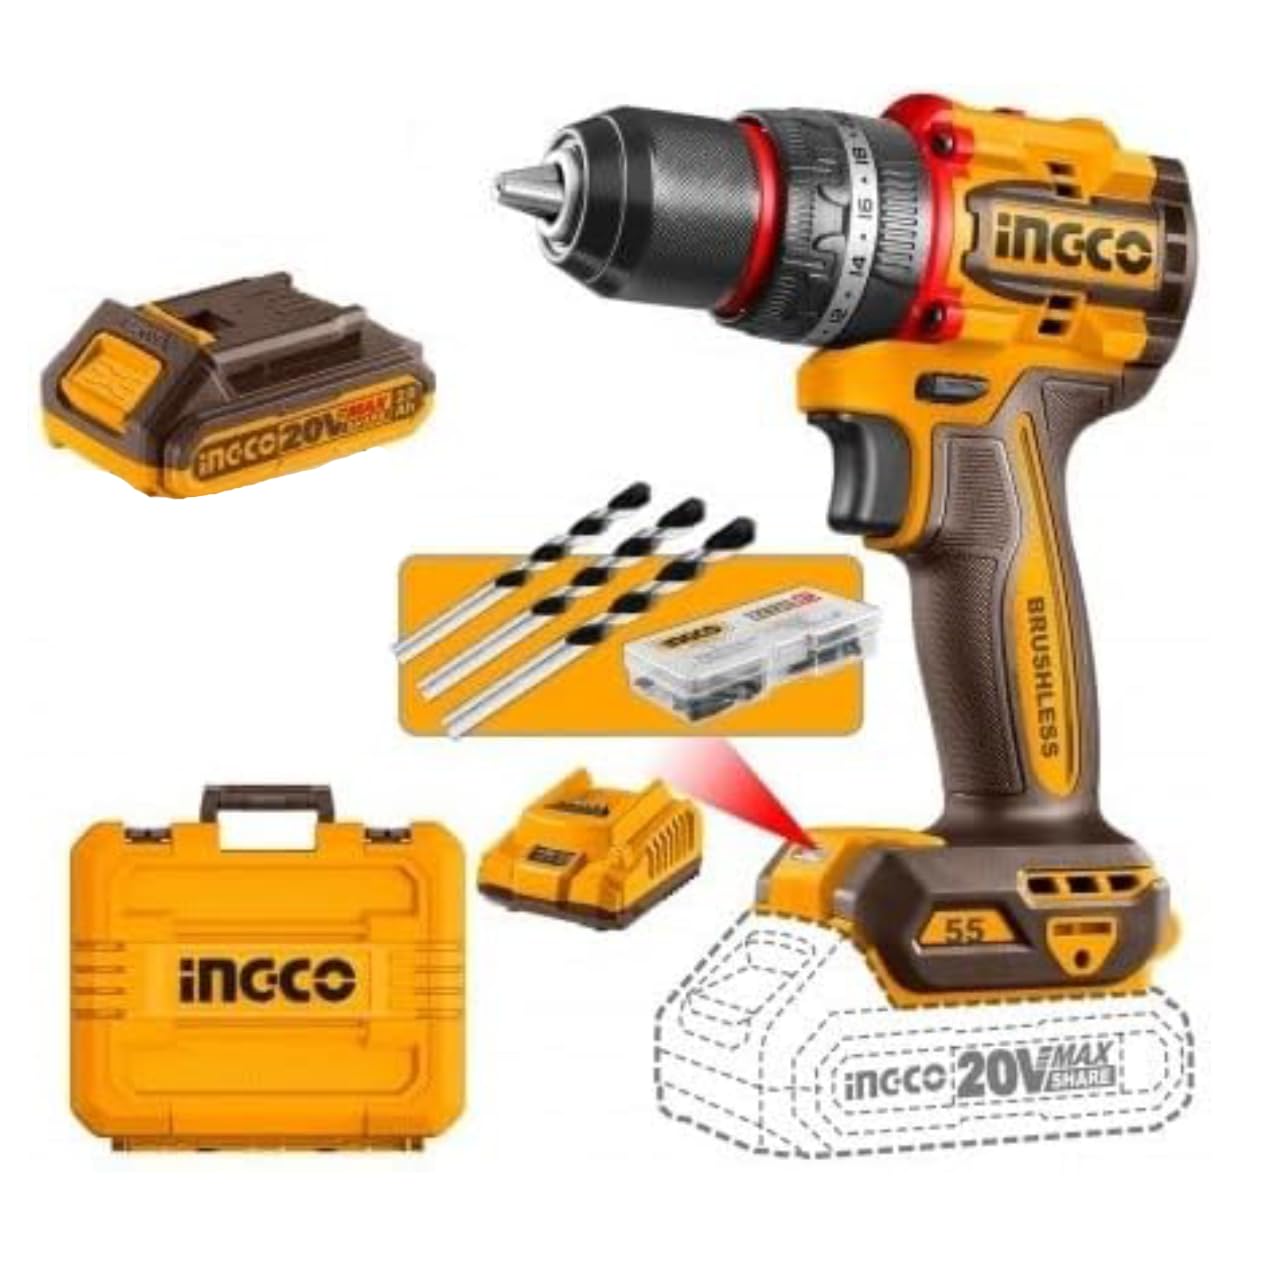
Imatge 1: acabatview of the INGCO CIDLI20558E Cordless Impact Drill kit, showing the drill, two 2.0Ah batteries, charger, various accessories, and the included carrying case.
Configuració
4.1 Càrrega de la bateria
- Connect the charger (FCLI2001E) to a standard 220-240V~50/60Hz power outlet.
- Slide the battery pack (FBLI2001) onto the charger until it clicks into place.
- The charger's indicator light will show the charging status. Refer to the charger's specific instructions for light indications (e.g., red for charging, green for fully charged).
- Un cop carregat completament, desconnecteu el carregador de la presa de corrent i retireu la bateria.
Nota: For optimal battery life, allow the battery to cool down before charging if it has been heavily used. Do not store batteries in a discharged state.
4.2 Instal·lació i extracció de la bateria
- Per instal·lar: Align the battery pack with the base of the drill handle. Slide the battery into the drill until it clicks securely into place. Ensure it is firmly seated before operation.
- Per eliminar: Press the battery release button (usually located at the front or rear of the battery pack) and slide the battery out of the drill handle.
4.3 Instal·lació i extracció de broques/accessoris
- Per instal·lar: Rotate the chuck counter-clockwise to open the jaws. Insert the desired drill bit or accessory into the chuck, ensuring it is centered. Rotate the chuck clockwise to tighten the jaws firmly around the bit. The 13mm metal chuck provides a secure grip.
- Per eliminar: Gireu el mandril en sentit antihorari per afluixar les mordasses i treure la broca.

Image 2: Detail of the drill's chuck and adjustable torque collar, highlighting the robust metal construction and control features.
Instruccions de funcionament
5.1 Engegada/Apagada i Control de Velocitat
- The drill is activated by pressing the trigger switch. The speed is variable and controlled by the amount of pressure applied to the trigger.
- Release the trigger to turn off the drill.
5.2 Rotació endavant/enrere
A forward/reverse selector switch is located above the trigger. Push it to the left for forward rotation (drilling/screwing in) and to the right for reverse rotation (removing screws). Ensure the switch is in the center position for safety when not in use, as this locks the trigger.
5.3 Speed Selection (Gearbox)
The drill features a two-speed mechanical gearbox, located on top of the drill body.
- Gear 1 (0–500 rpm): For high torque applications, such as driving large screws or drilling large holes in softer materials.
- Gear 2 (0–2000 rpm): For high-speed drilling in wood, metal, or for smaller screws.
Precaució: Always change gears when the drill is stopped to prevent damage to the gearbox.
5.4 Torque Settings and Mode Selector
The torque collar allows you to adjust the amount of torque applied, preventing overtightening of screws or damage to materials. The drill offers 22+1+1 settings:
- Configuració 1-22: For screwdriving applications. Start with a lower setting and increase as needed.
- Drill Mode (Drill Bit Symbol): For general drilling without impact. The clutch is bypassed, providing maximum torque.
- Impact Drill Mode (Hammer Symbol): For drilling into masonry or concrete, utilizing the percussion function (up to 30,000 bpm).
Rotate the collar to select the desired setting. Ensure the collar clicks into place.
5.5 LED Work Light and Battery Indicator
- The integrated LED light illuminates the work area when the trigger is pressed, improving visibility in dark spaces.
- A battery indicator LED on the battery pack or drill body shows the remaining charge level, allowing you to monitor autonomy.
Manteniment
- Neteja: Keep the ventilation slots of the drill clean to prevent overheating. Use a soft, damp drap per netejar l'eina casing. No utilitzeu productes químics agressius ni netejadors abrasius.
- Manteniment del mandril: Netegeu periòdicament les mordasses del mandril per assegurar un bon agafament de les broques.
- Cura de la bateria: Store batteries in a cool, dry place away from direct sunlight. Do not expose batteries to extreme temperatures. Charge batteries fully before long-term storage.
- Emmagatzematge: Quan no estigui en ús, guardeu el trepant, les piles i el carregador a la funda de transport proporcionada en un lloc sec i segur, fora de l'abast dels nens.
- Servei: All internal maintenance and repairs should be performed by qualified service personnel.
Resolució de problemes
| Problema | Causa possible | Solució |
|---|---|---|
| El trepant no s'engega. | Battery not charged or not properly installed. Forward/reverse switch in center (locked) position. | Charge battery fully and ensure it is securely installed. Move forward/reverse switch to either forward or reverse position. |
| Potència reduïda o temps de funcionament curt. | Battery charge is low. Battery is old or damaged. | Recharge the battery. If problem persists, consider replacing the battery. |
| Chuck does not hold bit securely. | Chuck jaws are dirty or worn. Bit shank is dirty or damaged. | Clean chuck jaws and bit shank. Ensure bit is inserted correctly and chuck is tightened firmly. |
| Sobreescalfament durant l'ús. | Ventilation slots blocked. Excessive load on the motor. | Ensure ventilation slots are clear. Reduce pressure on the drill or use a lower speed/higher torque setting for heavy-duty tasks. Allow the tool to cool. |
Especificacions tècniques
| Número de model | CIDLI20558E |
| Tipus de motor | Sense raspalls |
| Voltage | 20 V |
| Velocitat sense càrrega (marxa 1) | 0-500 rpm |
| Velocitat sense càrrega (marxa 2) | 0-2000 rpm |
| Taxa d’impacte | 30,000 bpm |
| Max Torque | 55 Nm |
| Mida del mandril | 13 mm (Metal Chuck) |
| Configuració del parell | 22+1+1 |
| Capacitat de la bateria | 2.0Ah (FBLI2001) |
| Entrada del carregador | 220-240V~50/60Hz (FCLI2001E) |
| Dimensions | 27 x 10 x 34 cm |
| Material | Metal (Chuck) |
Garantia i Suport
This INGCO product is covered by a manufacturer's warranty. For specific warranty terms and conditions, please refer to the warranty card included with your product or visit the official INGCO website. For technical support, spare parts, or service inquiries, please contact your local INGCO dealer or customer service department.


