1. Introducció
This manual provides detailed instructions for the safe and effective use of your DOGLinsen 2-in-1 Bark and Shock Collar for Dogs, Model PD 523-TIO-1. Please read this manual thoroughly before operating the device to ensure proper functionality and the well-being of your pet. This collar is designed to assist in dog training and bark control through various modes including beep, vibration, and static shock.
Informació important de seguretat: Always prioritize your dog's safety and comfort. Do not use this collar on aggressive dogs or for prolonged periods. Ensure proper fit to prevent skin irritation. Consult a veterinarian or certified dog trainer if you have concerns about your dog's health or behavior.
2. Contingut del paquet
Verifiqueu que tots els elements que s'enumeren a continuació s'inclouen al vostre paquet:
- 1 x comandament a distància
- 1 x receptor
- 1 x corretja de coll
- 1 x cordó
- 1 x cable de càrrega USB
- 1 x Manual d'usuari (aquest document)
- 1 x Caixa
- 4 x Metal Contact Points (Long)
- 4 x Black Rubber Sleeves (for contact points)
- 1 x Prova Lamp

Figura 2.1: Tots els components inclosos al paquet.
3. Producte acabatview
The DOGLinsen 2-in-1 Bark and Shock Collar system consists of a remote control and a receiver collar. The receiver can function independently as an automatic bark collar or be controlled via the remote for training purposes.
3.1 Característiques clau
- 3 Collar Modes: Bark Control Mode, Dog Training Mode, and All Modes.
- 2-in-1 Advanced Design: Functions as an automatic bark collar or a remote training collar.
- Automatic Bark Collar & Protection Mode: Automatically detects barking and pauses for 30 seconds after 7 consecutive triggers to prevent over-correction.
- 4 Effective Training Modes: Beep, Vibration (1-100 levels), Safety Shock (1-100 levels), and Automatic Mode with 5 adjustable sensitivity levels.
- Long Battery Life & Extended Range: Up to 30 days with remote use, 90 days for receiver only. Remote range up to 2800 feet.
- Ajust Universal: Suitable for dogs with neck sizes from 8 to 27 inches and weights from 10 to 110 lbs.
- Receptor impermeable IP67: The receiver is waterproof for use in various weather conditions (remote is not waterproof).

Figura 3.1: Mésview of the 3 collar modes.

Figure 3.2: The four effective training modes.
4. Configuració
4.1 Càrrega del dispositiu
Before first use, fully charge both the remote control and the receiver. Use the provided 2-in-1 USB-C charging cable. The indicator light on the devices will show charging status.

Figure 4.1: Charging the remote and receiver.
4.2 Attaching the Collar Strap and Contact Points
Thread the collar strap through the receiver. Select the appropriate length of metal contact points (long or short) based on your dog's fur length. For dogs with shorter fur, use the shorter contact points. For dogs with longer or thicker fur, use the longer contact points to ensure proper contact with the skin. Place the black rubber sleeves over the metal contact points for comfort and to prevent direct metal-to-skin contact, especially for static shock mode.
4.3 Ajust del collar
Proper fit is crucial for the collar's effectiveness and your dog's comfort. The collar should be snug but not too tight. You should be able to fit two fingers comfortably between the collar and your dog's neck. Ensure the contact points touch your dog's skin. If the collar is too loose, the stimulation may not be consistent, and if it's too tight, it could cause skin irritation.

Figure 4.2: Collar adjustability for various dog sizes.
5. Instruccions de funcionament
5.1 Pairing the Remote Control with the Receiver
Before using the remote control, ensure it is paired with the receiver. If the devices are not paired, follow these steps:
- Pas 1: Hold down the power switch button on the receiver until the indicator light starts flashing.
- Pas 2: Press and hold the power button of the remote for about 3 seconds to turn it on.
- Pas 3: While the receiver's light is flashing, press the Vibration button on the remote. The receiver will beep once, indicating it has received the signal.
- Pas 4: Press the Tone button on the remote. The receiver will beep again, confirming successful pairing.
Note: If pairing fails, repeat the steps. Ensure both devices are sufficiently charged.
Video Placeholder: A video demonstrating how to pair the remote control with the receiver would be embedded here if available. The video would show the steps of holding the receiver's power button until flashing, then pressing the remote's power button, followed by the vibration and tone buttons to confirm pairing.
5.2 Checking Receiver Battery Level
To check the battery level of the receiver:
- Pas 1: Press the power button on the receiver twice in a row.
- Pas 2: Listen for the number of beeps:
| Beep Times | Càrrega de la bateria |
|---|---|
| 5 bips | Per sobre del 80% |
| 4 bips | Per sobre del 60% |
| 3 bips | Per sobre del 40% |
| 2 bips | Per sobre del 20% |
| 1 bip | Per sota del 20% |
Video Placeholder: A video demonstrating how to test the power of the receiver by pressing the power button twice and interpreting the beeps would be embedded here if available.
5.3 Adjusting Automatic Mode Sensitivity
The automatic bark control mode has 5 levels of sensitivity. To adjust the sensitivity:
- Pas 1: Assegureu-vos que el receptor estigui encès.
- Pas 2: Press the power button on the receiver 3 times in a row.
- Pas 3: Listen for the number of beeps to identify the current sensitivity level:
| Beep Times | Nivell de sensibilitat |
|---|---|
| 5 bips | Nivell 5 (més alt) |
| 4 bips | Nivell 4 |
| 3 bips | Nivell 3 |
| 2 bips | Nivell 2 |
| 1 bip | Nivell 1 (el més baix) |
The higher the sensitivity level, the easier the device can be triggered. Choose the appropriate sensitivity for your dog's barking habits.
Video Placeholder: A video demonstrating how to adjust the sensitivity of the auto mode by pressing the power button three times and interpreting the beeps would be embedded here if available.
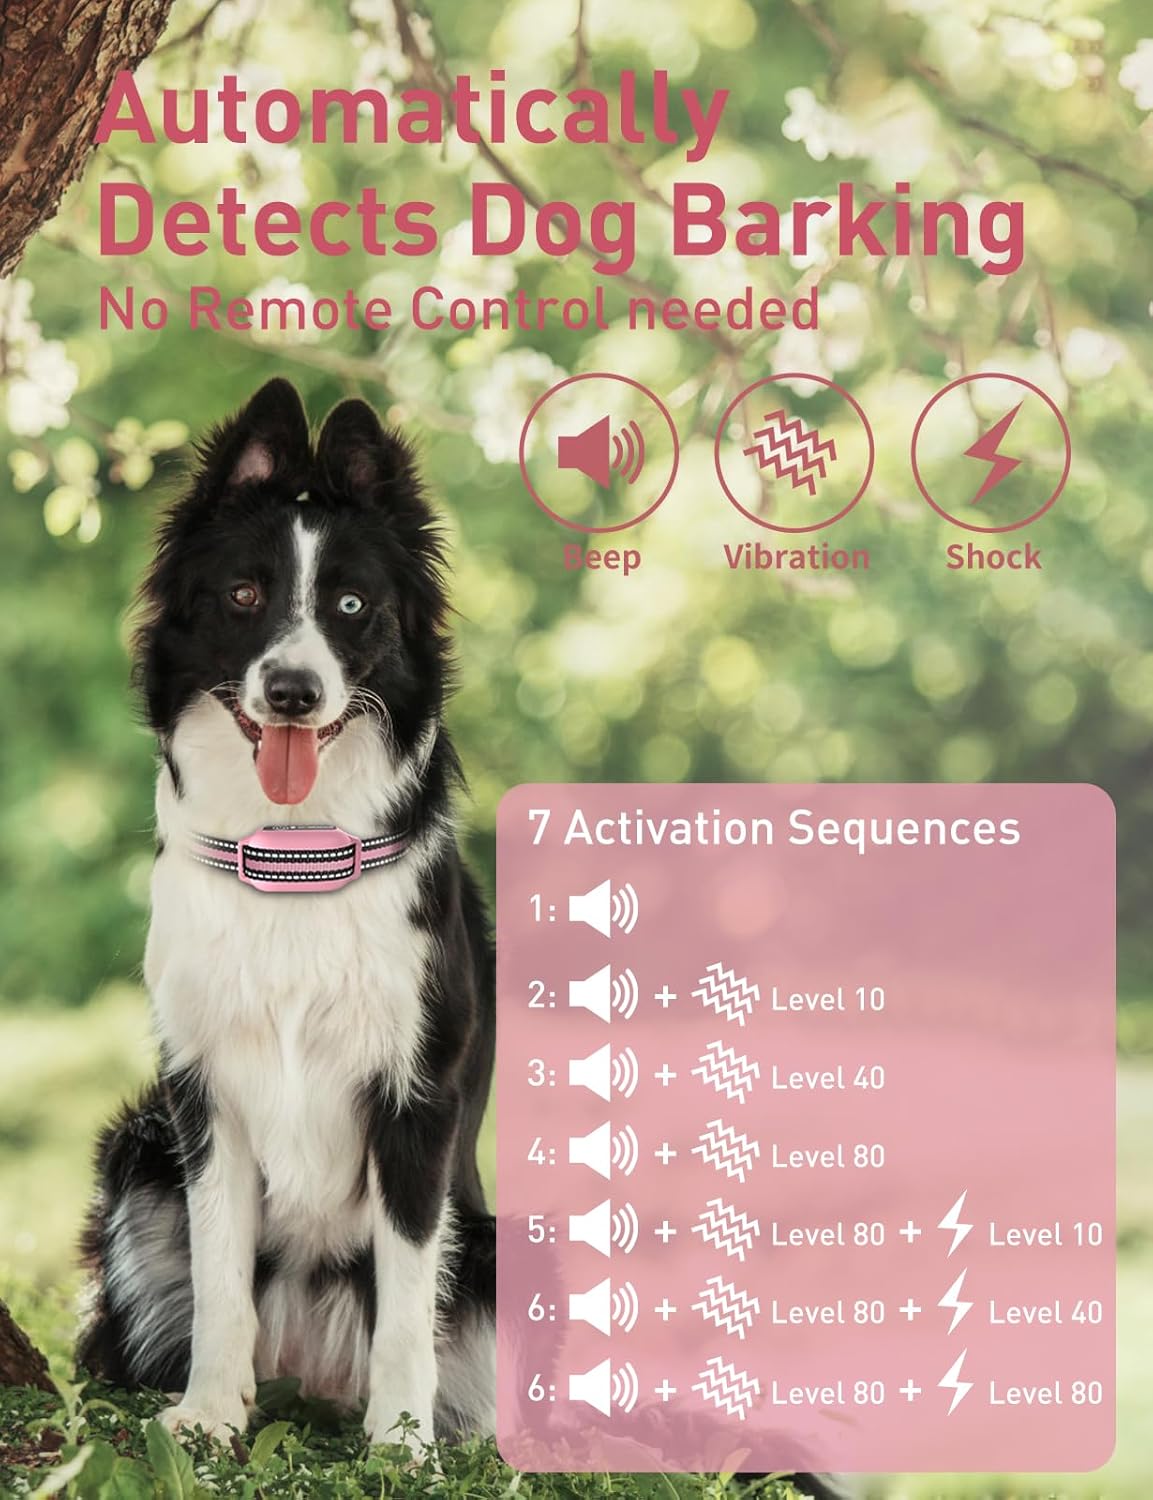
Figure 5.1: Automatic bark detection and activation sequence.
5.4 Turning Auto Mode On or Off
To turn the receiver's auto mode on or off:
- Encendre: Press and hold the power button on the receiver for about 3 seconds. You will hear a single beep, indicating Auto Mode is active.
- Apagar: Press and hold the power button on the receiver for about 3 seconds again. You will hear two beeps, indicating Auto Mode is off.
Video Placeholder: A video demonstrating how to turn the auto mode on and off by pressing and holding the power button would be embedded here if available.
5.5 Using Remote Training Modes
The remote control offers three training functions: Beep, Vibration, and Static Shock. Each can be adjusted for intensity (Vibration and Shock from 1-100 levels).
- Mode bip: Delivers an audible tone to your dog. Often used as a warning or for positive reinforcement.
- Mode de vibració: Delivers a non-harmful vibration. Levels 1-100.
- Mode de xoc estàtic: Delivers a static correction. Levels 1-100. Use with caution and at the lowest effective level.
To switch between modes and adjust levels, refer to the remote control's display and buttons. The remote allows for precise control during training sessions.
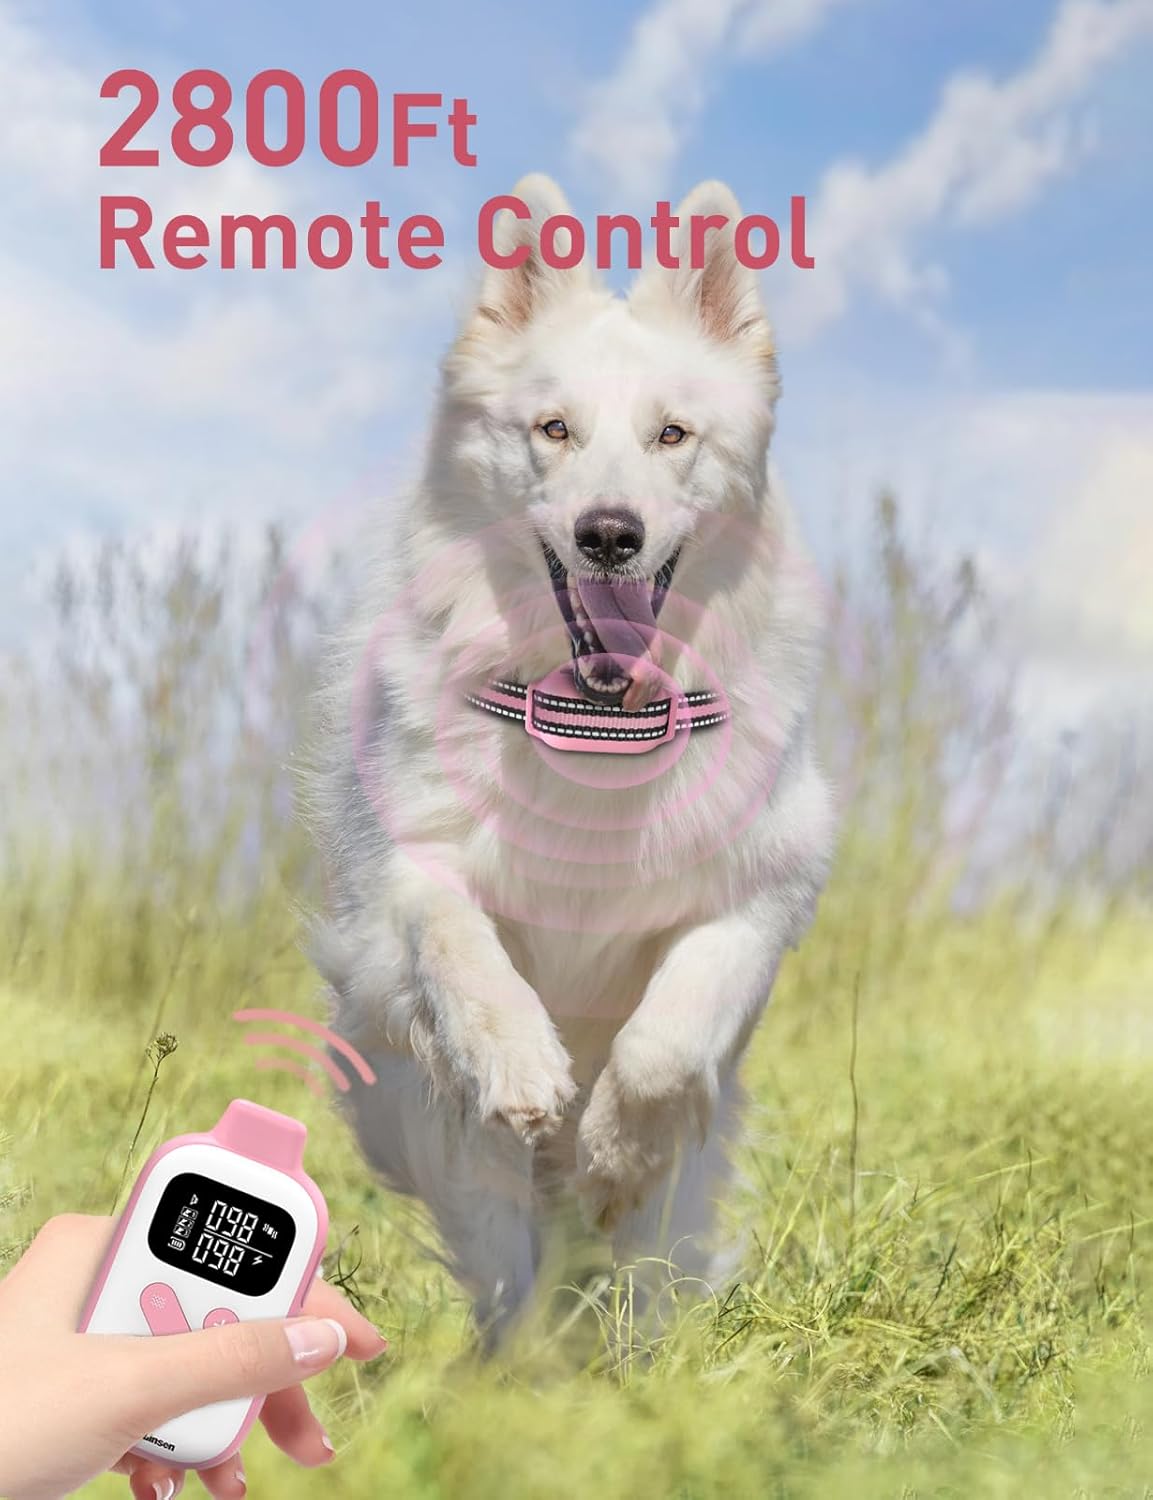
Figure 5.2: Remote control range for outdoor training.
6. Manteniment
6.1 Neteja
Regularly clean the collar strap and receiver. The collar strap can be hand washed. Wipe the receiver with a damp cloth. Ensure the charging port cover is securely closed when not charging to maintain its IP67 waterproof rating.
6.2 Cura de la bateria
To prolong battery life, avoid fully discharging the devices frequently. Charge them when the battery level is low. Store the devices in a cool, dry place when not in use for extended periods.

Figure 6.1: IP67 waterproof rating of the receiver.
7. Solució De Problemes
- El dispositiu no s'encén: Assegureu-vos que el dispositiu estigui completament carregat. Premeu i manteniu premut el botó d'engegada durant 3 segons.
- Cap resposta del receptor: Check if the remote and receiver are paired correctly (refer to Section 5.1). Ensure the receiver is charged. Verify the contact points are touching the dog's skin.
- Inconsistent stimulation: Adjust the collar for a snug fit. Ensure contact points are making proper contact.
- Automatic bark mode not working: Check the sensitivity level (refer to Section 5.3). Ensure the auto mode is turned on (refer to Section 5.4).
- Remote not controlling receiver: Ensure both devices are charged and paired. Check the remote's battery level.
- Irritació de la pell: Remove the collar immediately. Clean the area and consult a veterinarian. Ensure the collar is not worn for more than 12 hours a day and is properly fitted.
8. Especificacions
| Especificació | Detall |
|---|---|
| Nom de marca | DOGLinsen |
| Nom del model | 2-in-1 Bark and Shock Collar for Dogs - PD 523-TIO-1 |
| Número de model de l'article | PD 523-TIO-1 |
| ASIN | B0G6BGS2PQ |
| Pes de l'article | 8.4 unces |
| Dimensions del paquet de l'article L x W x H | 5.98 x 4.17 x 2.28 polzades |
| Bateries | Necessites 2 piles de polímer de liti (incloses) |
| Data de primera disponibilitat | 11 de gener de 2026 |
| Color | Rosa i blanc |
| Mida | Adjustable (Neck sizes 8 - 27 inches, Weights 10 - 110 lbs) |
| Material | Nylon, Polyester |
| Instruccions de cura | Rentat a mà |
| Tipus de tancament | Sivella |
| Classificació impermeable | IP67 (Receptor) |
| Distància remota | Fins a 2800 peus |
| Modes d’entrenament | Beep, Vibration (1-100 levels), Safety Shock (1-100 levels), Automatic Bark Control (5 sensitivity levels) |
| Usos específics del producte | Correcció del comportament del gos: capítolasing cars, running away, jumping on guests, barking wildly, follow commands, Indoor, outdoor |
9. Garantia i Suport
This DOGLinsen product comes with a 2 any de garantia del fabricant. For warranty claims, technical support, or any questions regarding your product, please contact DOGLinsen customer service directly. Refer to the contact information provided in your product packaging or on the official DOGLinsen weblloc.


