1. Introducció
This manual provides instructions for the assembly, operation, and maintenance of your Patiowell 4' x 4' Outdoor Storage Shed. Please read all instructions carefully before beginning assembly and retain this manual for future reference. Proper assembly and care will ensure the longevity and functionality of your storage shed.
2. Informació de seguretat
ADVERTÈNCIA: Si no es segueixen aquestes instruccions de seguretat, es poden produir lesions o danys materials.
- Utilitzeu sempre l'equip de seguretat adequat, inclosos guants i protecció ocular, durant el muntatge.
- Assegureu-vos que la zona de muntatge estigui lliure d'obstacles i anivellada.
- Do not assemble in high winds or adverse weather conditions.
- Mantingueu els nens i les mascotes allunyats de la zona de reunió.
- Verifiqueu que totes les peces estiguin presents i no estiguin danyades abans de començar el muntatge.
- Secure the shed to a stable foundation to prevent tipping.
- No emmagatzemeu líquids inflamables ni materials perillosos dins del cobert.
- Check local HOA policies and building codes before construction.
3. Llista de peces
Before assembly, ensure all components are present. Refer to the included hardware set and product instruction for a complete list. Key components include:
- Wall Panels (Durable Resin, Wood-Feel & Look)
- Roof Panels (Waterproof)
- Floor Panels (Stable Base Frame)
- Door Assembly (Lockable)
- Tauler de finestres
- Hardware (Screws, bolts, etc.)

Figure 3.1: Key features of the shed components, including durable resin, wood-feel texture, and stable base frame.
4. Configuració i muntatge
The Patiowell storage shed features a one-piece panel plug-in construction designed for simplified assembly. While one person can assemble it, having assistance is recommended for certain steps, especially roof installation.
4.1 Preparació del lloc
Choose a level, stable surface for your shed. A concrete slab or a treated wood foundation is ideal. Ensure adequate drainage around the site.
4.2 Floor Assembly
Lay out the floor panels on your prepared site. Connect them securely according to the detailed instructions provided in the separate hardware manual. The stable foundation design allows adaptation to various ground conditions.

Figure 4.1: Assembly of the shed's floor panels on a prepared base.
4.3 Wall Panel Installation
Begin installing the wall panels by interlocking them into the floor base and to each other. The one-piece panel design reduces the number of screws needed, simplifying the process.
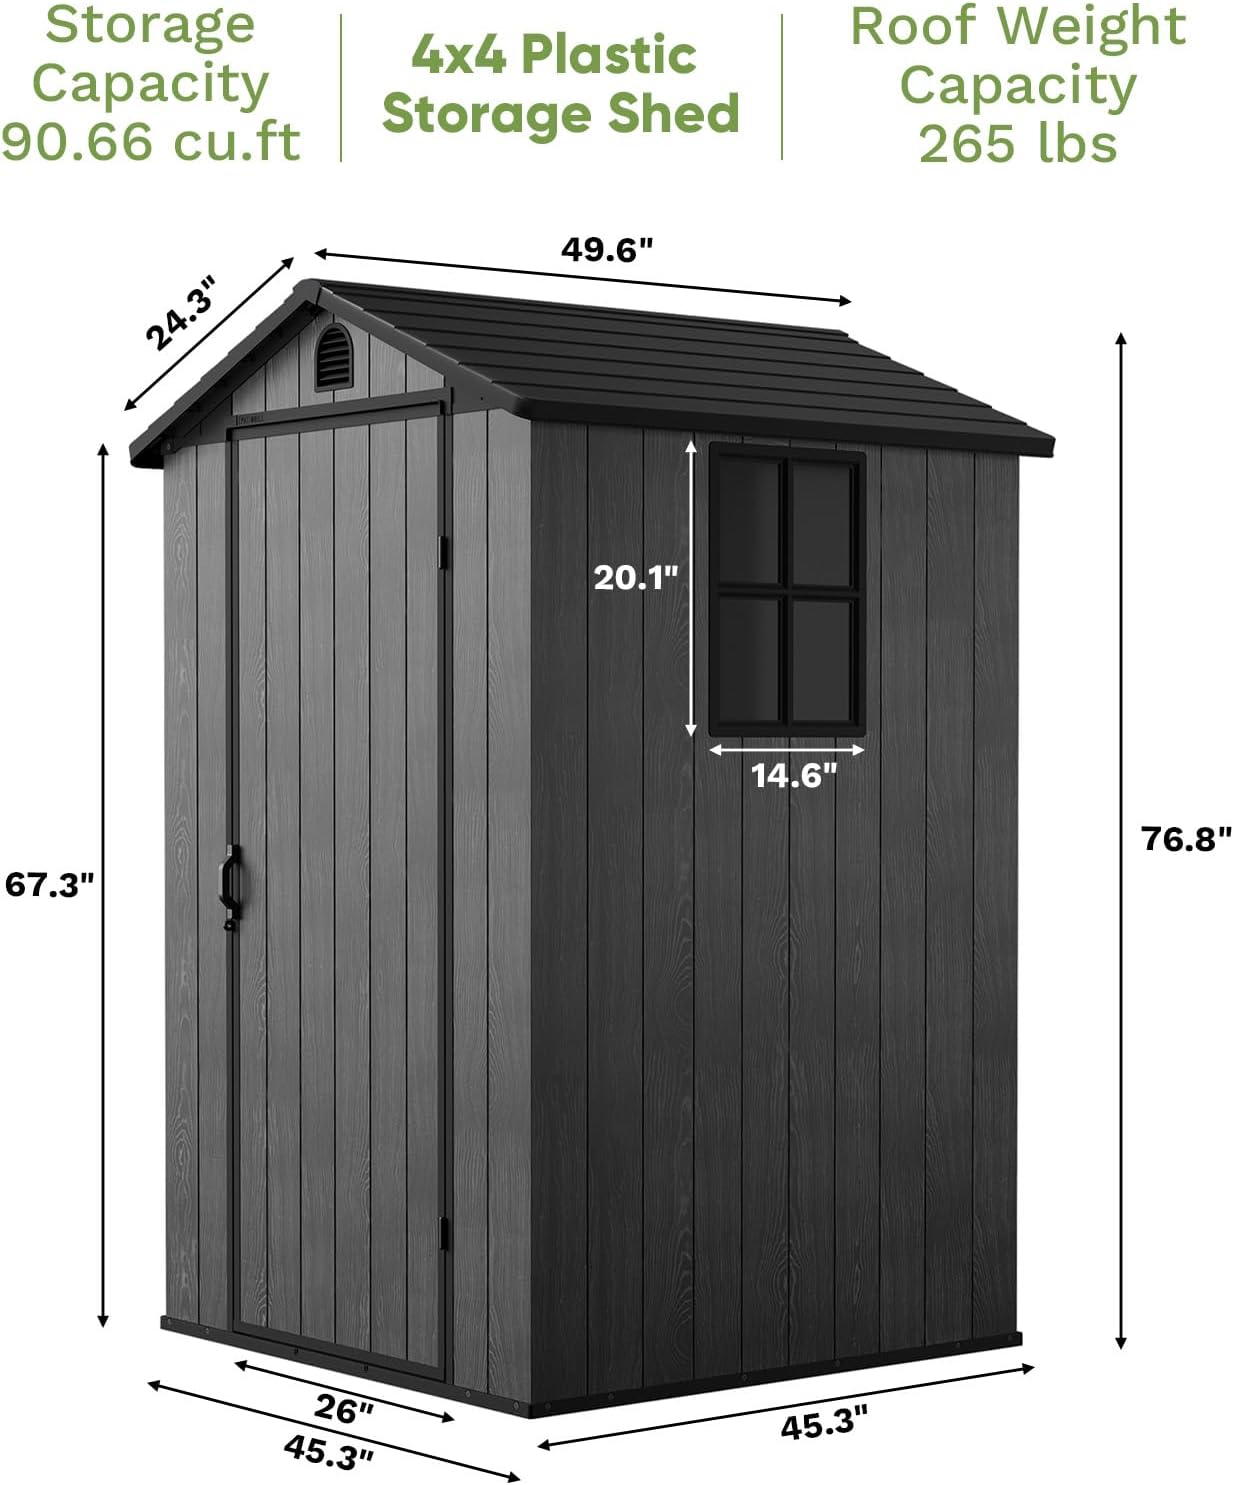
Figura 4.2: Mésview of the shed's structure and dimensions during assembly.

Figura 4.3: Explotat view illustrating the one-piece panel and plug-in construction for easy assembly.
4.4 Door and Window Installation
Install the door and window panels as indicated in the assembly guide. Ensure the door operates smoothly and the locking mechanism functions correctly.
4.5 Instal·lació de la teulada
Carefully place and secure the roof panels. The roof is designed for all-weather protection, including rain and snow. Ensure all connections are tight to maintain waterproofing.

Figure 4.4: The shed's roof design provides all-weather protection.
4.6 Guia de vídeo de muntatge
For a visual guide on the assembly process, please refer to the official video below. This video demonstrates the key steps for setting up your Patiowell shed.
Video 4.1: Official assembly guide for Patiowell sheds, demonstrating the step-by-step installation process.
5. Funcionament
Your Patiowell storage shed is designed for convenient outdoor storage. Here are some operational guidelines:
- Ús de la porta: The shed features a single lockable door. Ensure the door is fully closed and secured to protect contents from weather and unauthorized access.
- Ventilació: The shed includes an air vent to prevent mold and mildew by allowing air circulation. Do not block this vent.
- Capacitat d'emmagatzematge: The 4' x 4' shed offers ample space for garden tools, outdoor equipment, and other items. Organize items efficiently to maximize space.

Figure 5.1: The Patiowell shed with its door closed, ready for use.

Figura 5.2: Example of interior storage, showcasing the shed's capacity for various tools.
6. Manteniment
The Patiowell storage shed is designed for low maintenance due to its plastic material. Follow these guidelines to keep your shed in optimal condition:
- Neteja: Periodically clean the exterior with mild soap and water. Avoid abrasive cleaners or harsh chemicals that could damage the plastic.
- Inspecció: Regularly check all connections, screws, and the door mechanism for tightness and proper function. Tighten any loose fasteners.
- Drenatge: Ensure the area around the shed remains clear of debris to allow for proper water drainage.
- Retirada de neu: In areas with heavy snowfall, clear excessive snow from the roof to prevent structural stress.
7. Solució De Problemes
Aquesta secció tracta els problemes habituals que podeu trobar amb el vostre magatzem.
| Problema | Causa possible | Solució |
|---|---|---|
| Fuita d'aigua dins del cobert | Loose roof panels, improperly sealed joints, uneven foundation. | Check all roof and wall panel connections and tighten screws. Apply silicone sealant to any gaps if necessary. Ensure the shed is on a level surface. |
| La porta no tanca ni es tanca correctament | Uneven foundation, misaligned door frame, debris in hinges. | Verify the shed is level. Adjust door hinges or frame if possible. Clean hinges and lubricate if needed. |
| Panels appear warped or bent | Improper assembly, excessive weight on roof, extreme temperature fluctuations. | Ensure all panels are correctly installed and secured. Avoid placing heavy objects on the roof. Contact customer support if warping persists. |
8. Especificacions
| Característica | Detall |
|---|---|
| Marca | Pou del pati |
| Número de model | PS-0421 |
| Dimensions del producte (P x A x A) | 45.3 "P x 45.3" W x 76.8" H |
| Material | Plastic (Durable Resin) |
| Color | Gris fosc |
| Pes de l'article | 86 lliures |
| Amplada de la porta | 26 polzades |
| Alçada de la porta | 67.3 polzades |
| Nivell de resistència a l'aigua | Resistent a l'aigua |
| Muntatge obligatori | Sí |
9. Garantia i assistència
Patiowell stands behind the quality of its products. For specific warranty details, please refer to the documentation included with your purchase or visit the official Patiowell website. If you encounter any issues or require assistance, please contact Patiowell customer support.
Informació de contacte:
- Assistència en línia: Visita el Patiowell Store on Amazon
- Correu electrònic: Refer to your product packaging for direct email support.


